

Setting up Autopilot in Intune for Streamlined Device Deployment
Whether you are onboarding laptops for new employees that work in a remote office or executing a large-scale refresh for employees or students, the manual effort required to configure each device can drain IT resources, disrupt productivity, and create inconsistent user experiences. If your computers are going to be integrated within Azure AD however, there is a simpler way that streamlines the process.
Windows Autopilot is a cloud-based Microsoft solution that simplifies and automates the deployment and configuration of new Windows devices. By leveraging the OEM-installed version of Windows, Autopilot gives you true zero-touch deployment.
Key benefits of Windows Autopilot include:
- Zero-touch deployment: Devices ship directly to end-users, eliminating IT intervention.
- No OS re-imaging: Autopilot automates app installation, driver setup, and policy configuration.
- Enhanced productivity: Reduced setup time allows employees to start work sooner.
- Customized experience: Pre-configured settings and branding personalize the out-of-box experience (OOBE).
- Simplified redeployment: Devices can be easily wiped and reconfigured for new users.
Zero touch deployment includes things such as automatic Azure AD or Hybrid Azure AD join, MDM auto enrollment, local administrator account restrictions, dynamic group assignments, and device resets.
Windows Autopilot is managed using Microsoft Intune. It is here where you can register devices, create deployment profiles, assign them to Azure AD groups, configure settings for the out-of-box experience (OOBE) and establish compliance policies and application deployments.
What are the requirements for Autopilot?
While there is no specific "Windows Autopilot license" its functionality can be enabled through one of the following plans:
- Microsoft Intune Plan 1
- Microsoft 365 Business Premium
- Microsoft 365 Enterprise E3 or E5
- Microsoft 365 Education (Academic) A1, A3, or A5
- Microsoft 365 F1 or F3
- Enterprise Mobility + Security E3 or E5
What operating systems support Autopilot?
- Windows 10 and 11 Pro
- Windows 10 and 11 Pro for Workstations
- Windows 10 and 11Enterprise
- Windows 10 and 11 Education
- Windows 10 Enterprise 2019 LTSC
Autopilot works with Entra ID, formerly Azure AD. The device IDs for any computer that will participate in Autopilot will have to be uploaded to your Entra ID ahead of time. Some OEMs will work in cooperation with you, so they are ready to go upon delivery. You can also add the computers yourself by capturing the device information and uploading it in a CSV file. You can obtain the hardware hash and serial number using the Get-WindowsAutopilotInfo.ps1and saving the captured information in a CSV file which you can then import into Intune.
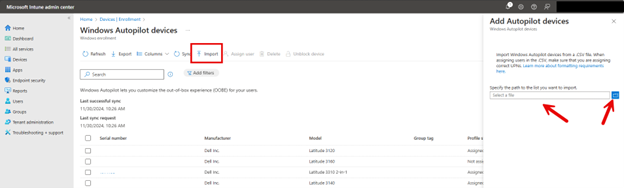
To upload the CSV file Microsoft Intune Admin Center you navigate to Devices > Enroll Devices > Windows enrollment. In the Windows Autopilot Deployment Program pane, select Devices and then click Import and select a CSV file containing device information. An example is shown below although the serial numbers have been hidden.
Create an Autopilot Profile
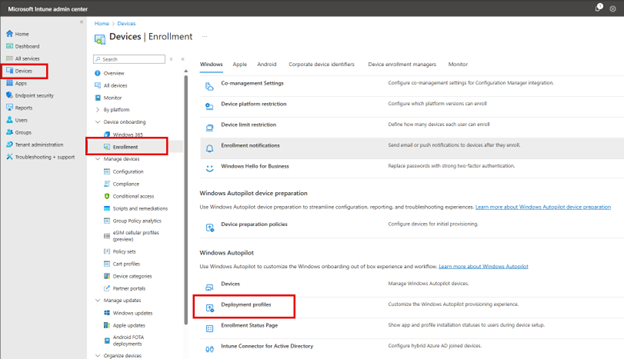
Once the computer hardware information is uploaded to Entra ID, it is time to create an autopilot profile. Navigate to Windows > Windows enrollment > Deployment profiles as shown in the screenshot below.
Click Create profile and choose Window PC. Then provide a name for the profile. In the next window you will configure the settings for the out-of-box experience as shown in the screenshot below.
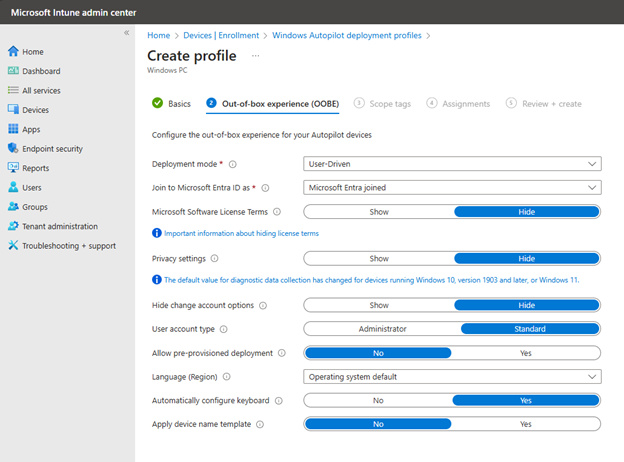
In most cases you will choose User-Driven for the Deployment mode as this is for is for end users who will log in with their Azure AD credentials. You could choose Self-Deploying for kiosks or shared devices that don’t require user interaction. Once you have your desired settings, you can assign the profile to your desired groups.
Before initiating the Autopilot deployment, you will create the necessary configuration profiles and application profiles in Intune. These profiles will define the settings, policies, and applications that will be applied to devices during the Autopilot process, ensuring a consistent and secure setup for all deployed devices.
Setup and Enrollment Status Page
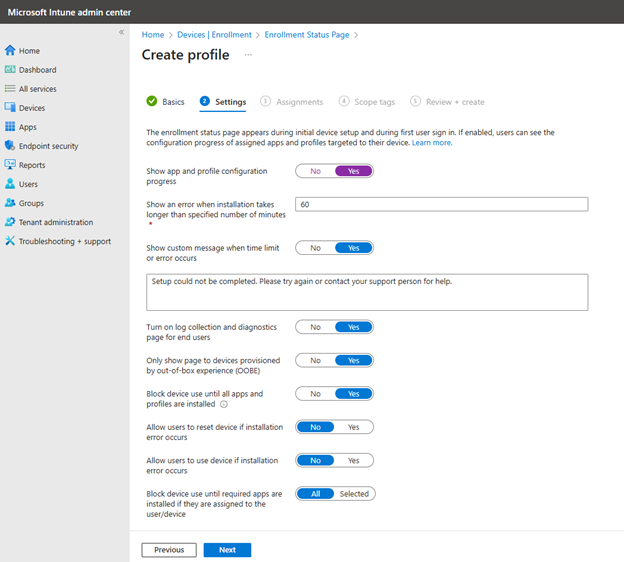
While it isn’t required, you can set up an Enrollment Status Page to track device enrollment progress and ensure all required applications are installed before users access the desktop. This is done by navigating to Devices > Enrollment > Windows enrollment and click "Create" to set up a new ESP profile. Here you can configure settings such as:
- show app and profile configuration progress
- Block device use until all apps and profiles are installed
- Specify required apps that must be installed before users can access the desktop
- Set time limits for installation and error handling
An example is shown in the screenshot below.
Like all profiles, you would then assign the ESP profile to your target user or device groups.
Testing your Autopilot Deployment
Of course, it is highly recommended that you test all of this on a few sample devices to ensure proper functionality. When a registered device connects to the internet it should automatically begin the Autopilot process, prompting user sign-in with Azure AD credentials and applying configurations as per the assigned profile.

Comments (0)