Not everyone needs to be a power user. Some employees just need a basic computer to get the job done. Examples include front line workers, home based users or those who access everything over a web browser. While these users may only need the very basics, internal IT doesn’t want to skimp on security for them either. It is for these types of situations that Microsoft began offering Windows 10 in cloud configuration. Windows 10 Cloud Config simplifies the desktop experience for end users as well as the management experience for admins. You can use it to configure new devices or reuse existing hardware in order to extend the life of older machines. Because Windows 10 in cloud config is a Microsoft-recommended device configuration, you also know that it is secure. Windows 10 Cloud Config is suited for the following types of scenarios:
Devices that do not require complex setting configurations
Are not dependent on any type of on-premise infrastructure
Uses a basic set of apps that are curated by internal IT such as Microsoft Teams and Edge
To be clear, cloud config is not Windows “lite.” It is the full Windows experience. You deploy devices with it or assign it to existing devices using Microsoft Endpoint Manager. From there you manage these machines just like any other MDM enrolled device. These devices are configured with Windows 10 endpoint security settings and automatically updated through Windows Update for Business. Admins don’t have to do a thing. All user data is stored and redirected to OneDrive. For this reason, Microsoft does not recommend cloud config be used for shared devices.
Cloud config can be deployed to any device running any one of the following operating systems.
Windows 10 Professional
Windows 10 Enterprise
Windows 10 Education
Cloud config requires the following licenses:
Azure Active Directory Premium P1
Microsoft Intune
Microsoft Teams
OneDrive for Business
Windows 10 Pro (minimum)
Note that Microsoft recommends Enterprise Mobility + Security E3 and Office 365 E3.
There are two ways to deploy Windows 10 cloud config in Microsoft Endpoint Manager. The easiest way uses the new guided scenarios feature. Cloud config is one of the sets of customized steps that admins can use to quickly deploy devices for a given scenario. You can also configure cloud config manually in order to deploy it using the following steps:
Create an Azure AD group
Configure device enrollment
Deploy a script to configure Known Folder Move and remove built-in apps
Deploy apps
Deploy endpoint security settings
Configure Windows Update settings
Deploy a Windows 10 compliance policy
Additional optional configurations
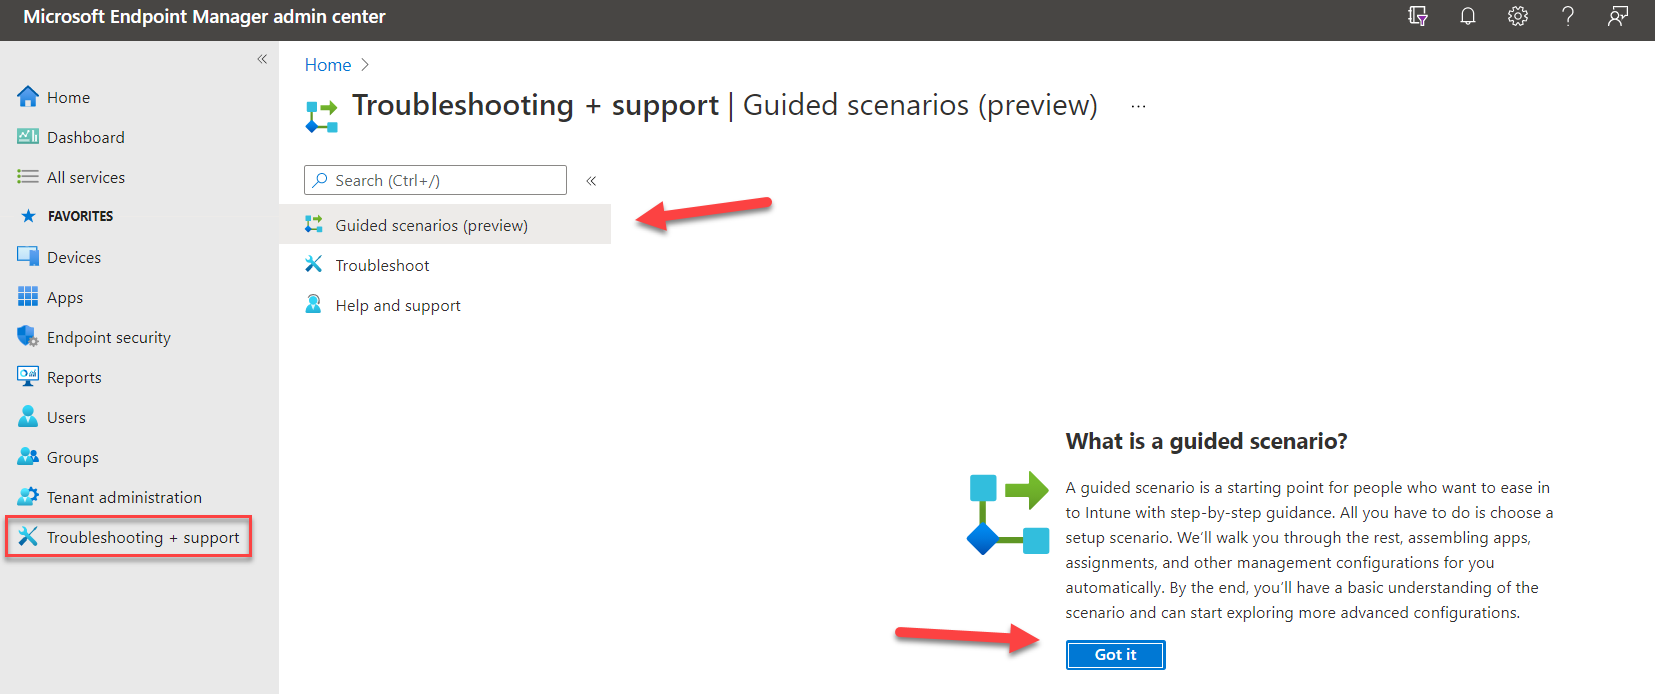
For this example, we are going to use guided scenario. You will find it by going to Troubleshooting + support > Guided scenarios. The first time you access this section you may have to click the “Got it” button as shown below.
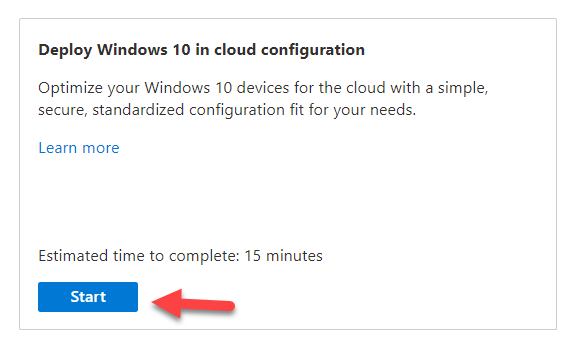
Then choose Deploy Windows 10 in cloud configuration by clicking the Start button for that scenario.
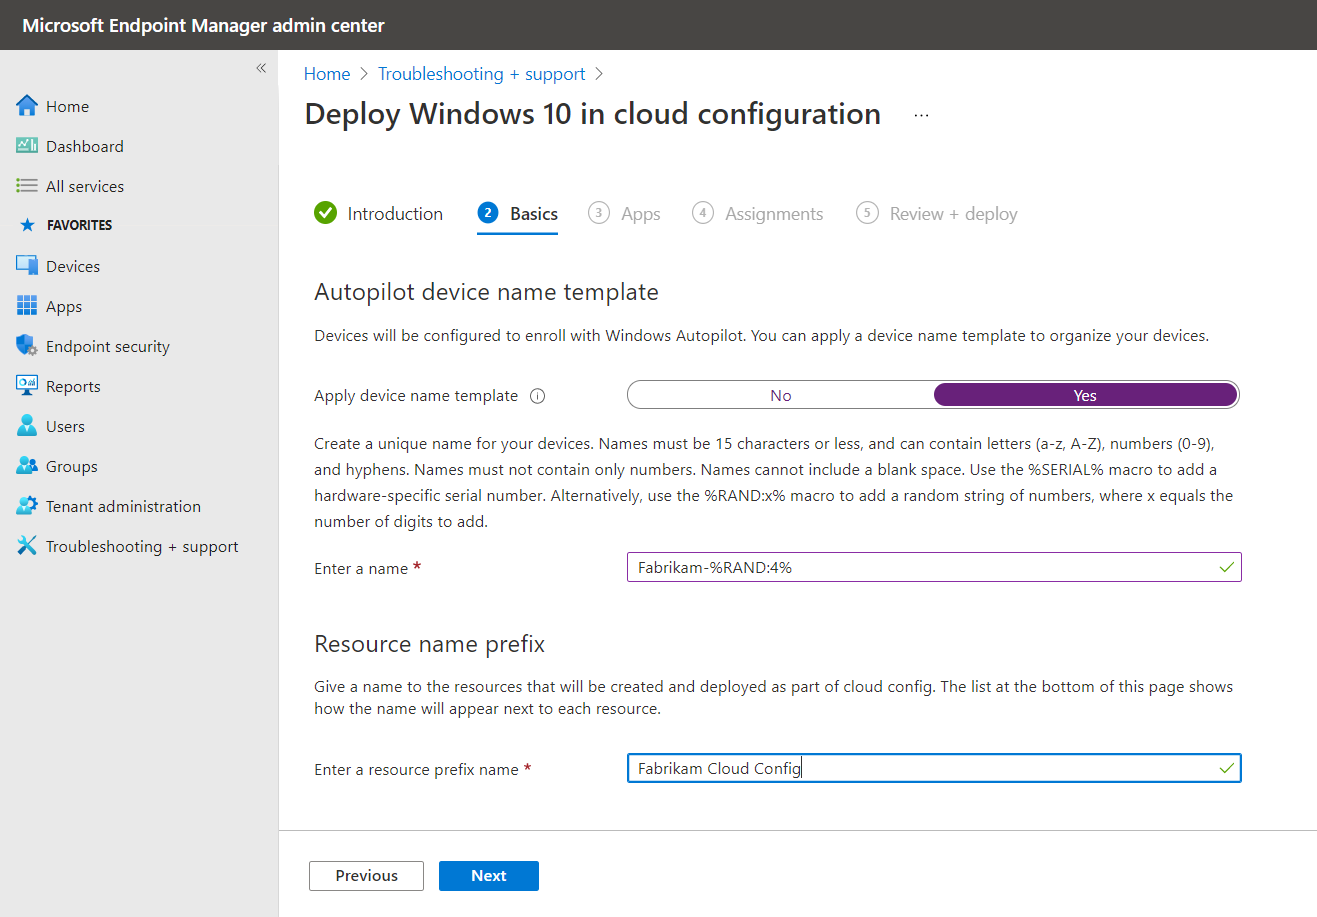
The first step involves the naming of the devices during the Windows Autopilot enrollment process. If you choose not to use the device name template, all devices will use the OEM name. If you select “Yes” however, you can then create a unique pattern to name the devices. You can use the %RAND:x% variable to include a string of random characters after Fabrikam. The X represents the number of random characters allocated. In the example below we are appending 4 random characters to Fabrikam.
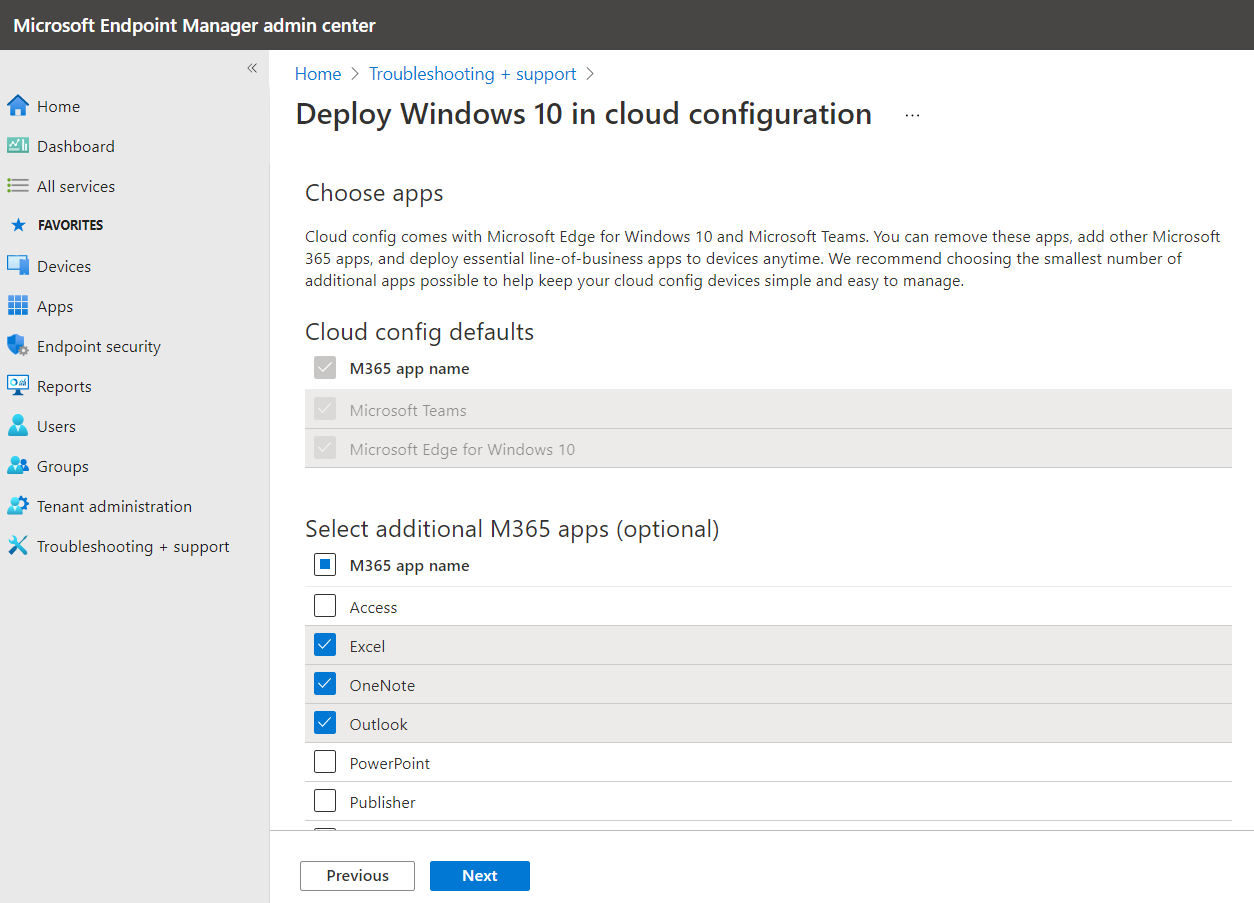
The next step is to select the apps you want to deploy to these devices. Because Cloud Config is about keeping things simple, Microsoft recommends keeping the list of included apps to a minimum so that your cloud config devices are simple to use and manage. By default, the guided scenario includes Edge and Teams. As you cannot remove them when using the guided scenario, you must uninstall them at a later time if you don’t want them. You can then select additional Microsoft 365 optional apps as is shown in the screenshot below.
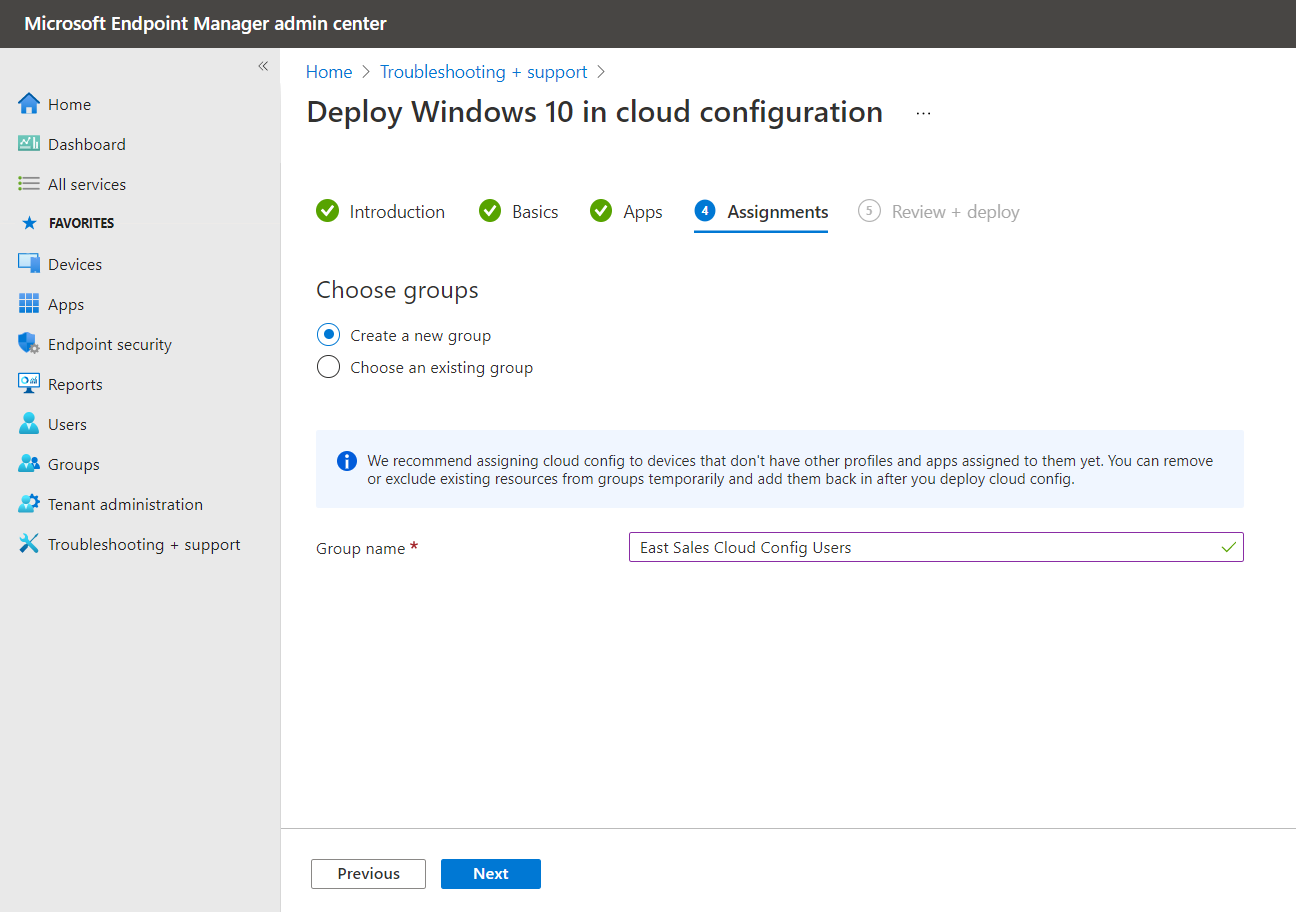
Next is the Assignment phase in which you will assign the cloud config devices to a group. Here you can either create a new group or choose an existing group as is shown below.
After you create your group and click “Next” you will be presented with a Summary showing all of your selections. You can go back to the other tabs, and change any values you added. Once you verify your settings then click Deploy.
You can then watch as the resources are being created along with their status. If there's an error, then the guided scenario isn't deployed, and all changes are reverted. Once deployed successfully you can use the monitoring and reporting features in the Endpoint Manager. If you want to remove any of your chosen settings, go to each policy created by the cloud config guided scenario and configure the settings to Not Configured. Then redeploy the policies.
In the end, cloud config is just a recommended set of configuration settings for Windows 10 for standardized deployments that are easy to manage. While it isn’t for everyone, it is an ideal fit for specific user scenarios.
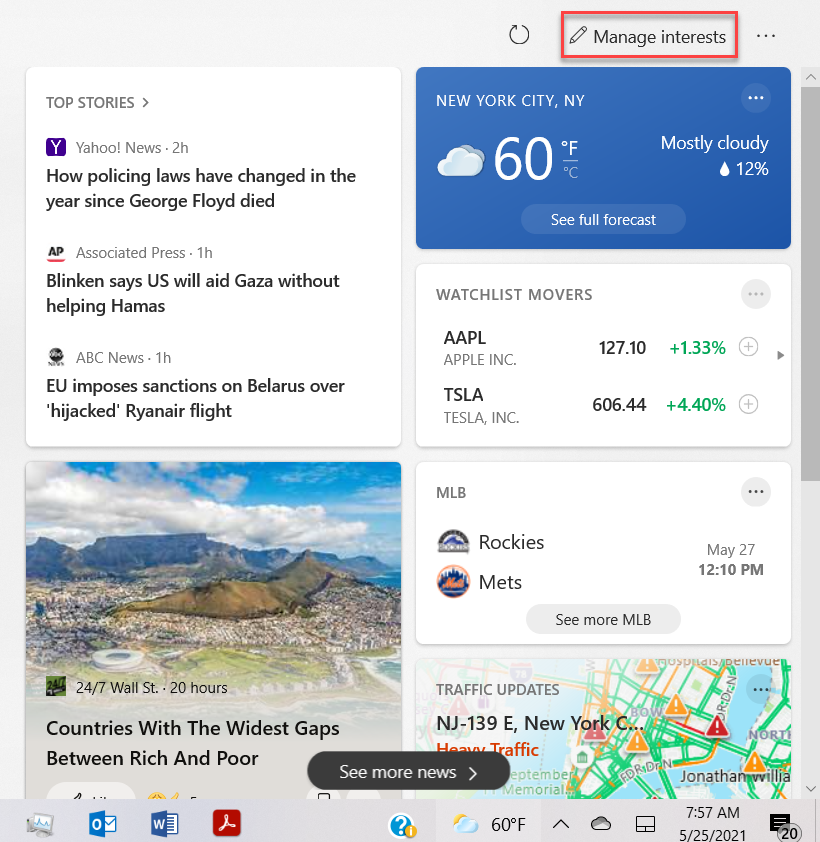
Those who have updated to Windows 10 Build 19042.964 via Windows 10 KB 10 KB5001391 have noticed the addition of the News and Interest Feed on the Windows taskbar. The feed is announced on the taskbar by a weather icon by default that represents nearby current sky conditions. With a click of the mouse you can gain access to nearby weather and traffic conditions, updates on your personal stocks as well as stories on professional or personal interests. You can customize the stories and publisher sources by clicking on “Manage Interests” at the top as shown in the screenshot below. A web browser will then open allowing you to tune your fee. You can also select “More options” on headlines and article in order to share or save them.
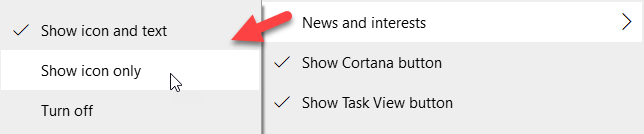
Users can also customize how the newsfeed appears on the taskbar. By default, the weather conditions icon and temperature are shown. By right clicking on the icon, users can modify this in the context menu as shown below.
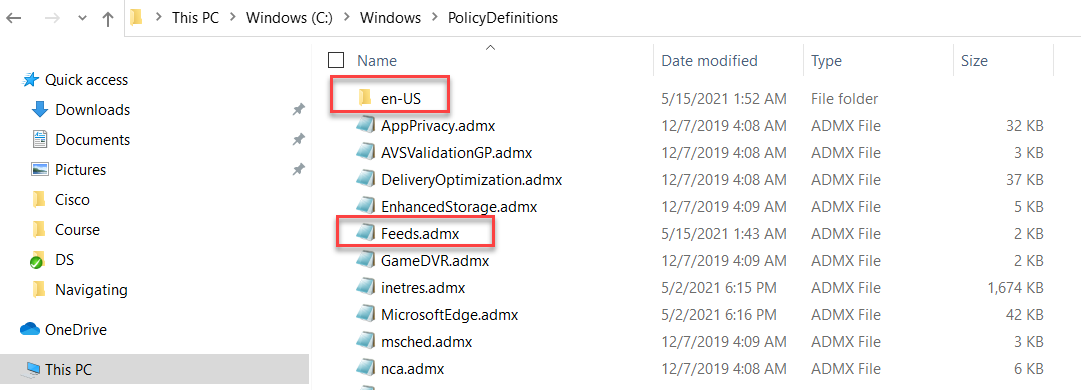
Windows admins will understandably want to manage the appearance of this new feature. This can be done through either Windows Group Policy or Microsoft Endpoint Manager. In order to access the associated Group Policy you need to obtain the Feeds.admx file. You can access it by navigating to C:\Windows\PolicyDefinitions on a machine that has the update installed. Copy the Feeds.admx file and paste it into your group policy central store. You will also need the Feeds.adml file as well. Those in the U.S. will find this file in the en-US directory. The two locations are shown below.
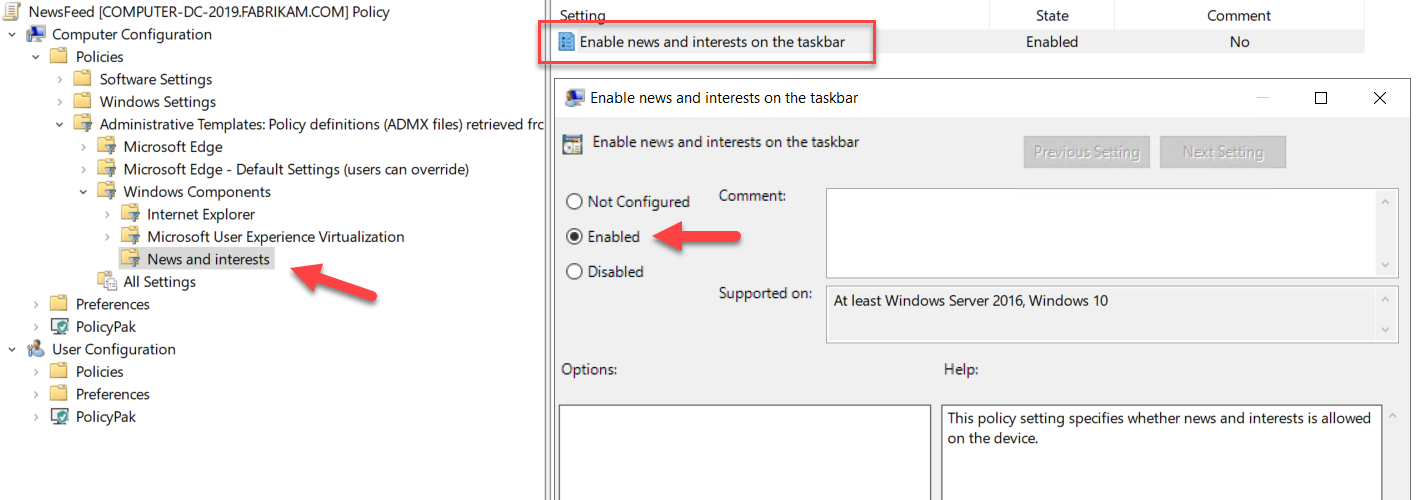
You must then create a computer side policy by going to Computer Configuration > Administrative Templates > Windows Components > News and interests > Enable news and interests on the taskbar. You can then choose to enable or disable the feature. Enabling the policy will allow News and interests on the taskbar and give users access to the applicable context menu. This will give users the ability to turn it off if they wish. The policy is enabled in the screenshot below.
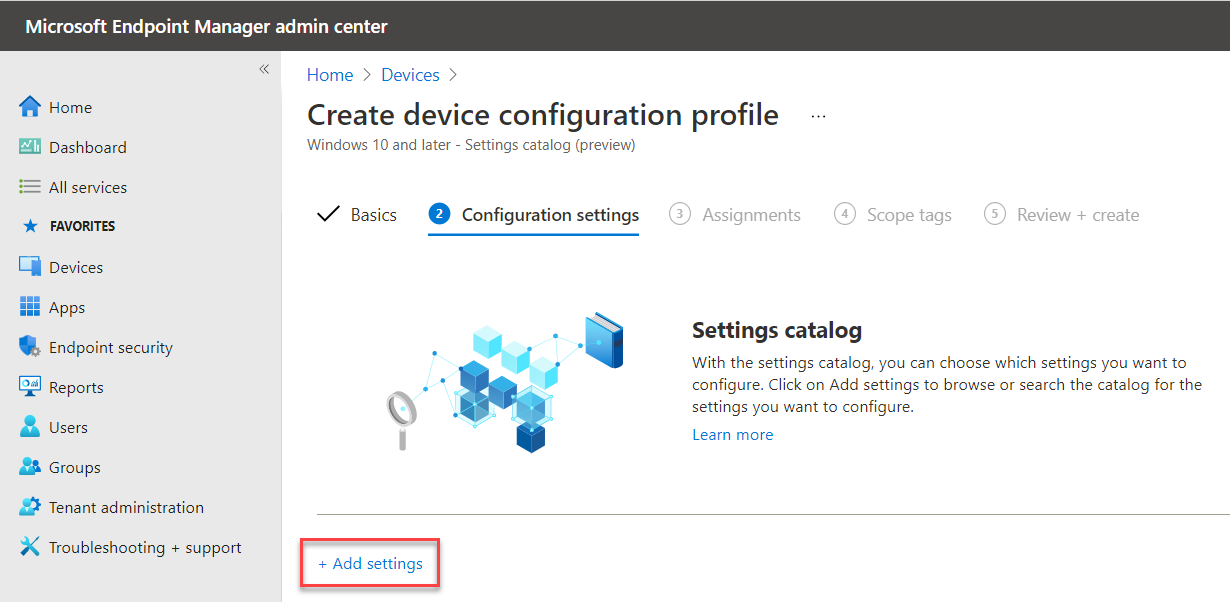
You can also manage News and interests in Microsoft Endpoint Manager as well by creating a Configuration profile. Select Windows 10 and later as the platform and choose Settings catalog (preview) as the profile type. After naming the policy, select “Add settings” to access the Settings Picker as shown below.
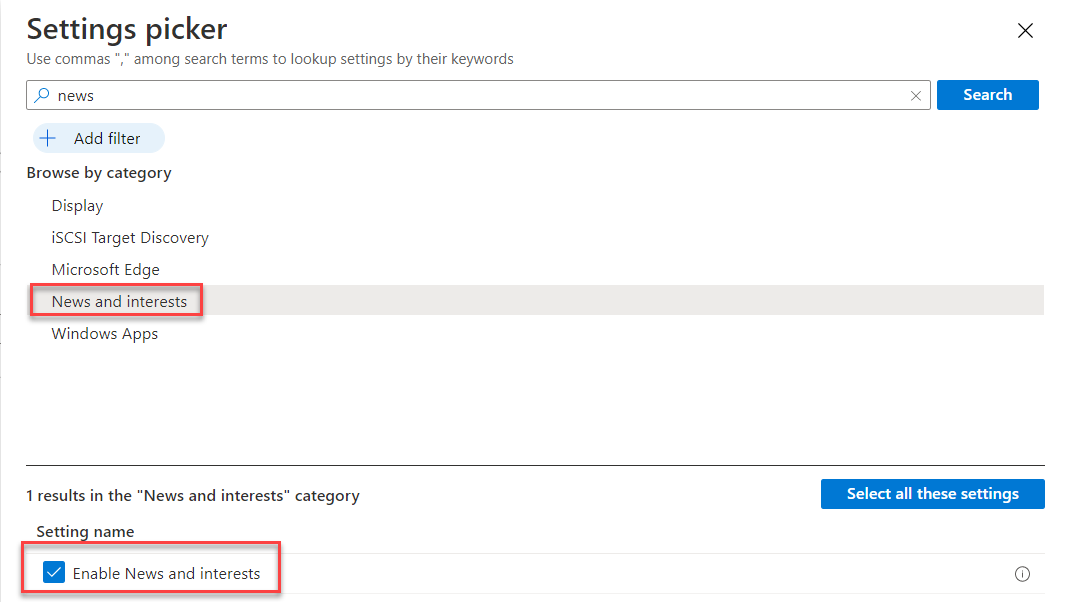
Then do a search for “news” and select “News and interest” and enable the setting as shown below.
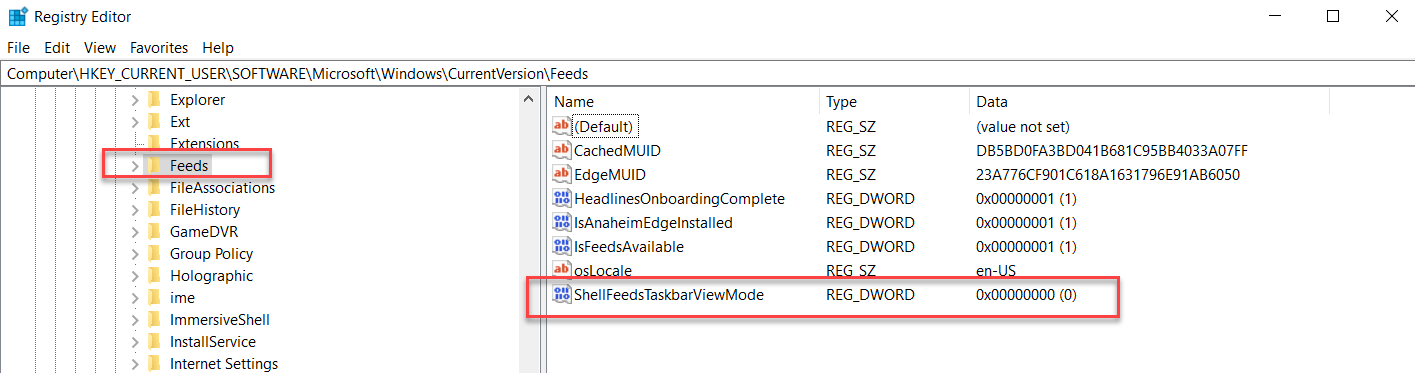
You can also manage News and interests via the registry. Go to:
While the phrase, “between a rock and a hard place” stems from ancient Greek Mythology, it could easily apply to the task of applying Windows feature updates. A new feature update can integrate new innovation and added value to your users. On the other hand, that same update may also cause an rebellion amongst your helpdesk team as a ticket monsoon is created from that update going bad. It’s a pendulum that can swing both ways.
What are Safeguard Holds?
That’s one reason why Microsoft developed Safeguard holds. Safeguard holds prevent devices with a known compatibility issue from receiving a new feature update. By doing so, it protects users from a potentially poor desktop experience should the updated feature not be a harmonious match for their particular device. Microsoft uses quality and compatibility diagnostic data to identify issues of possible incompatibility. When such a device is identified, it is placed on hold, which serves as a safeguard. Devices that are placed on hold are prevented from installing the designated Windows 10 feature in order to preserve the user experience for the time being. Microsoft then uses the captured diagnostic data to release a fix that addresses the compatibility issue and at some point, the hold will be released. At that point, the update can then be delivered. Microsoft also uses holds when a customer or partner reports a disruptive issue directly related to an update for which an immediate workaround is not available. Those enterprises that utilize Microsoft Endpoint Manager can use Update Compliance reporting retrieve data related to current safeguard holds.
Keep in mind that safeguard holds only apply to Windows devices that use Windows Update for Business. Safeguard holds do not pertain to feature updates that are deployed through other channels such as Windows Server Update Services (WSUS) or installation media. Most enterprises should be using Windows Update for Business as it offers administrators the ability to define Windows Update service rings in order to manage update delivery schedules for different user classifications.
Opting out of Safeguard Holds
Safeguard holds are a good thing. However, there are instances when you might not want them. For instance, internal IT may want to validate the newest feature on a test device (for those who have it, it is best to validate feature updates using the Windows Insider Program for Business Release Preview Channel). Allowing the update to go through will allow you to experience the compatibility issue firsthand as well as assess other implications concerning the update. For those who want to bypass holds for special circumstances, Microsoft released a Disable safeguards for Feature Updates Group Policy late last year. The policy is applicable to any Windows Update for Business device running Windows 10, version 1809 or later with the October 2020 security update installed.
Deploying the Policy
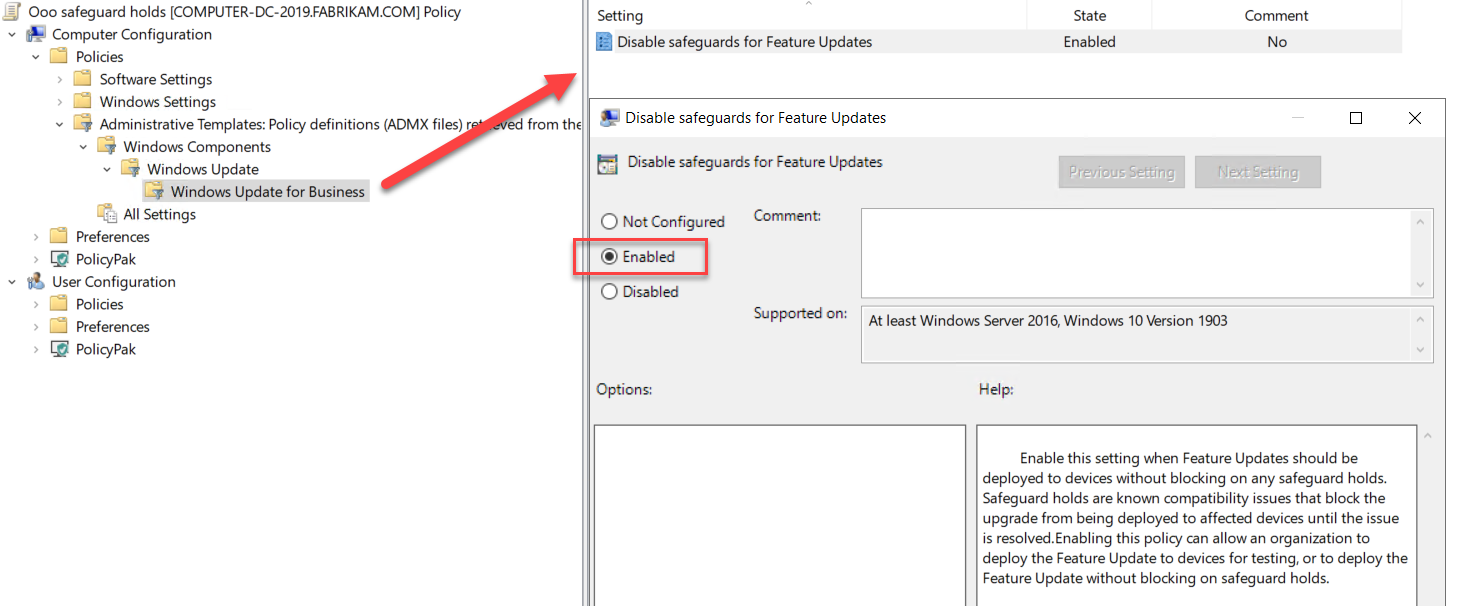
There are several ways to deliver the Disable Safeguards policy to your devices. For domain-joined devices, Group Policy is easy. Create a GPO and go to Computer Configuration > Administrative Templates >Windows Components > Windows Update > Windows Update for Business and enable “Disable safeguards for Feature Updates” as shown in the screenshot below.
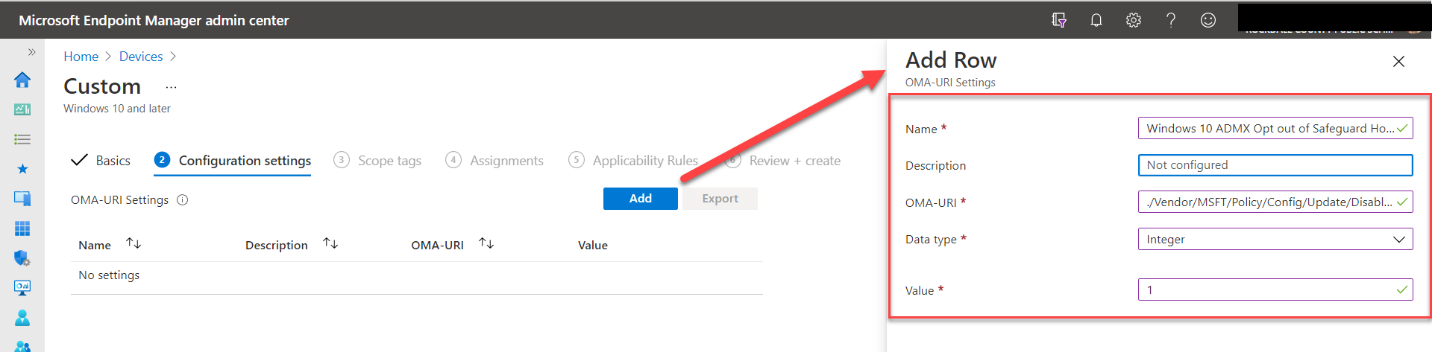
Administrators can also use an MDM such as Microsoft Endpoint Manager to manage your devices, you can create a custom profile to deploy the policy. While the involved settings do not appear in the management interface, you can create a custom device configuration profile using OMA-URI settings. Using Microsoft Endpoint Manager go to Devices and create a custom profile for the Windows 10 platform. Provide a name for the OMA-URI setting and optional description if desired. Then add the following settings as shown in the screenshot below.
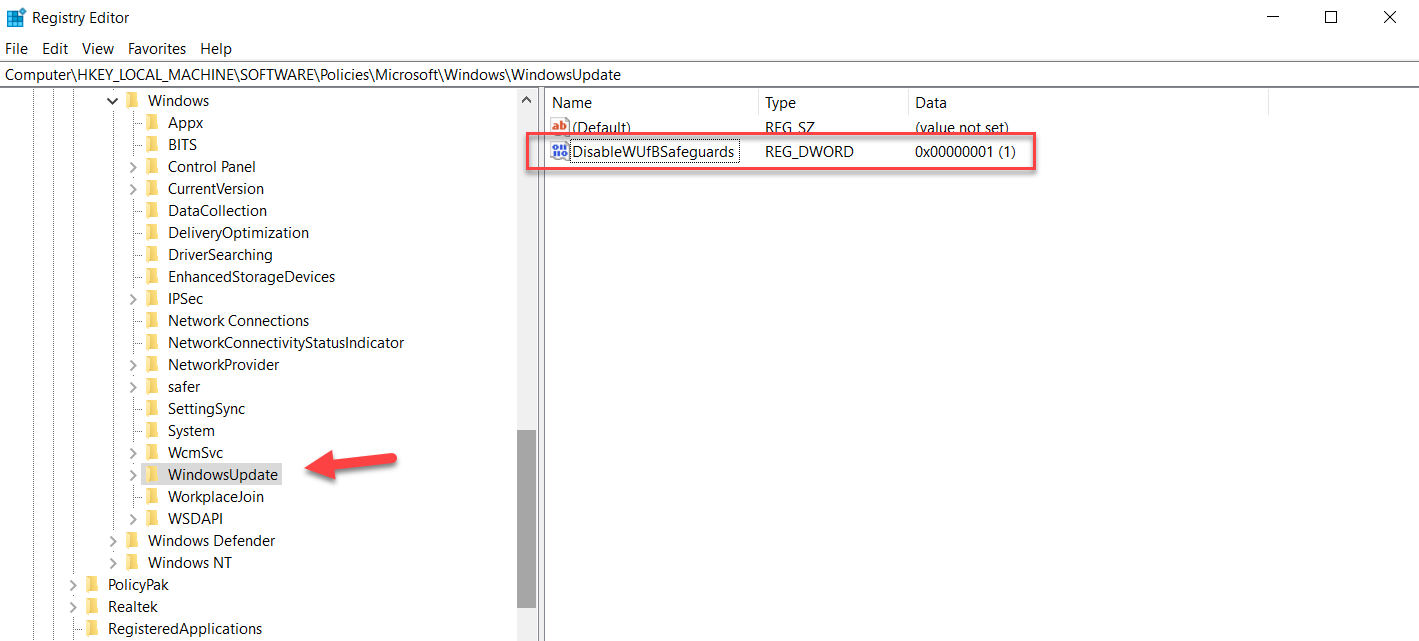
Another way is to modify the registry. You can do this manually or deploy the modification using Group Policy Preferences. Start by going to the following key:
Go to HKEY_LOCAL_MACHINE\SOFTWARE\Policies\Microsoft\Windows\WindowsUpdate
Right click on WindowsUpdate and select New > Dword (32-bit) Value
Name it DisableWUfBSafeguards
Set its value to “1” and reboot.
The finished result is shown below.
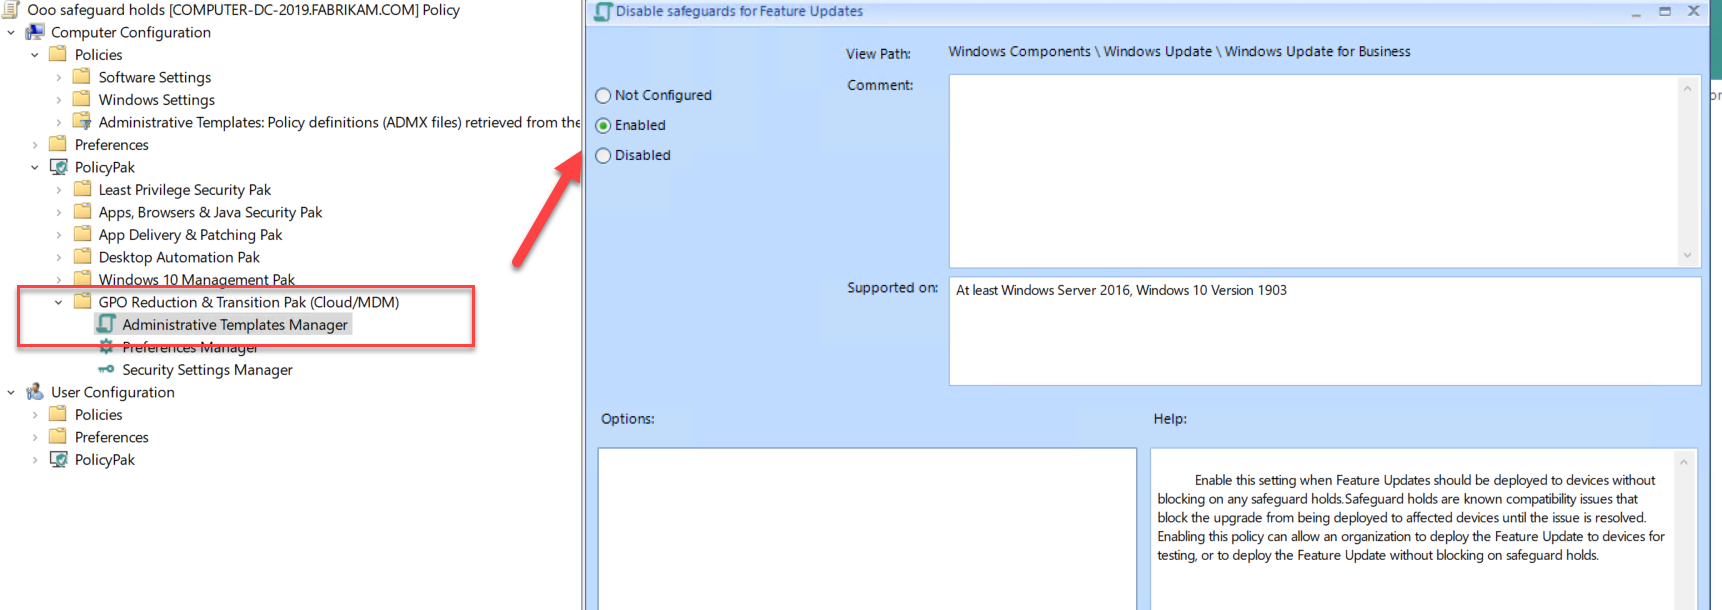
For those enterprises that utilize both domain-joined and non-domain joined machines, there are third party solutions such as PolicyPak that you can use to deploy the Disable Safeguards policy to any internet connected Windows 10 device. In this case, the PolicyPak editors are built inside the Group Policy Management Editor so creating the policy is simple and straightforward. Once created, you can deploy it using standard Group Policy, your chosen MDM solution or PolicyPak Cloud. The screenshot below shows the creation process that utilizes the ADMX templates.
To be clear, you shouldn’t disable Safeguard Holds to rush out feature updates to standard users, but this policy does provide administrators with greater the flexibility they need at times.
Welcome to Part 2 of this article series in which we take a look at the primary policy types that you can create and utilize in Microsoft Endpoint Microsoft (Intune). In Part 1 we looked at Configuration Profiles and how they are the rough equivalent of GPOs in a traditional AD on premise domain in which some things were hidden, others revealed. Here we will examine some of the other major components of MEM, all pertaining to security.
Security Baselines
Also referred to Security Profiles, Security Baselines are sets of Windows settings that are preconfigured by Microsoft Security engineers. There are currently 3 Security Baselines as is shown below. They are
Windows 10 Security Baseline
Microsoft Defender ATP Baseline
Microsoft Edge Baseline
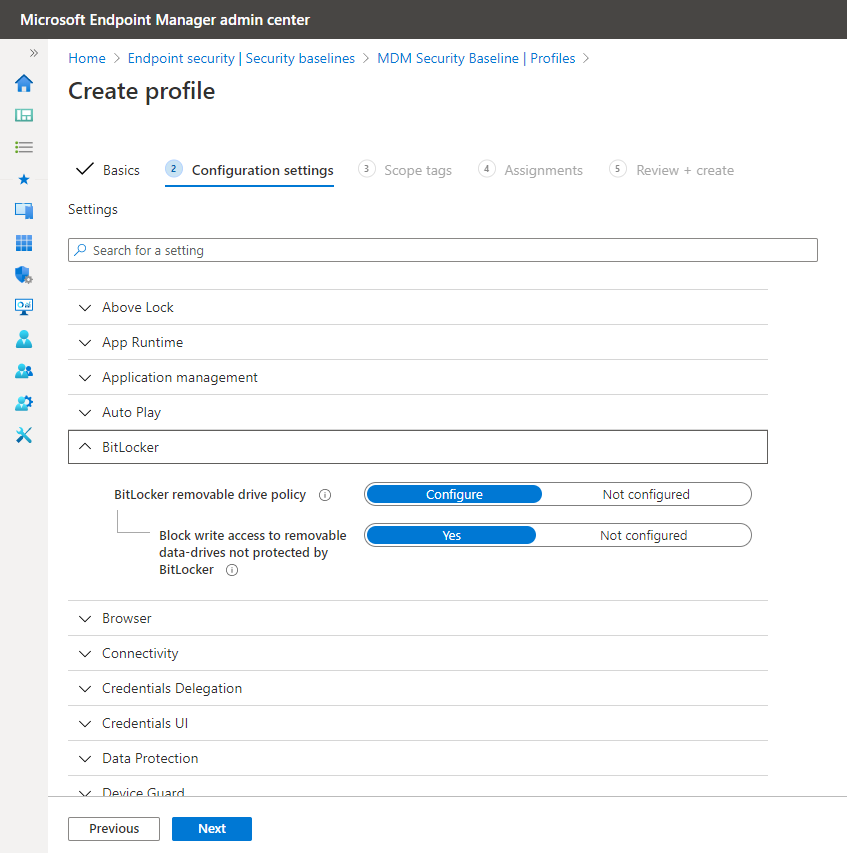
The baselines by themselves don’t really do anything until you use one of them to create a security policy. To create a profile you simply click on the appropriate baseline and then create your desired policy. Baselines should be looked at as minimum security standards, although for most enterprises, they would work admirably. You can change any of the settings, but keep in mind that when you unconfigure a setting, you are making it less secure. In most cases, you should simply accept the settings as is and deploy the policies to their targeted users and devices. The screenshot below shows the preconfigured BitLocker settings within the Windows 10 Security Baseline.
Compliance Policies
Compliance Policies are used to determine whether a device is compliant with a pre-defined baseline. Compliance Policies vary on the platform of the device. Some examples of Windows 10 compliant baselines can include the following:
BitLocker enabled
Minimum OS version
Password qualities
Firewall enabled and configured
Location of the device
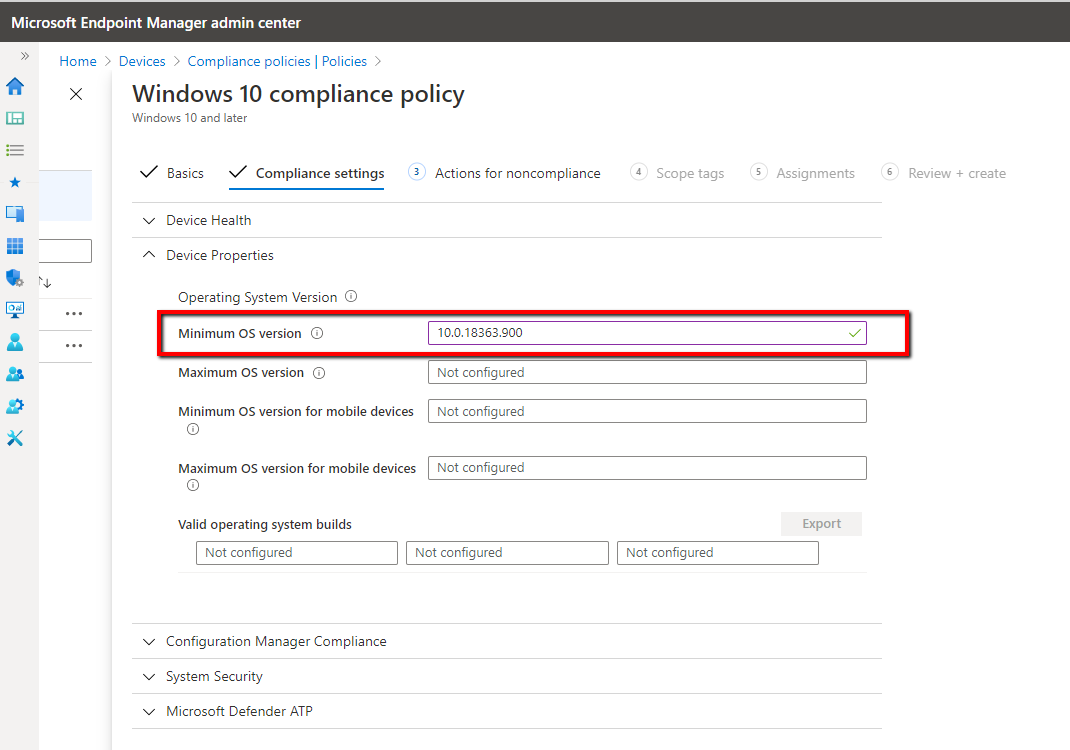
You can then select a noncompliance action such as an email notification sent to the user informing them of their device’s noncompliance state. You can even lock or retire a device that has been noncompliant for a specified duration. An example of a Compliance Policy requiring a minimum Windows 10 OS version is shown below:
Conditional Access Policies
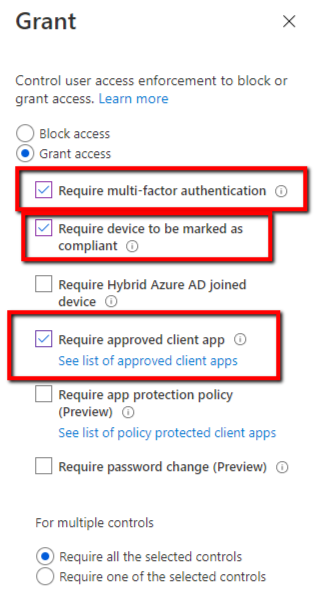
Conditional Access Policies work hand-in-hand with Compliance Policies. They prevent access to noncompliant devices. For instance, you can prevent devices connecting from anywhere outside of the U.S. for instance. You can also list other conditional access requirements such as the installation of approved applications or MFA as shown in the screenshot below. You should always test your Conditional Access Policies first as you could deny everyone access including yourself.
Enrollment Restrictions
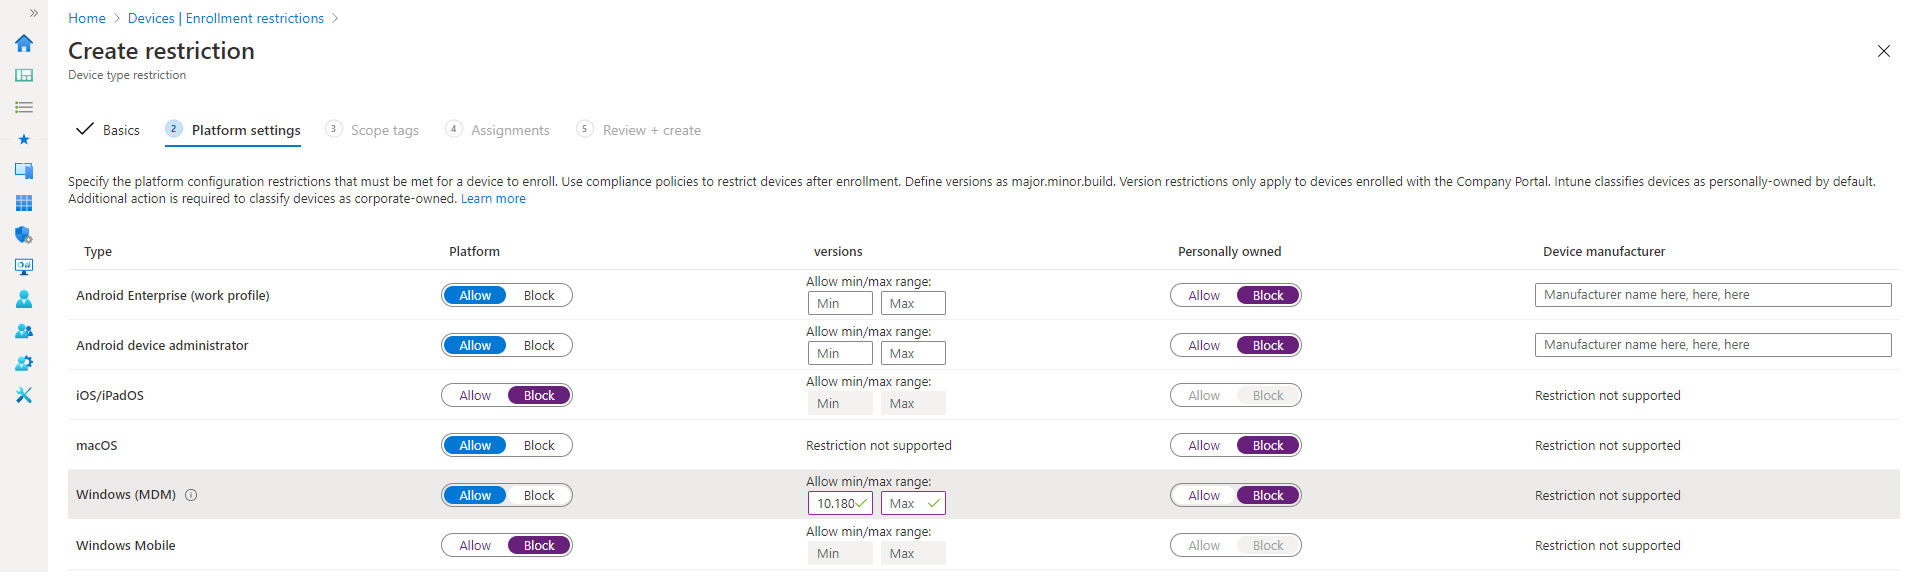
Although not a “policy” per se, Enrollment Restrictions play an important role in MEM security. By default, authorized users can enroll 2 devices into the MEM portal. If don’t want the default, you can create enrollment restrictions that will allow users to enroll anywhere from 1 to 15 devices. You can also assign Device Type Restrictions that will prevent users from enrolling either personal devices, or designated device version platforms as is shown in the screenshot below.
Creating a MEM Strategy
As you can see, there are a lot of moving parts in MEM. The key is to ensure that all of your policies and restrictive settings work in conjunction of one another in order to safeguard your organization as well as ensure that your users can perform their required digital workloads. While MEM alone falls short of the granular setting coverability of Group Policy, it can play an important role for new startups and established companies that have significant numbers of mobile and remote devices.
Microsoft Endpoint Manager (the Intune part), is a powerful device management and endpoint security system that is constantly evolving. What began as a portal to manage and secure mobile devices can now manage desktop computers, virtual machines and even servers. It can now deliver a broad spectrum of configuration and security settings as well as intelligent cloud actions. Because of this, it’s hard to keep abreast of all of the changes and informational resources are perpetually outdated.
Microsoft Endpoint offers multiple policy types. With so much confusion out there concerning which policies do what, I thought it might be a good time to take a snapshot of the state of Microsoft Endpoint as it is today. This two-part series will cover a quick review, (or for some an introduction), on the various parts of this rapidly expanding management ecosphere.
Configuration Profiles
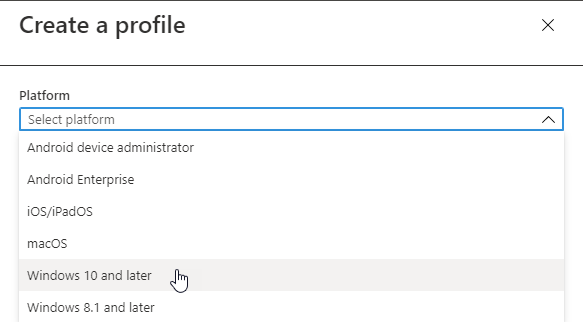
This has long been the bread and butter of Intune. Configuration policies are the equivalent of Group Policy Objects. A configuration profile is created to deploy managed settings to targeted devices or users. Like other MDM solutions, Microsoft Endpoint supports more than just Windows. When you go about creating a configuration profile, you can choose between multiple platforms including Android, iOS, iPadOS, macOS and Windows as is shown in the screenshot below.
For the sake of this article, we will focus on Windows 10. You then select which profile type you want to configure settings for. The list of profiles has greatly expanded over the years. Some of the profiles available at this time include:
Device Restrictions (Think Group Policy restrictions)
Edition upgrade and mode switch
Endpoint Protection
VPN
Wi-Fi
Below is an example of the available Control Panel Settings than you can block within the Device Restrictions policy.
A wizard then guides you through the process of configuring your desired settings and deploying them to the applicable targets. While the number of available settings offered within Microsoft Endpoint has exponentially grown over the years, it still doesn’t come close to the more than 10,000 settings offered by the culmination of Group Policy and Group Policy Preferences combined. While its capabilities and offerings may fall short for on-prem AD enterprises, it does provide ample coverage for many mobile and non domain-joined devices.
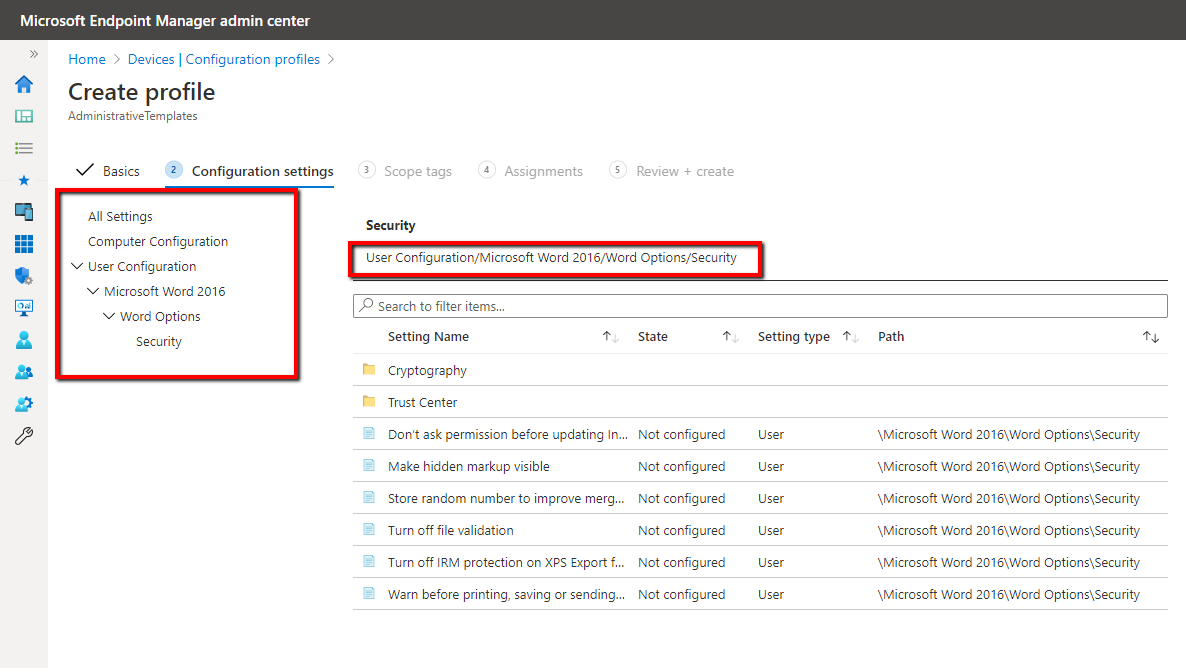
Administrative Templates
Administrative Templates is one of the available Configuration profiles but I want to focus on it separately. These are ADMX settings, some of the same ones you are accustomed to configuring in Group Policy Administrative Templates that includes both Computer and User side settings. Here you can configure settings for things such as Microsoft Edge, One Drive, Word, Excel, etc. In the screenshot below you will notice the same hierarchical structure you are familiar with in Group Policy Administrative Templates. Again, while the list of available ADMX settings has grown substantially, it still falls far short of what is currently available in native Group Policy. (Hint: Use PolicyPak MDM to take 100% of real on-prem GPO settings and use them with Intune.)
Custom Profiles
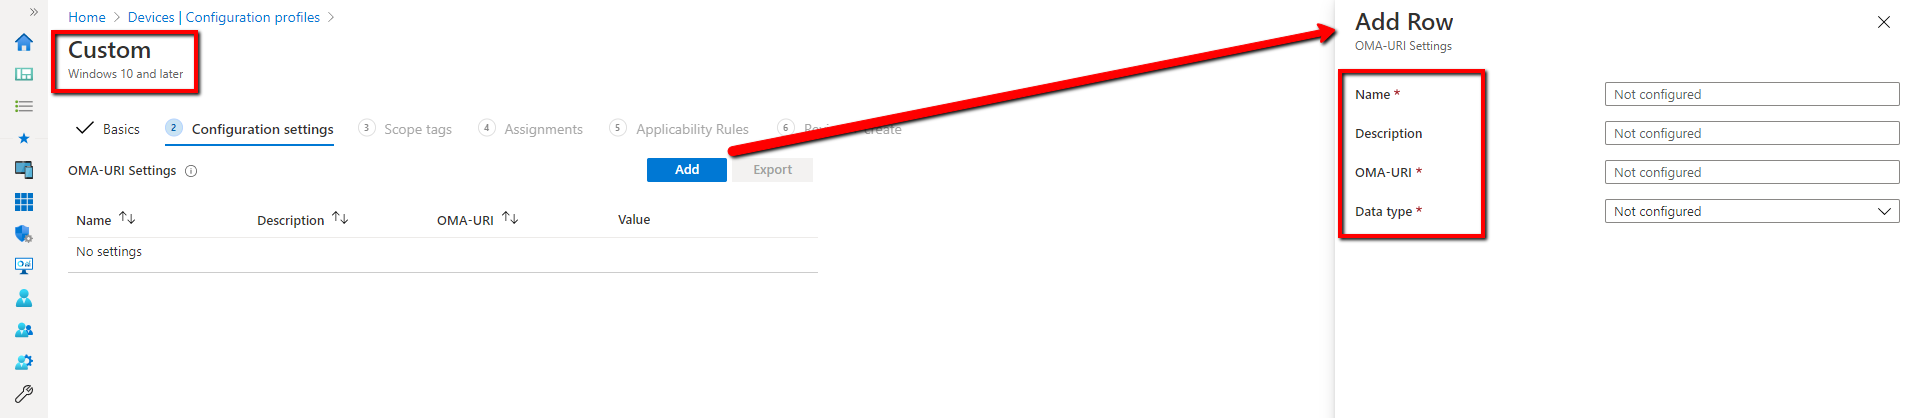
One more Configuration Profile type I want to focus on is Custom Profiles because a lot of people find them confusing. Windows 10 devices contain Configuration Service Provider (CSP) settings and it is these settings that MDM solutions actually manage. MDM has the ability to manage any CSP setting, but not all of these settings are currently built into the Microsoft Endpoint interface. That is where custom profiles come into play. If you want to deliver settings to an available CSP that isn’t accessible within the Microsoft Endpoint, you can create a custom profile which does require some input the following settings:
Name: The name is for your own reference to help you identify it. Use any name you wish.
Description: Enter a short summary of what the profile does and any other pertinent details
OMA-URI: The OMA-URI settings are unique for each platform be it Android, iOS, Windows, etc. It is also case sensitive so be careful to type in the setting path correctly. To configure settings for a Windows 10 device you would type the path: Vendor/MSFT/Policy/Config/AreaName/PolicyName
Data type: The data type will vary based on the OMA-URI setting. The options are String, String (XML file), Date and time, Integer, Floating point, Boolean and Base 64 (file)
Value: Here is where you associate the OMA-URI value you wish to enforce.
Below is what the Custom Profile creation process looks like in Microsoft Endpoint.
So that sums up our look at Configuration Profiles.
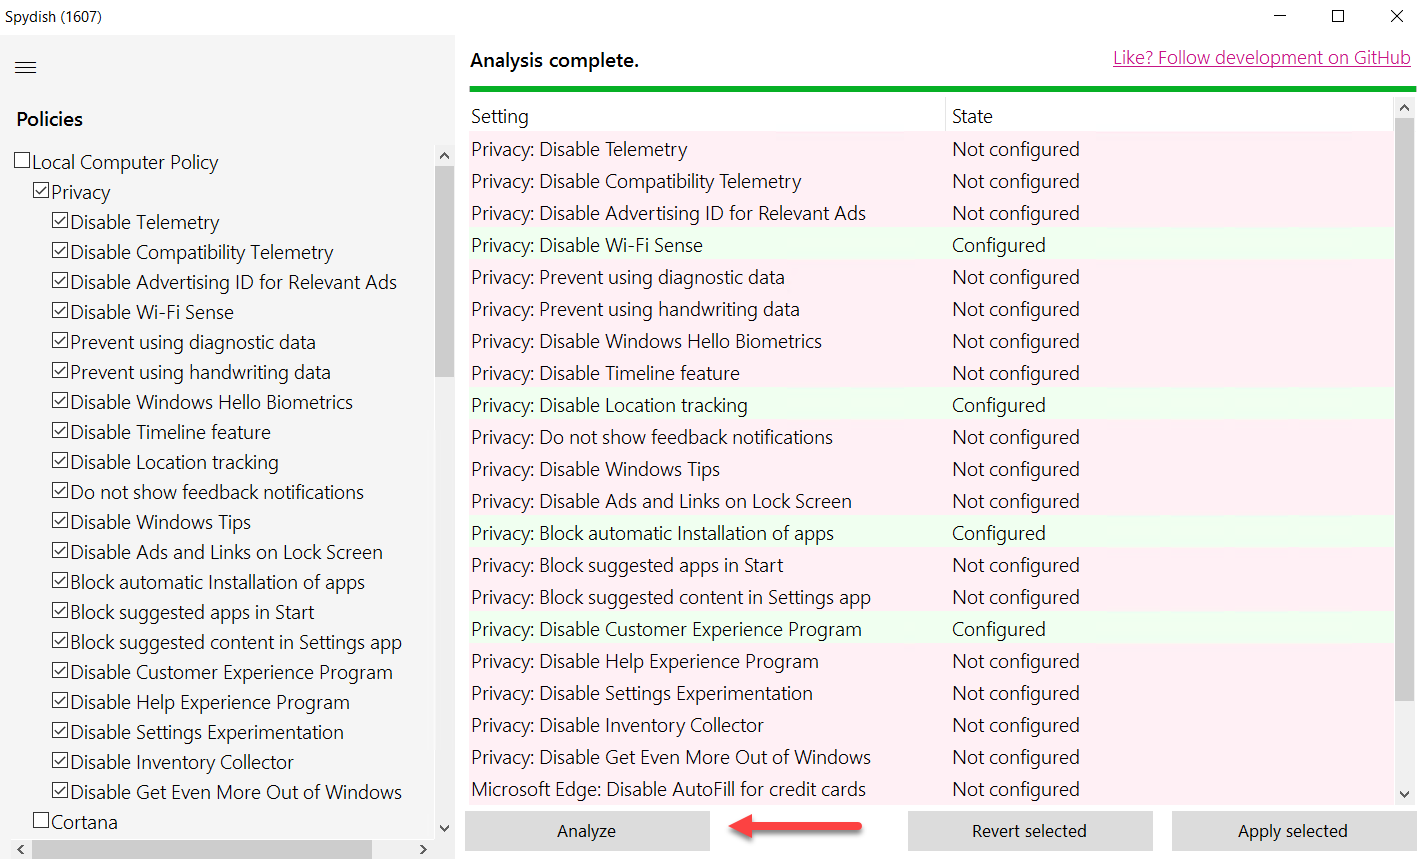
I came upon this cool little app the other day and wanted to share it. It is a Windows 10 privacy tool called Spydish. It’s a very small app that you can download from the developer’s GitHub site. It runs as an EXE file so there’s not installation necessary. The premise of the app is straightforward as it simply checks if privacy related policies are enabled on your Windows 10 machine. It also gives you the option to enable any of the included settings or return them to their default state. The application can only be run locally so you cannot use it to access privacy settings of remote machines. It doesn’t require Group Policy so you can run it on a Windows 10 Home version. While you wouldn’t use it to manage the privacy settings of your enterprise fleet of laptops, it’s a quick way to see which privacy settings are set on a designated Windows 10 system and modify them.
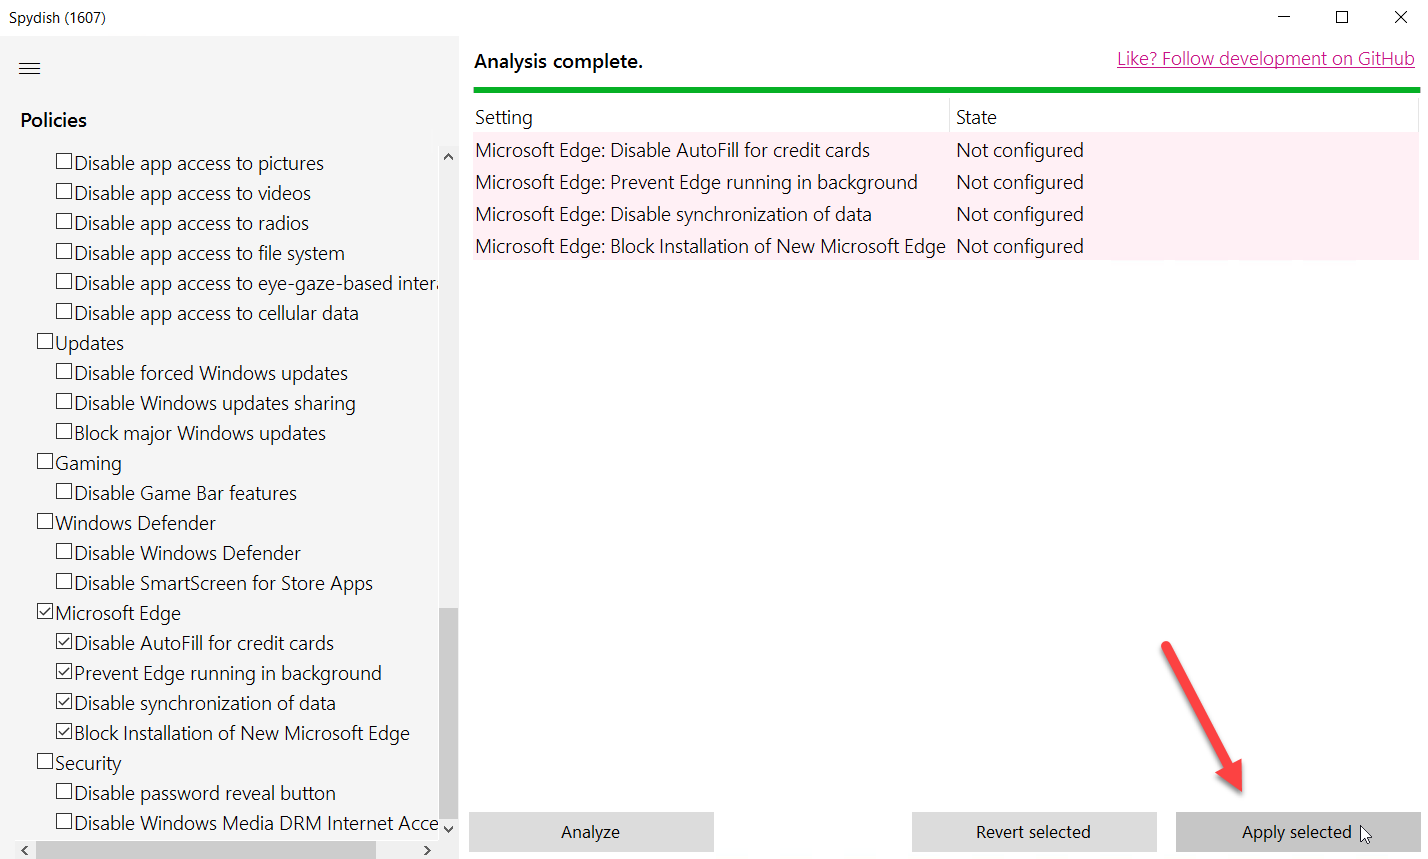
Once opened, Spydish lists a series of privacy related policies in a sidebar on the left. Settings are grouped in different categories such as Privacy, Cortana, Bloatware, App Permissions, etc. You can choose the entire allotment of Local Computer Policies, a selected group or groups or pick individual settings. Then click the Analyze button as is shown in the screenshot below. A readout appears almost instantly, showing the current settings for each policy.
As easy as it is to obtain the current state of your privacy settings, it is just as easy to apply or revert them. In the screenshot below I have selected the Microsoft Edge group of settings. As you can see, none of the settings are currently configured. Now simply click the “Apply selected” button as is shown below.
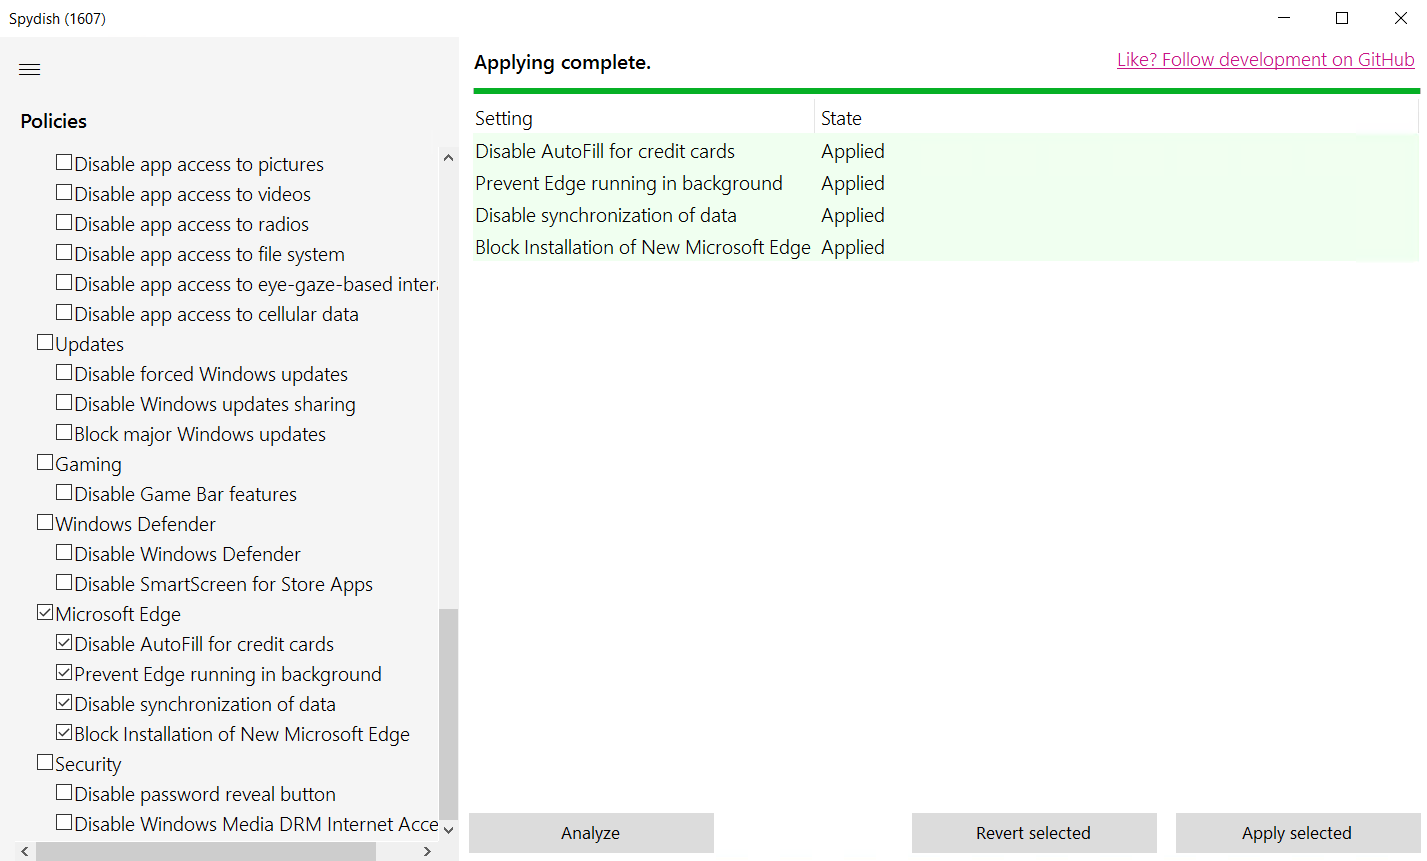
Spydish will then apply all of the settings as shown here.
Clicking “Revert selected will revert any settings back to their default state. While users can modify Windows 10 privacy settings manually, Spydish is a way to get the job done quick and effortless. Check it out.
It’s a Cloud, Cloud, Cloud, Cloud, Cloud, Cloud world. Except actually most of your stuff is still likely mostly on-prem, or acts that way. Take Windows 10 for instance. Windows 10 has events in the event logs, and maybe you already know about on-prem Event Forwarding.
Tip: If you want to learn more about on-prem Event Forwarding, you can see my Walkthrough of that here video and text.
But how do we take on-prem events from Windows 10 (or Windows Server) and get the up to the cloud for later analysis? If you have 24, 250, or 25,000 domain joined (or even NON-domain joined) machines, say with Windows Intune or PolicyPak Cloud… how can you do the equivalent of event forwarding to some central place?
That is the job of Azure Log Analytics. I’m going to call it “LA” for short.
LA had an original name, OMS which stood for Operations Management Suite, but as near as I can tell, that’s over. But its good to know LA’s original name, because you’ll see OMS pop up from time to time in the walkthrough, docs, and software. Additionally, it’s also good to know that what you’ll see here is build upon the original System Center Microsoft Operations Manager (SCOM); but I won’t be using that function.
The official documentation for LA can be found here; but I had a few stumbles. Some tips o’ the hat to Travis Roberts’ video and blog which also helped give me a leg up. The blog is here and the helpful video series on Azure Log Analytics (though a little old now because of the name and UI changes) can be found at: https://www.youtube.com/watch?v=6hgvjgPBNzE&list=PLnWpsLZNgHzVXXyN9a0jm9xNNDrikHf8I
My goal in researching this project was to give some PolicyPak MDM Customers a quick guide to research interesting events that PolicyPak automatically logs to its own event log. But in this guide, I’m also going to show you how to collect some standard and also some extra event logs.
To get started you need a Log Workspace. This is basically a security block between this collection of logs, and say another collection of logs. Each Log Workspace has a GUID based Workspace ID and two keys (Primary and Secondary.) You’ll use these to send, say, YOUR Windows 10 machines’ event logs to your workspace. And the other Azure admins … you know, those SQL server people or Exchange or whatever … they’ll send their event logs to their workspaces.
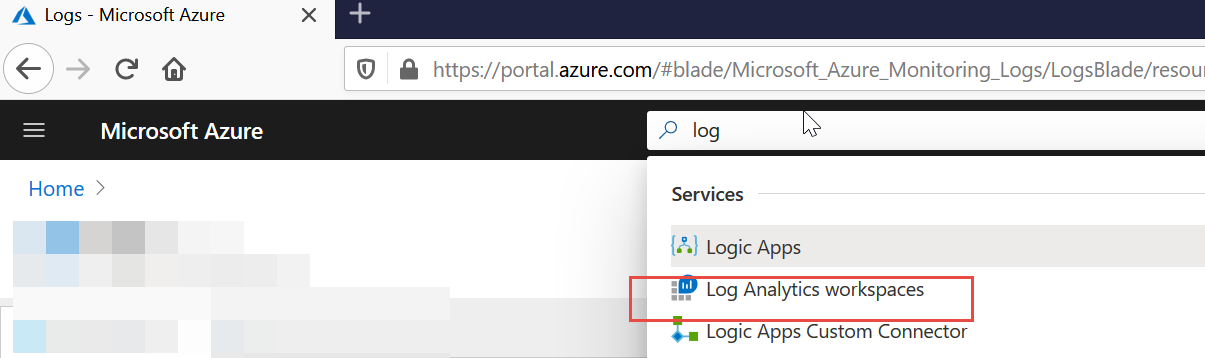
To get started use the big search thingie to find “Log Analytics workspaces” like what’s seen here.
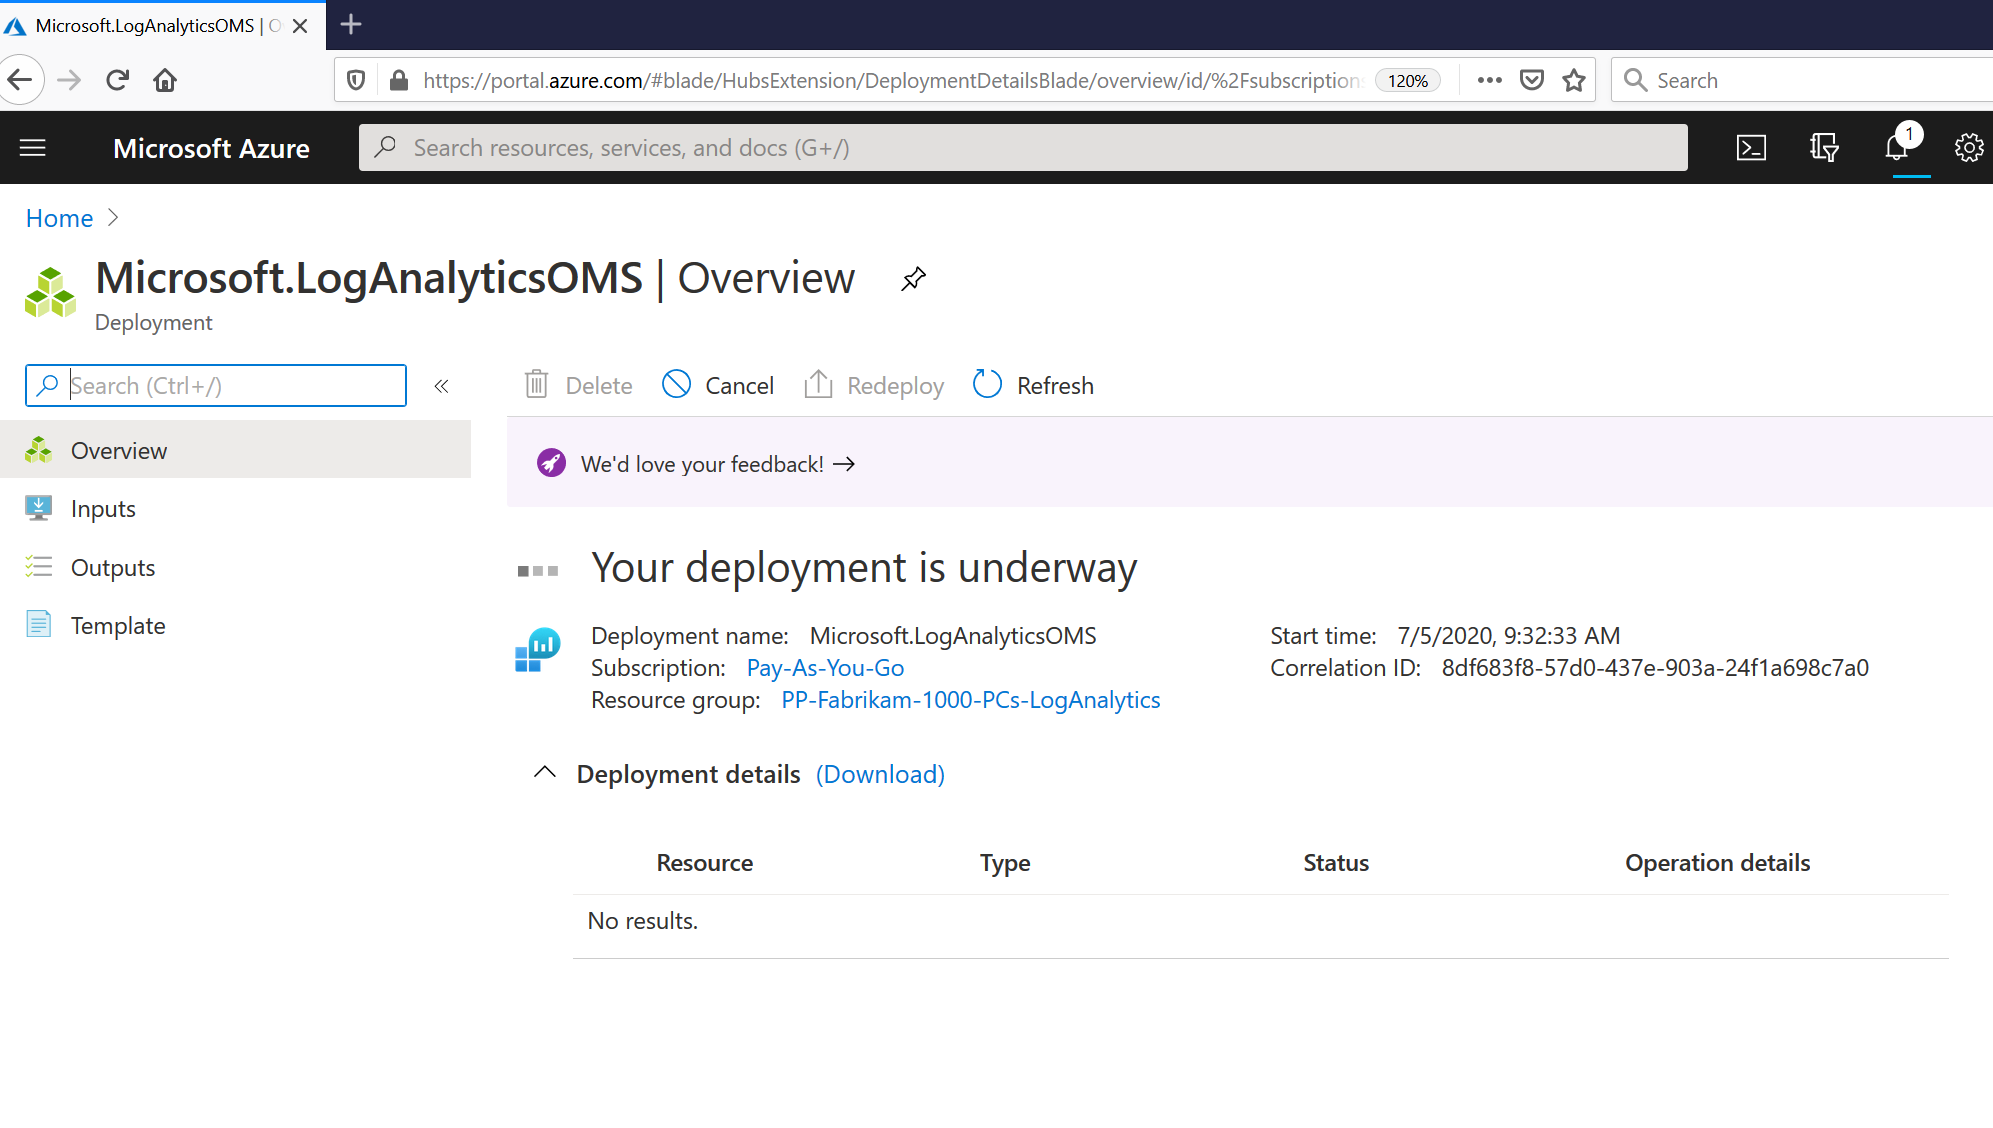
Then, there’s a little Wizard (not shown) to help you get started. Basically it’s asking you for names and which Azure region you want to keep the data in. Then after it gets going you’ll see “Your deployment is underway” like what’s seen here.
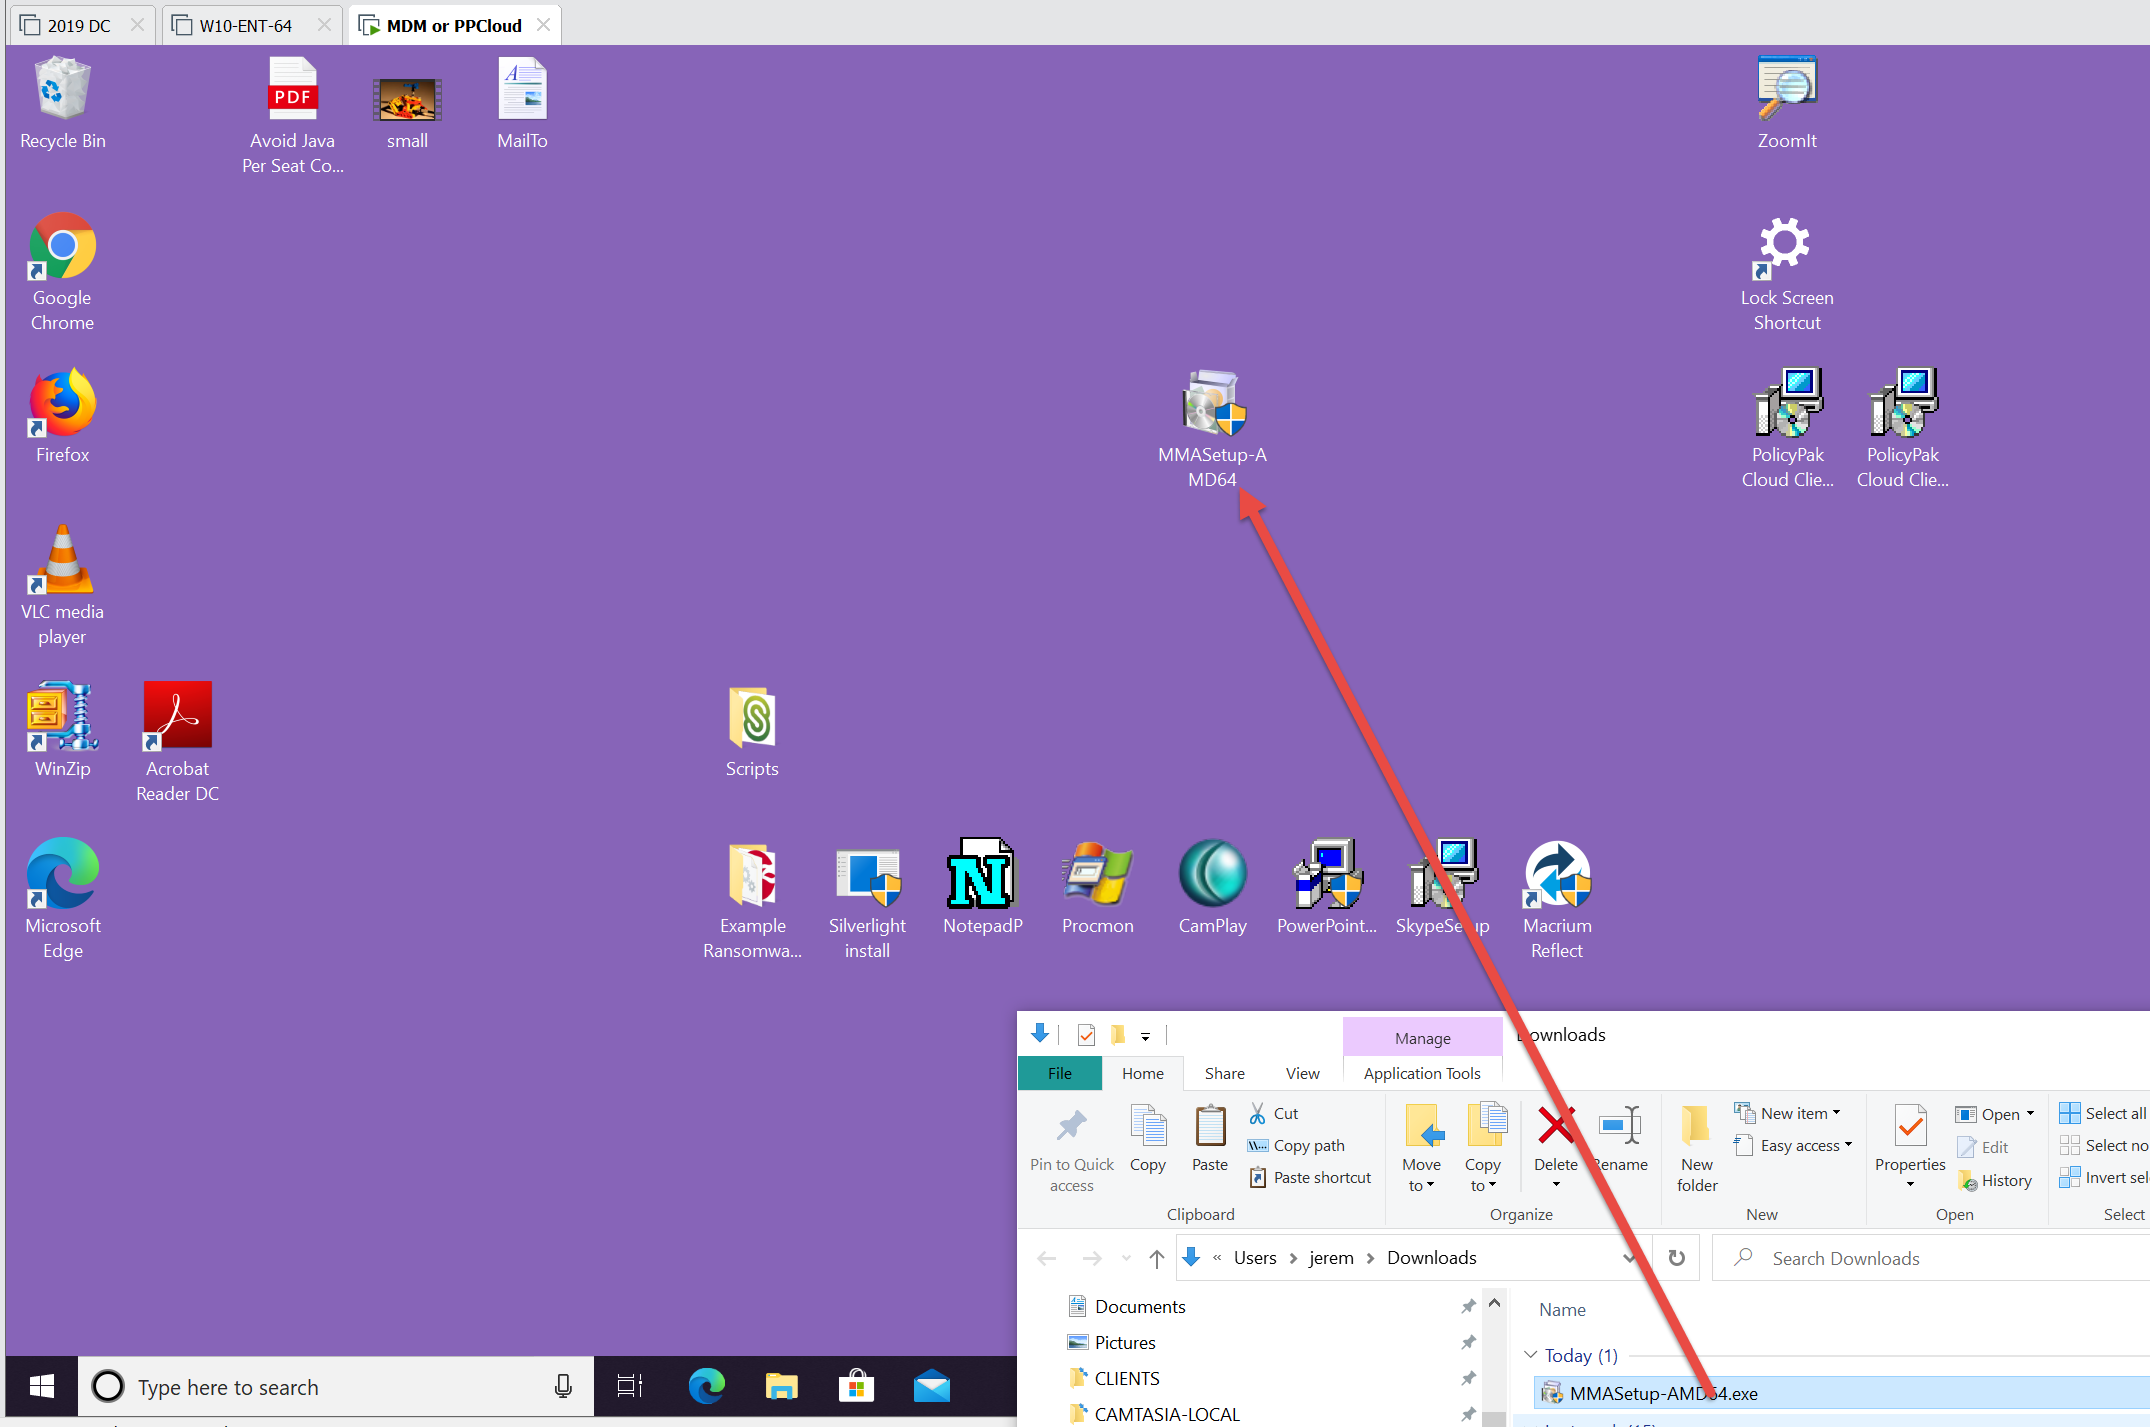
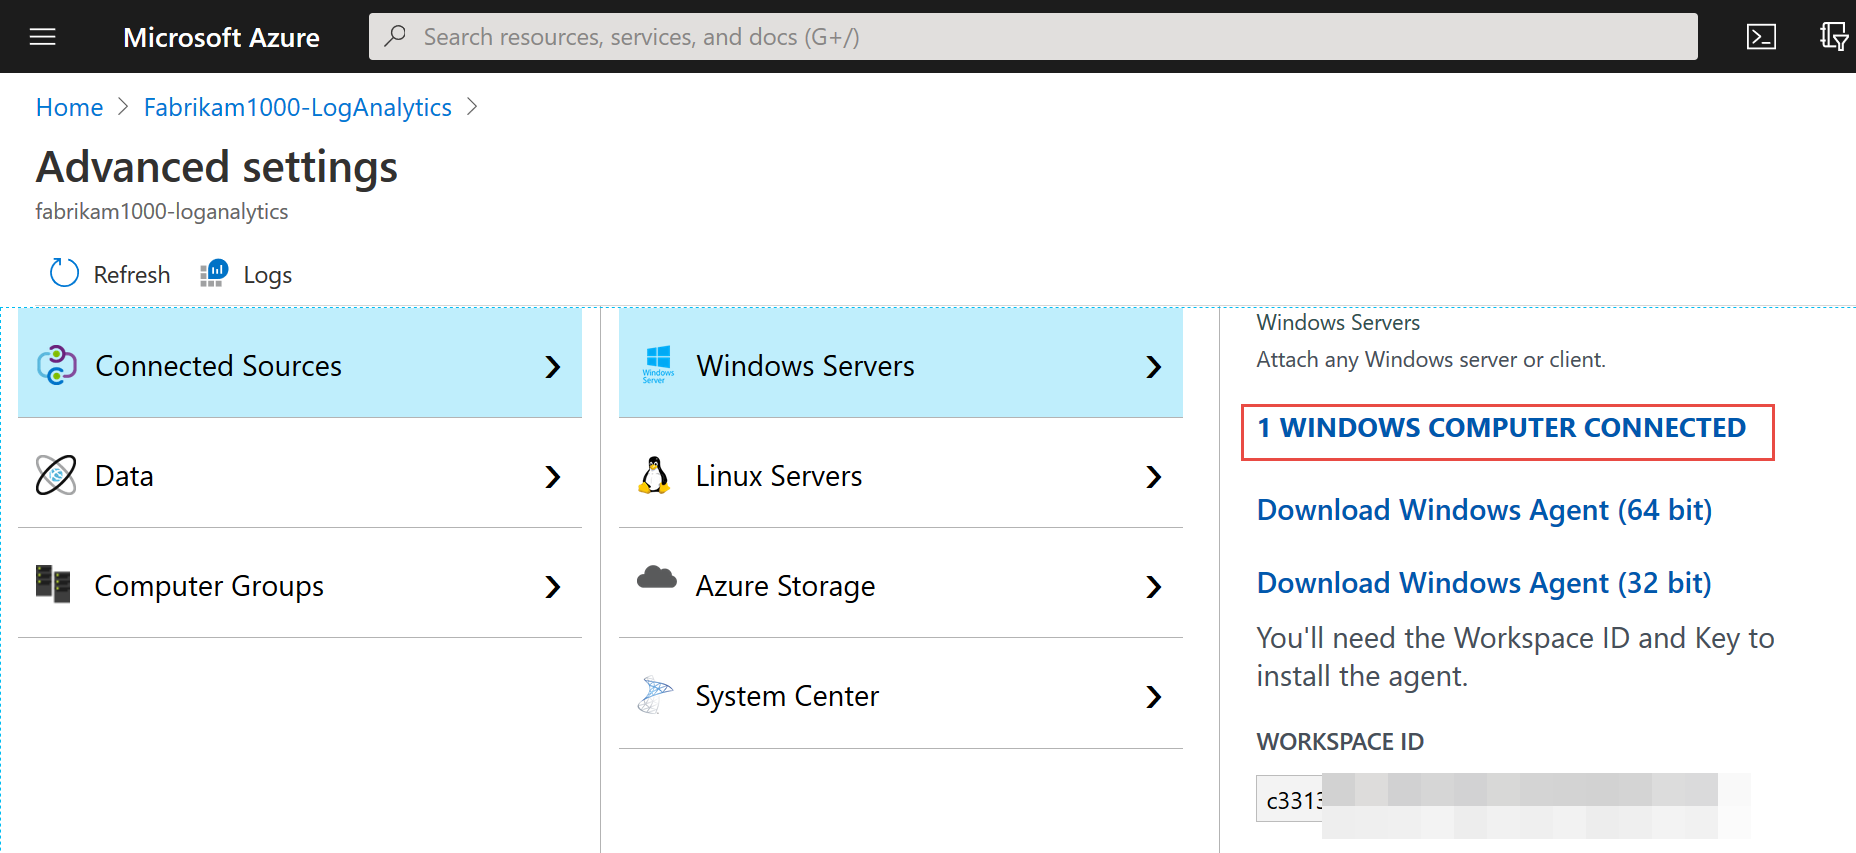
Then you should be thrown into the Advanced settings like what’s seen here. If not, find the Workspace you just created and click Advanced in the left-side menu. It should get you to this place. Note then the “WORKSPACE ID” and “PRIMARY KEY” like what’s seen here. Hang on to those, you’ll need these in a bit. Then also download the Windows Agent 64-bit or 32-bit to get started for your example machines.
In this example, we’ll be installing the LA Agent by hand on a test machine. In real life you could use, say Windows Intune to deploy it with command line options to just chuck in your Workspace ID and Primary Keys and do the whole thing silently and automatically.
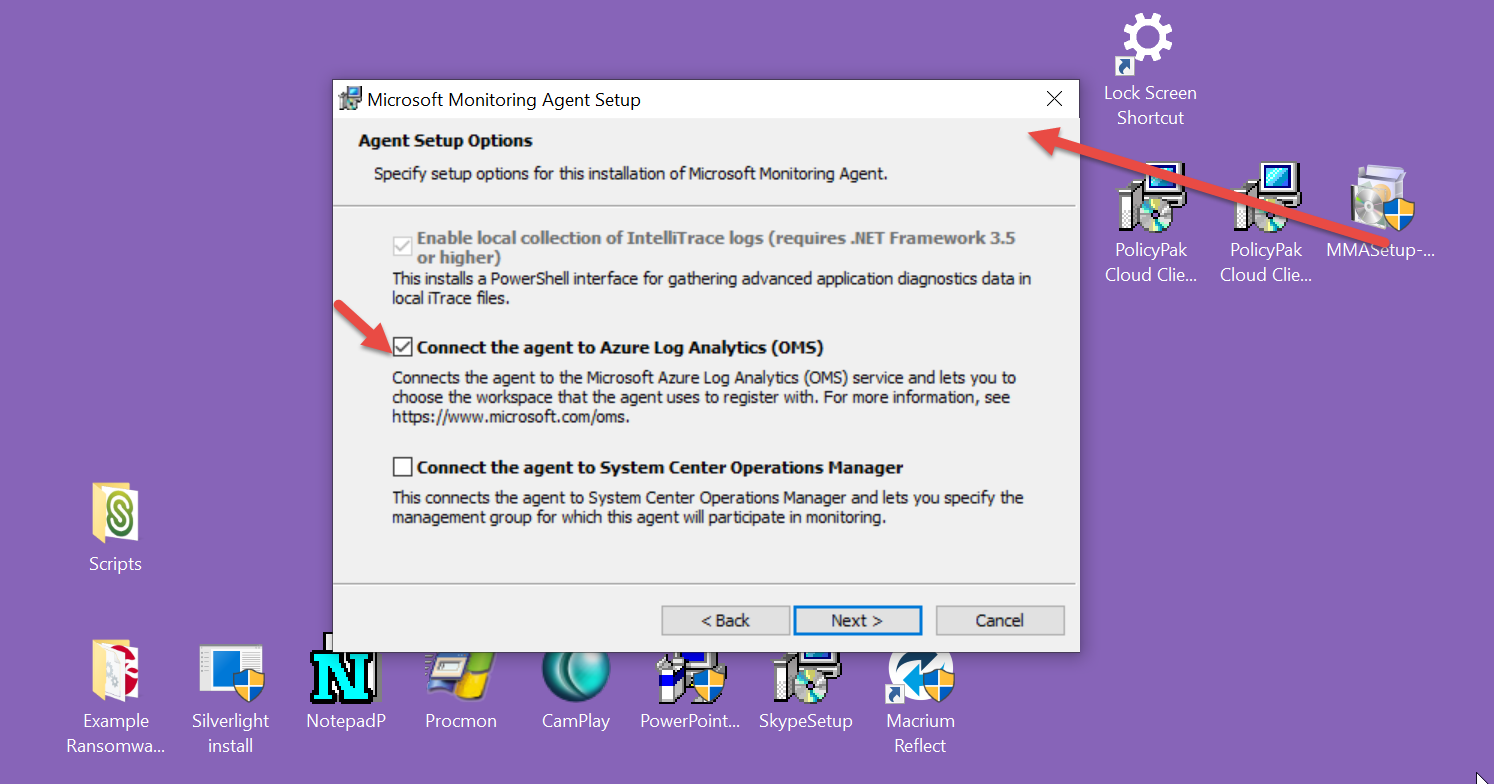
You’ll need to select “Connect the agent to Azure Log Analytics (OMS)” like what’s seen here.
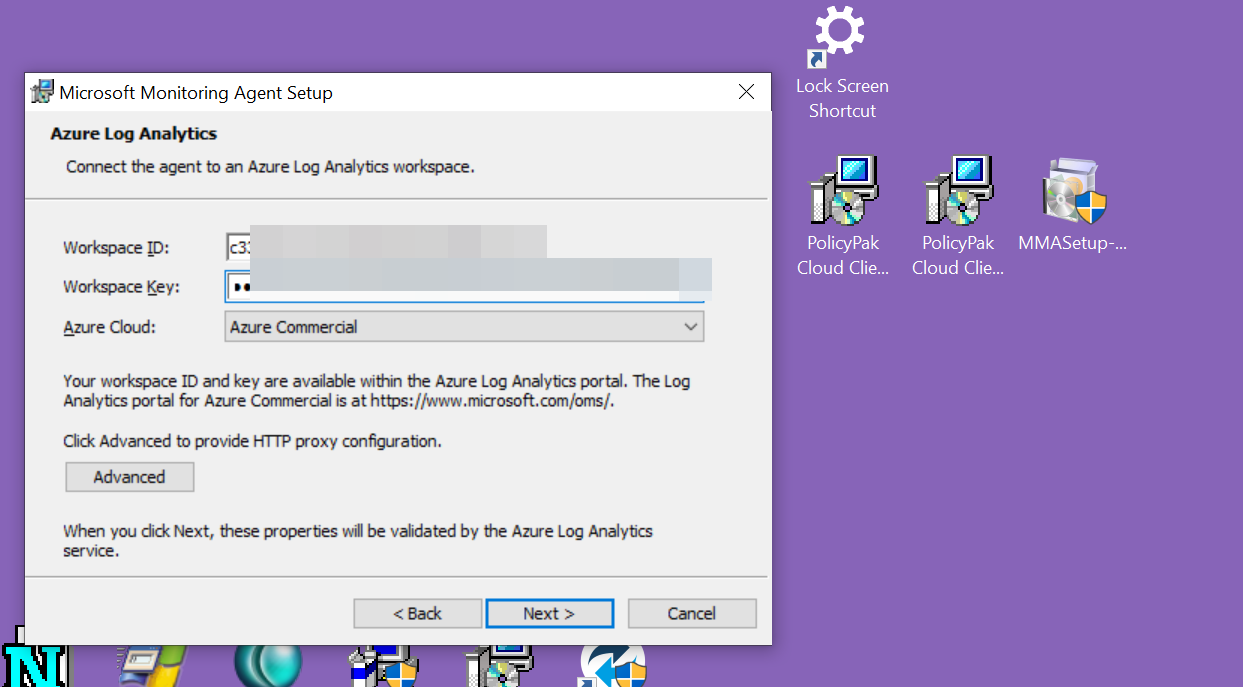
Then, it’s time to chuck in your Workspace ID and Workspace Key. And you’ll likely keep the default of Azure Cloud: Azure Commercial. Pull the pulldown if you have something unusual to select here.
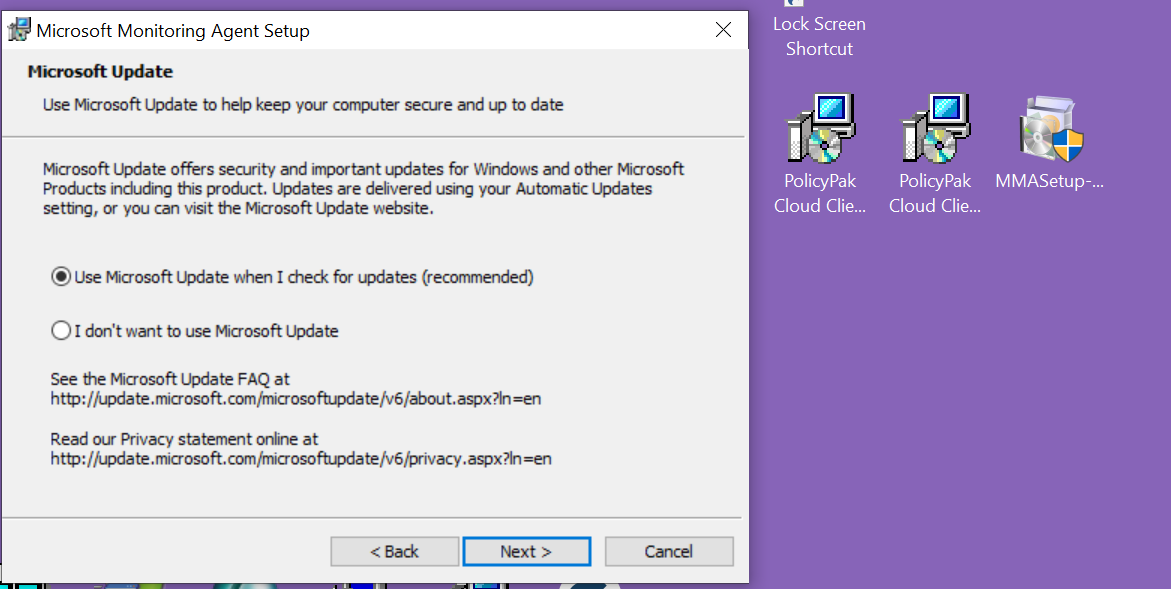
Yes, you want to check for updates when MS Update kicks in….
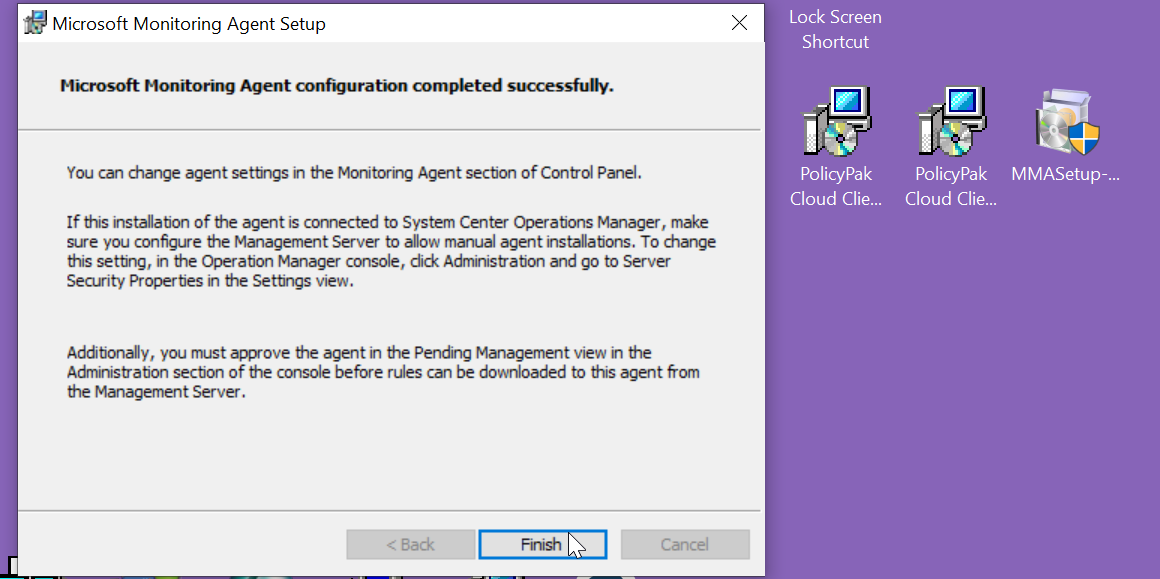
And.. you’re basically done.
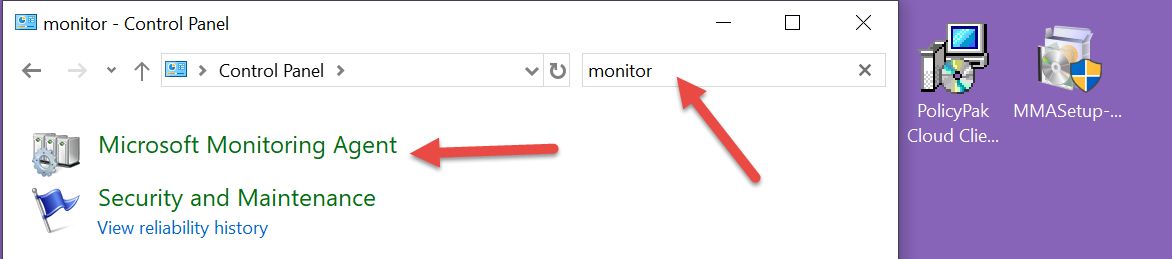
Now let’s make sure we’re talking in both directions. The Microsoft Monitoring Agent is found in Control Panel… which is a weird place, but, hey… that’s okay.
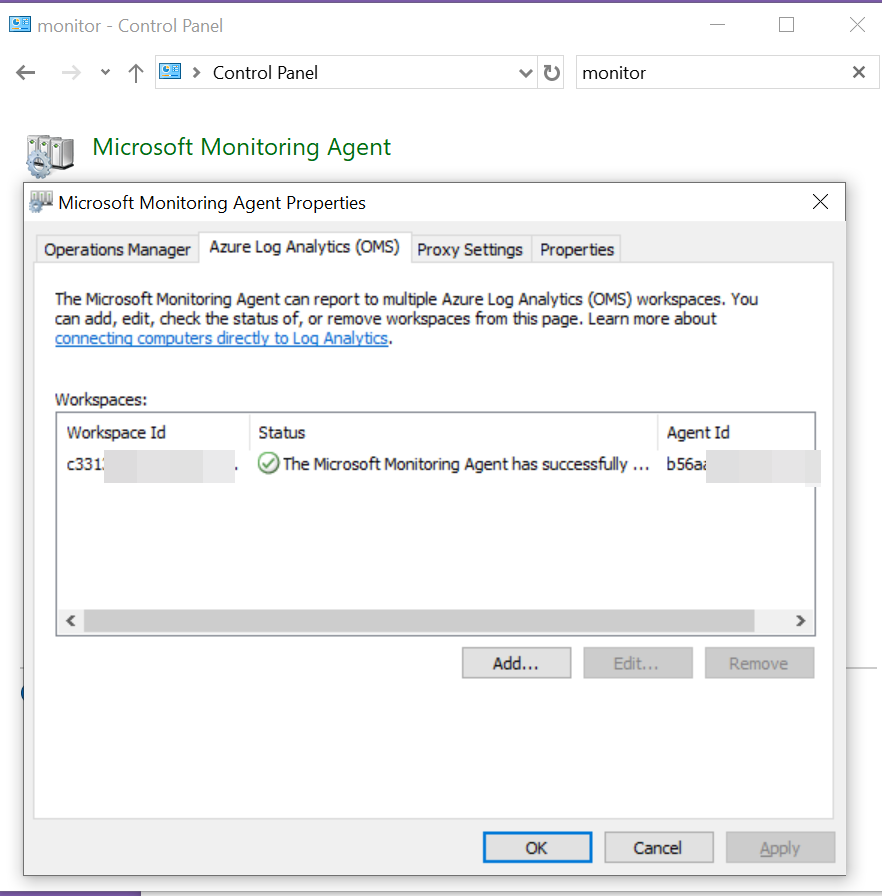
Then click the Azure Log Analytics (OMS) tab and … see you’re talking outbound.
Back in Azure, in the Advanced Settings page, the zero should be one !
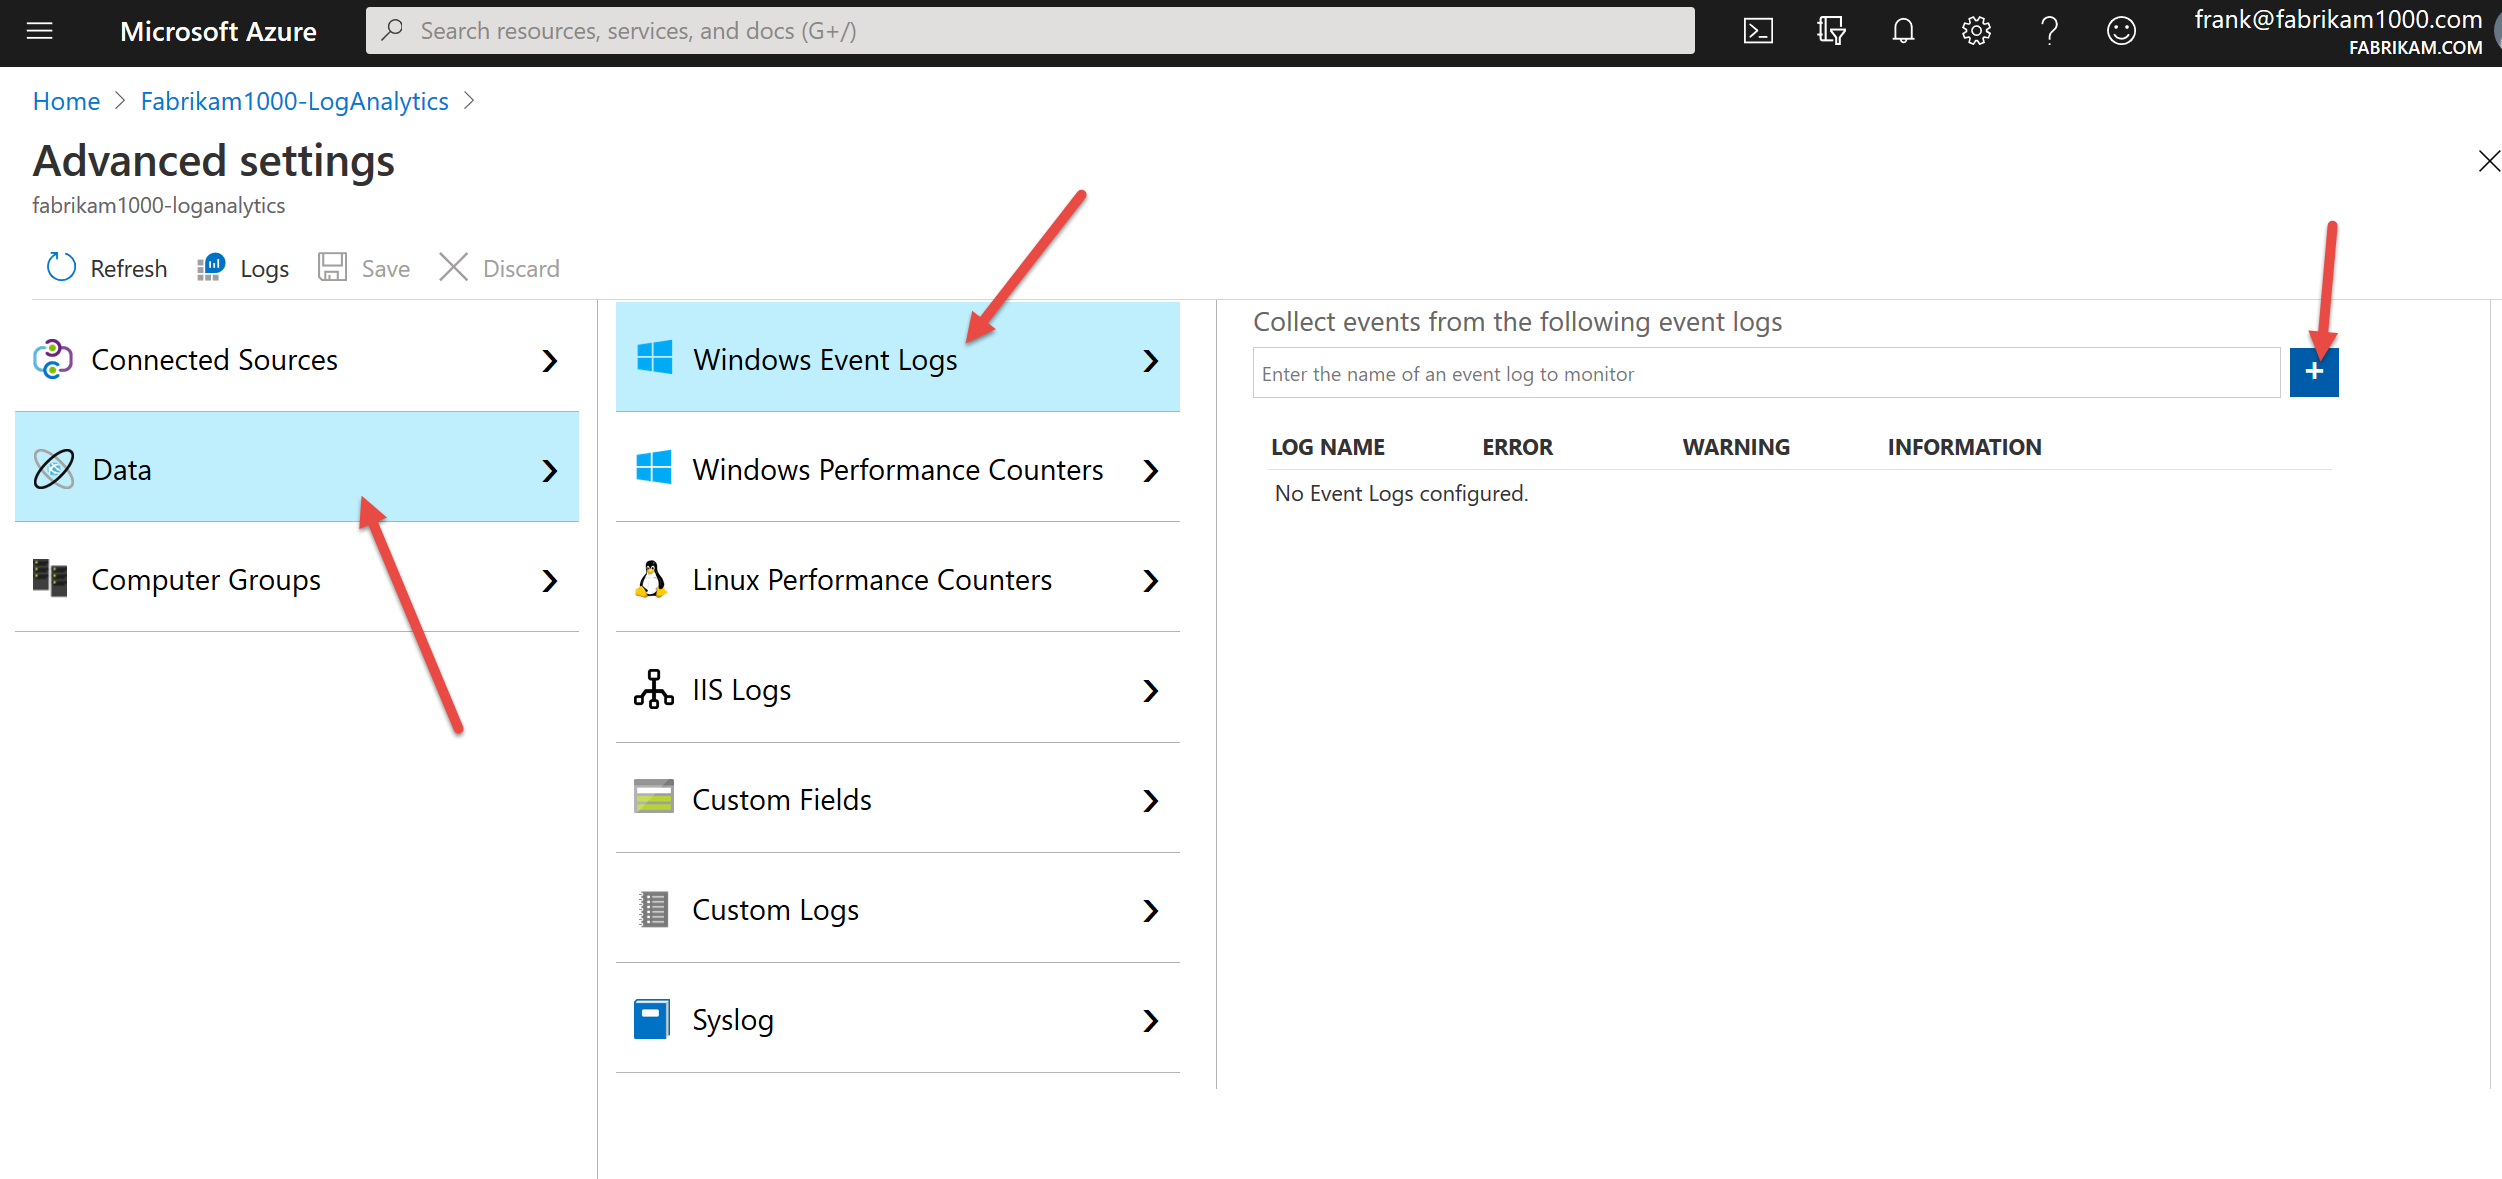
Now it’s time to add in the actual event logs you want to capture. Note that the more you capture, the more you pay. Strictly speaking for the PolicyPak customer I made this blog entry for, he only needed to capture the PolicyPak log (which I do last.) But just for completeness and testing, I’ll capture some more too, since you might not have the PolicyPak Log. (And, why don’t you!? Come on over and check out PolicyPak for Pete’s sake. Really, your sake to be honest.)
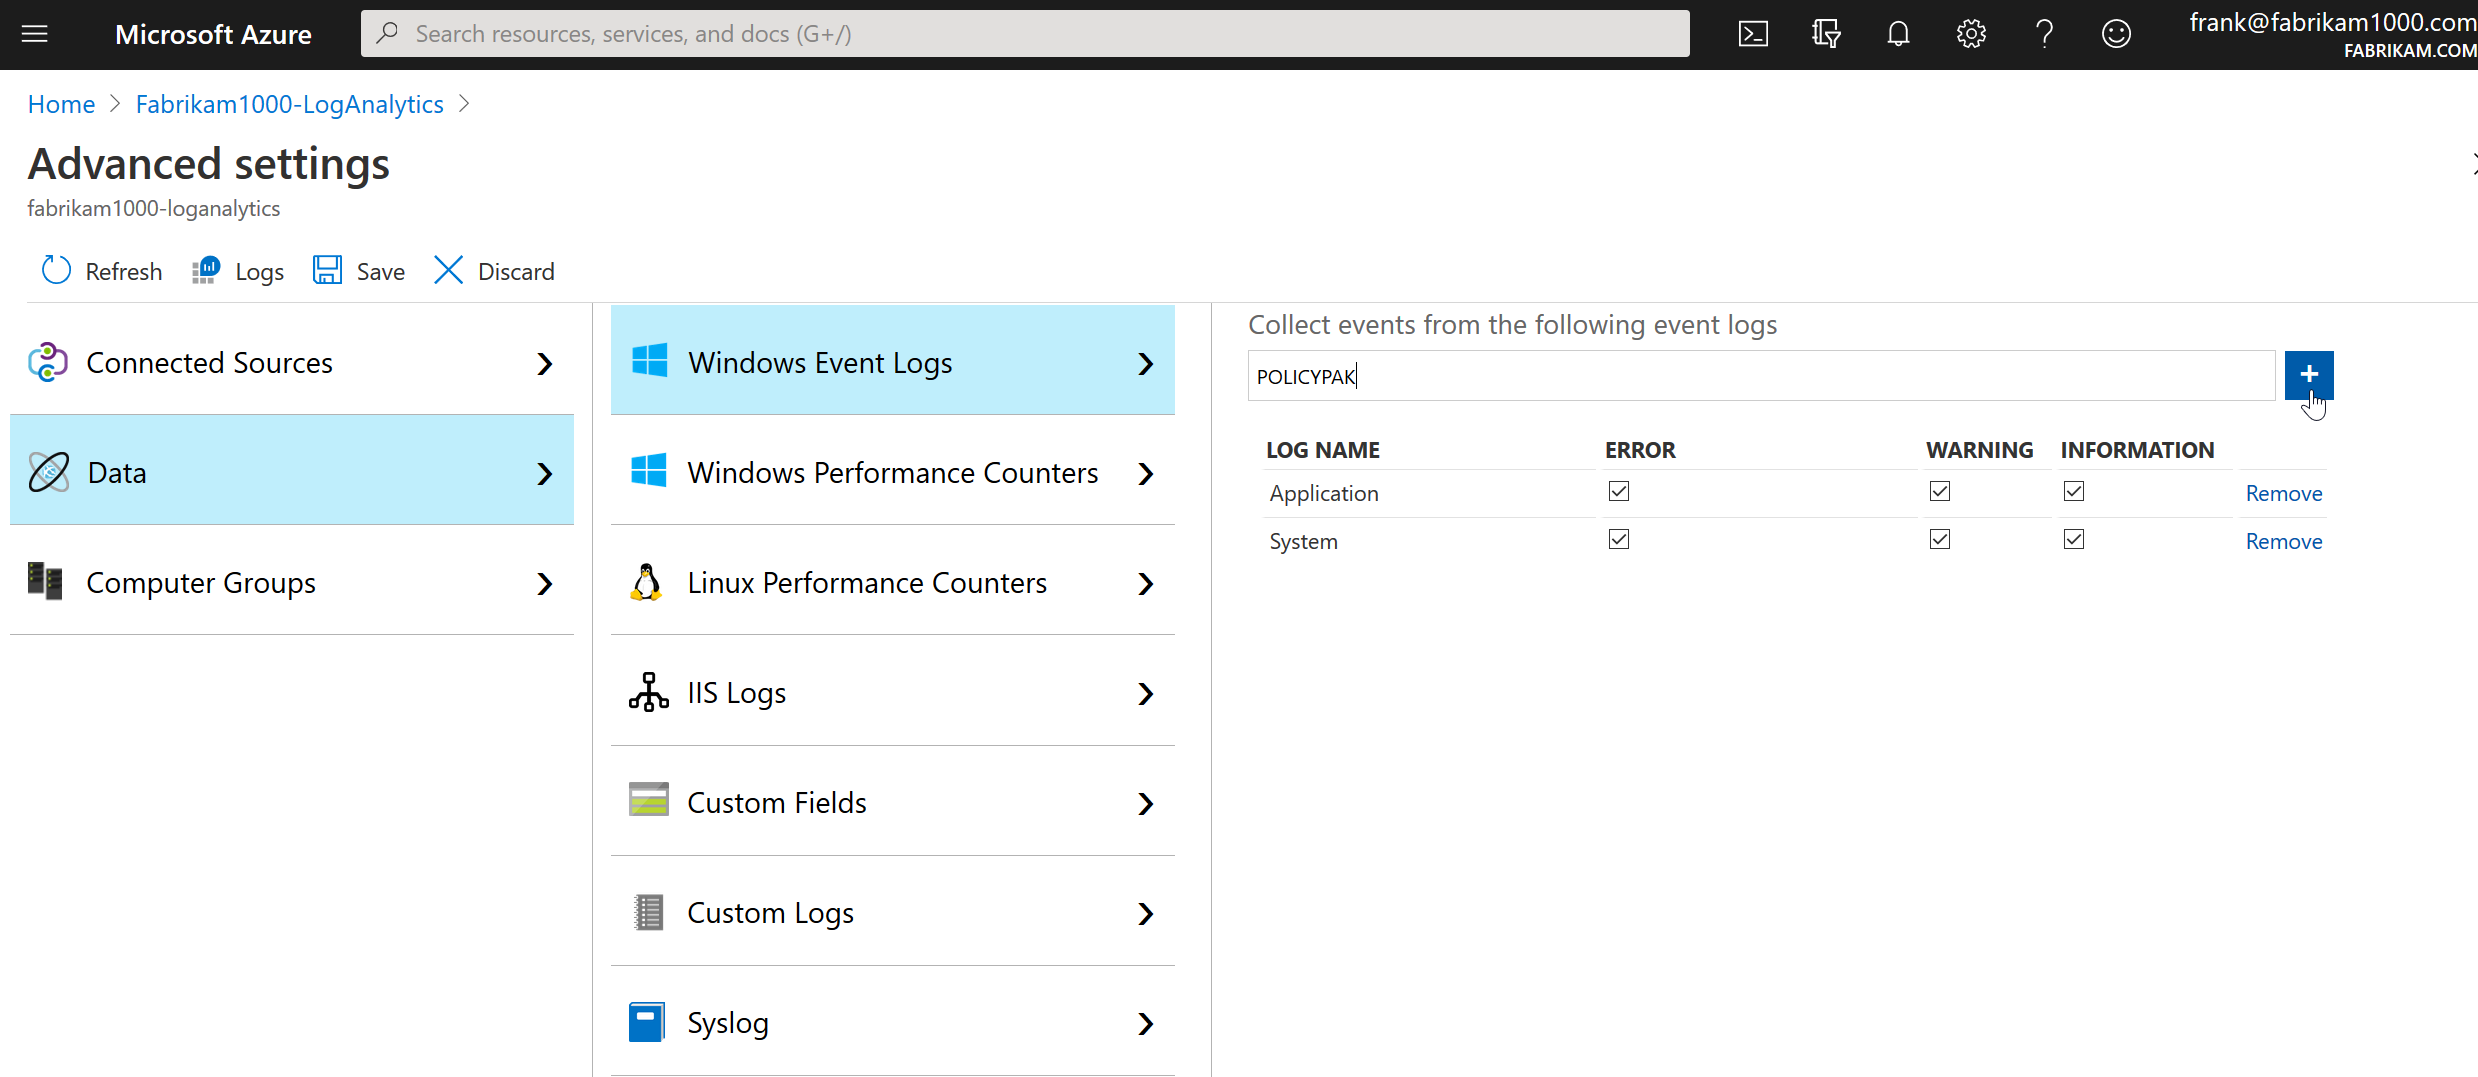
So just type Application then +. Then System and + and bingo. Those are “well known” logs which LA knows about and pre-populates this list. But PolicyPak? Not as common.. (Yet !) Therefore you could take a guess that our event logs are named PolicyPak (they are…). But how would you know?
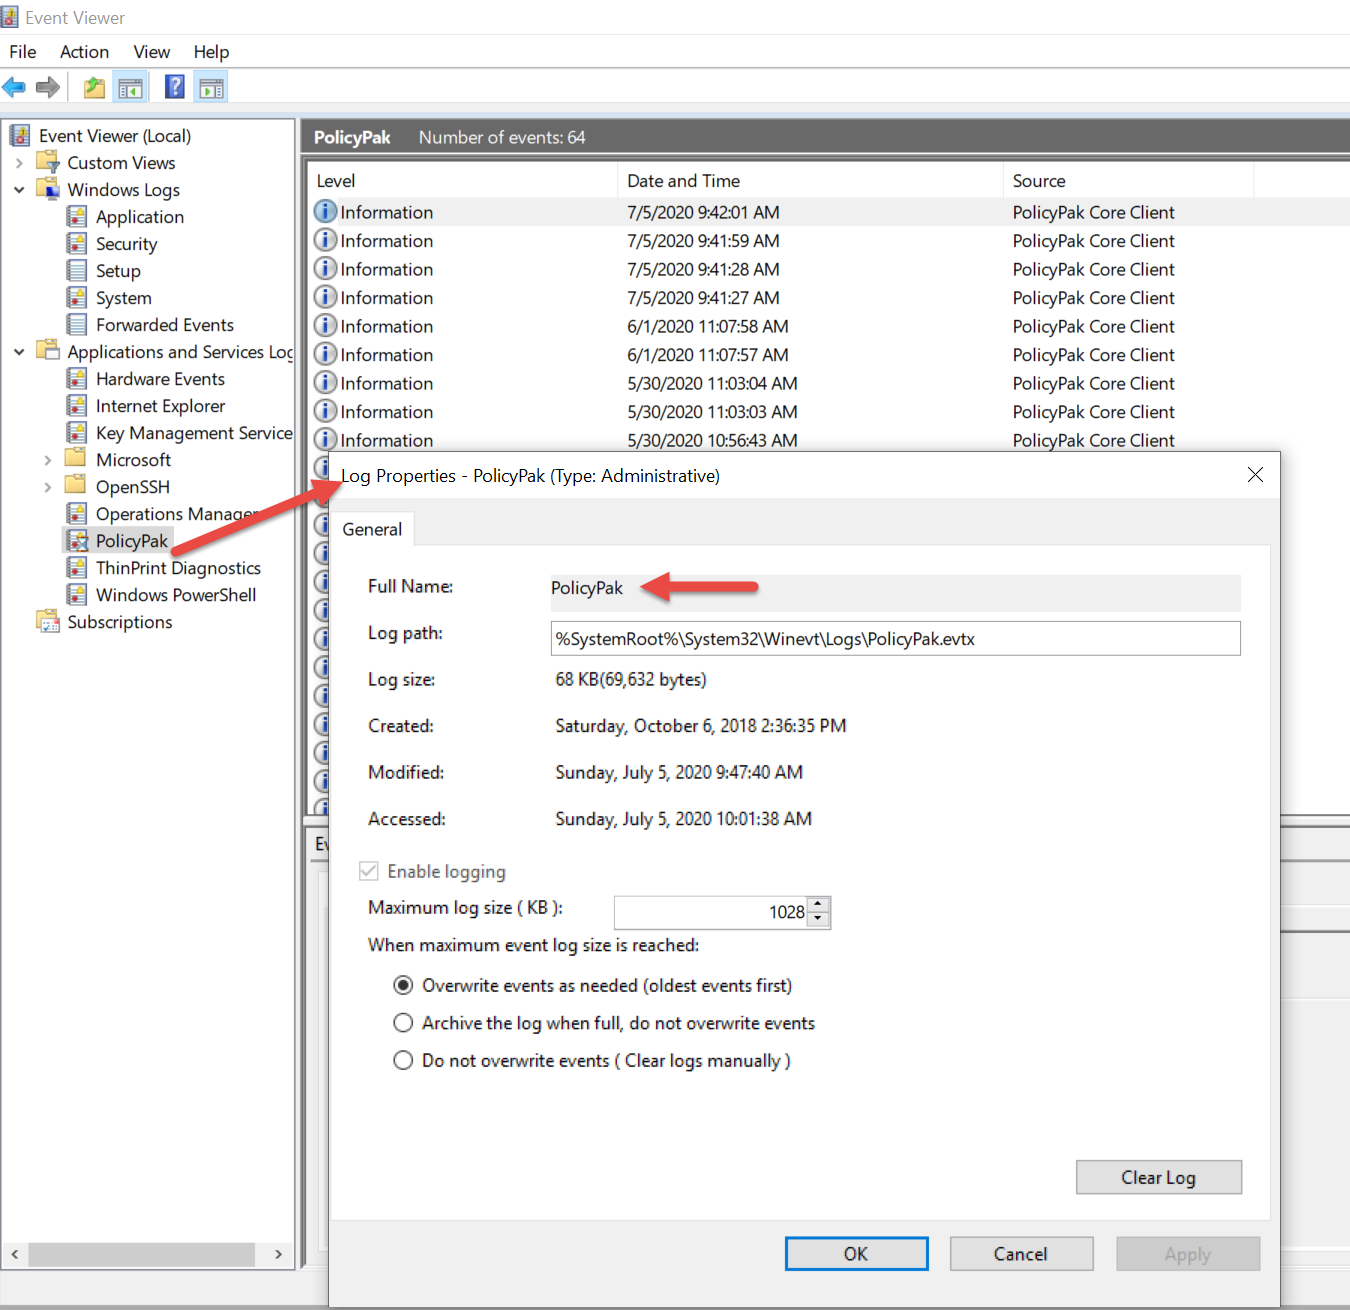
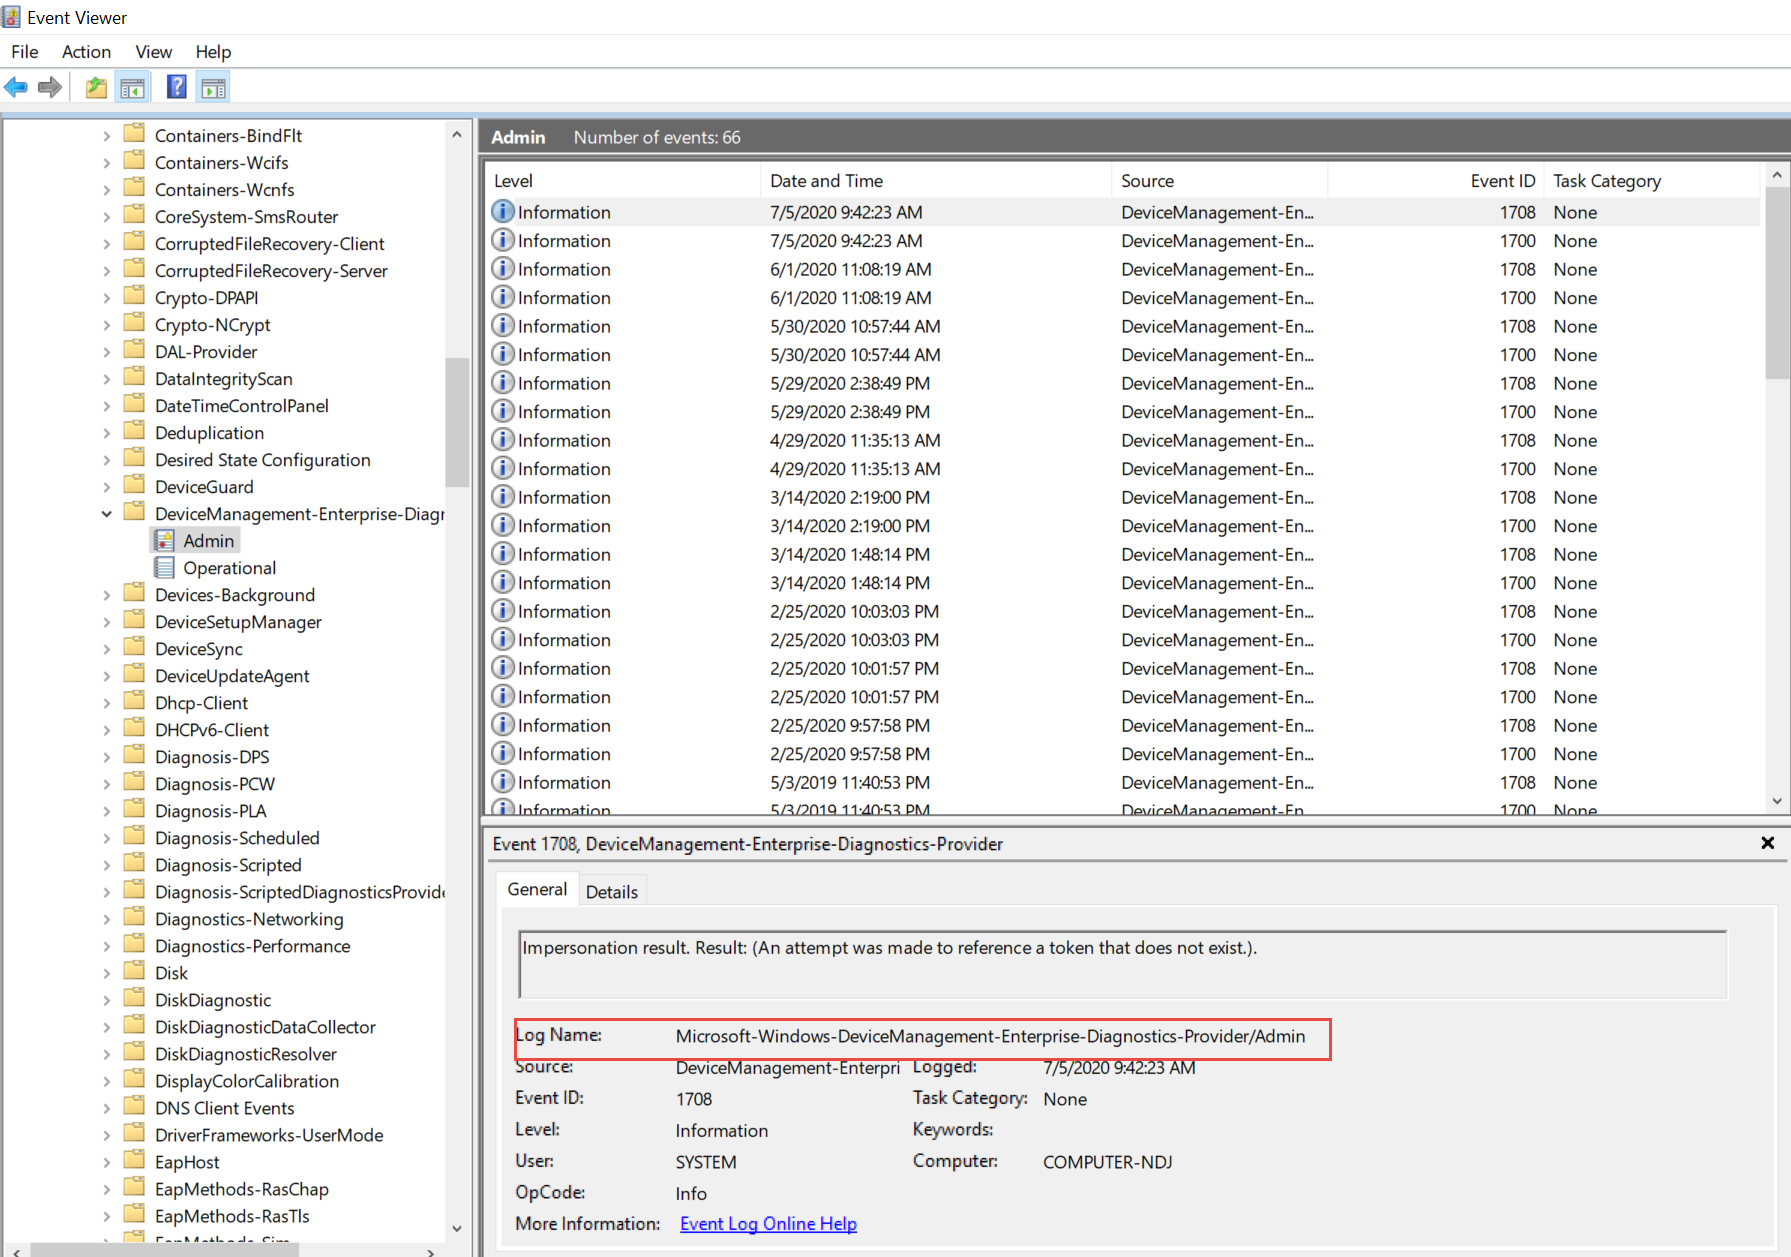
The trick is to find the log you want to capture in Windows, and go to its properties and get its Full Name like what’s seen here. Yeah, this one was easy.
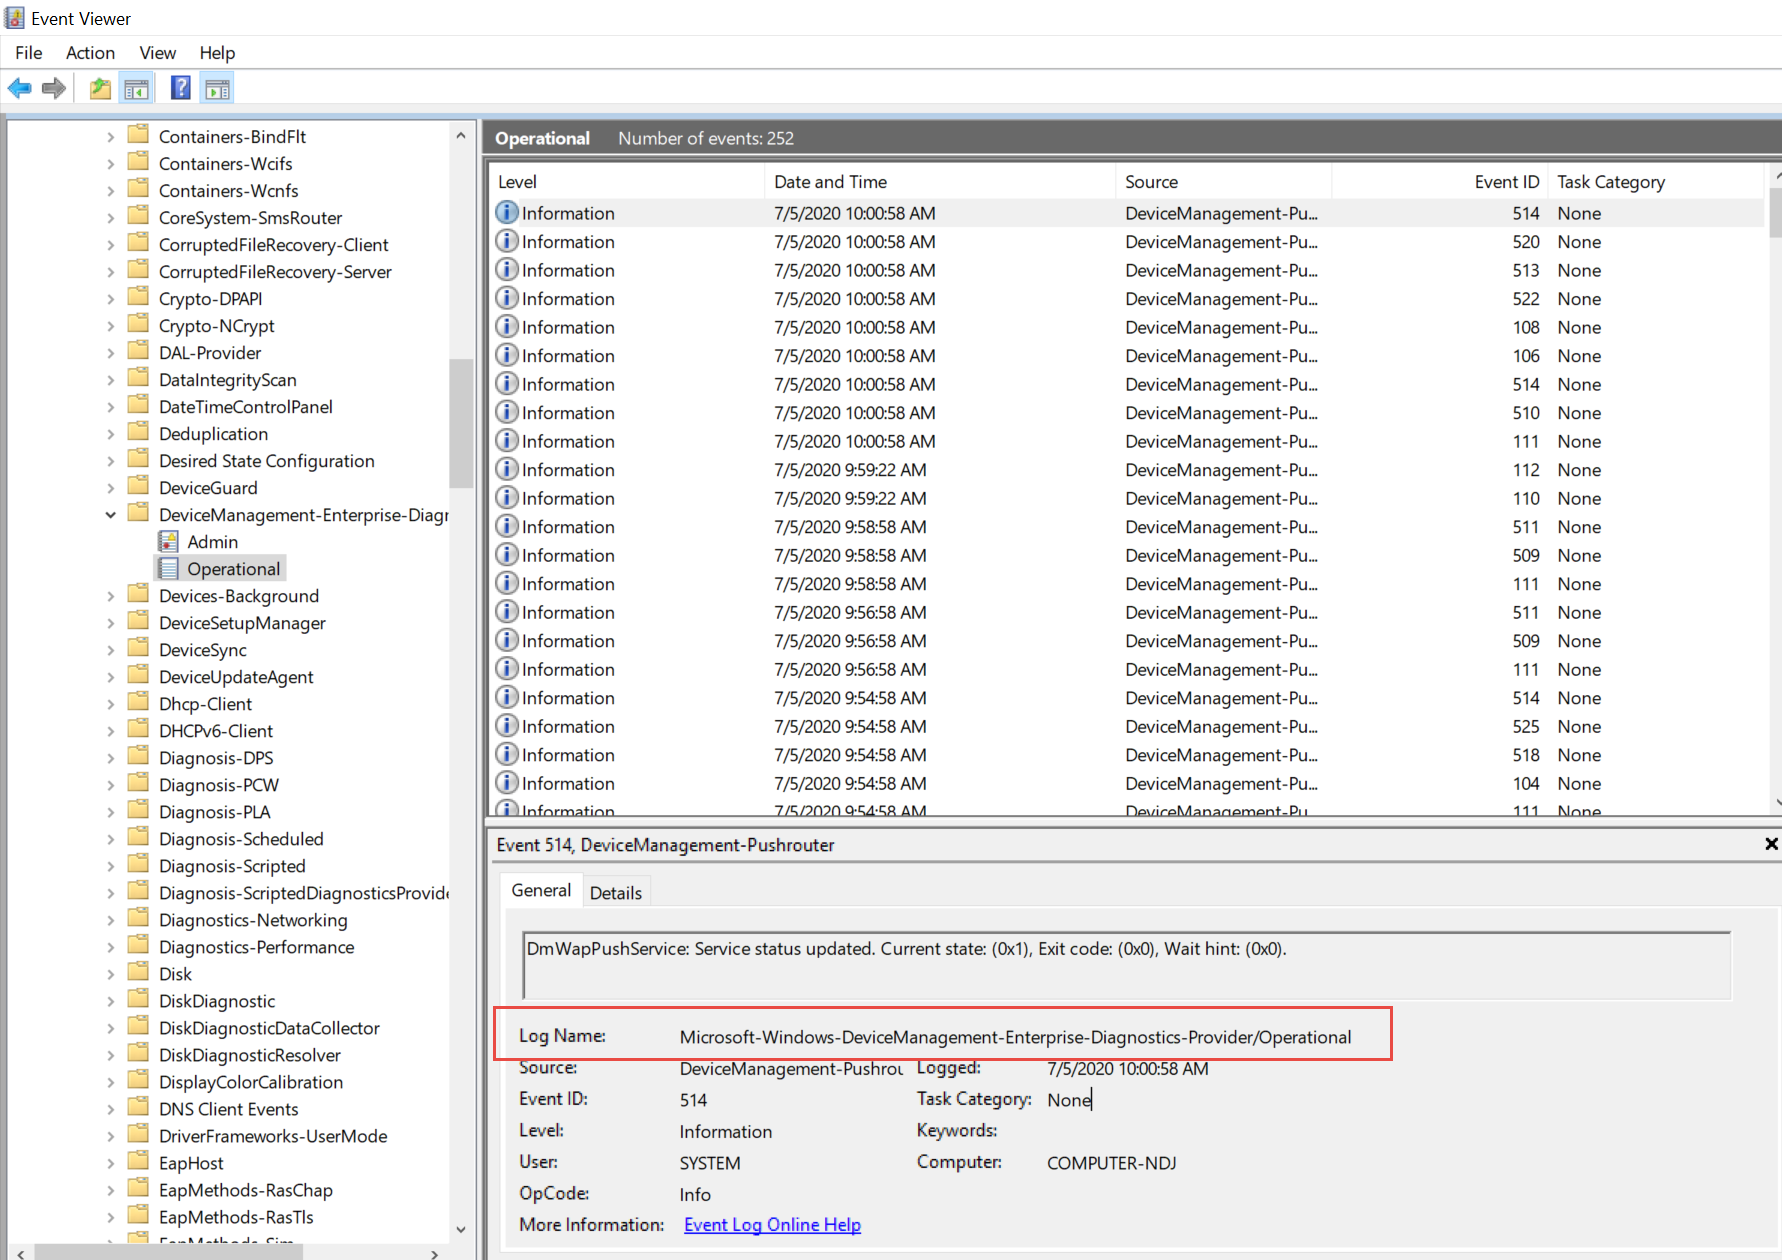
But some are harder. I also wanted to capture the MDM event log which has a goofy and weird name. To get it, I went into an Event inside that log and captured its name microsoft-windows-devicemanagement-enterprise-diagnostics-provider/Operational and its brother microsoft-windows-devicemanagement-enterprise-diagnostics-provider/admin.
You can see that second log here…
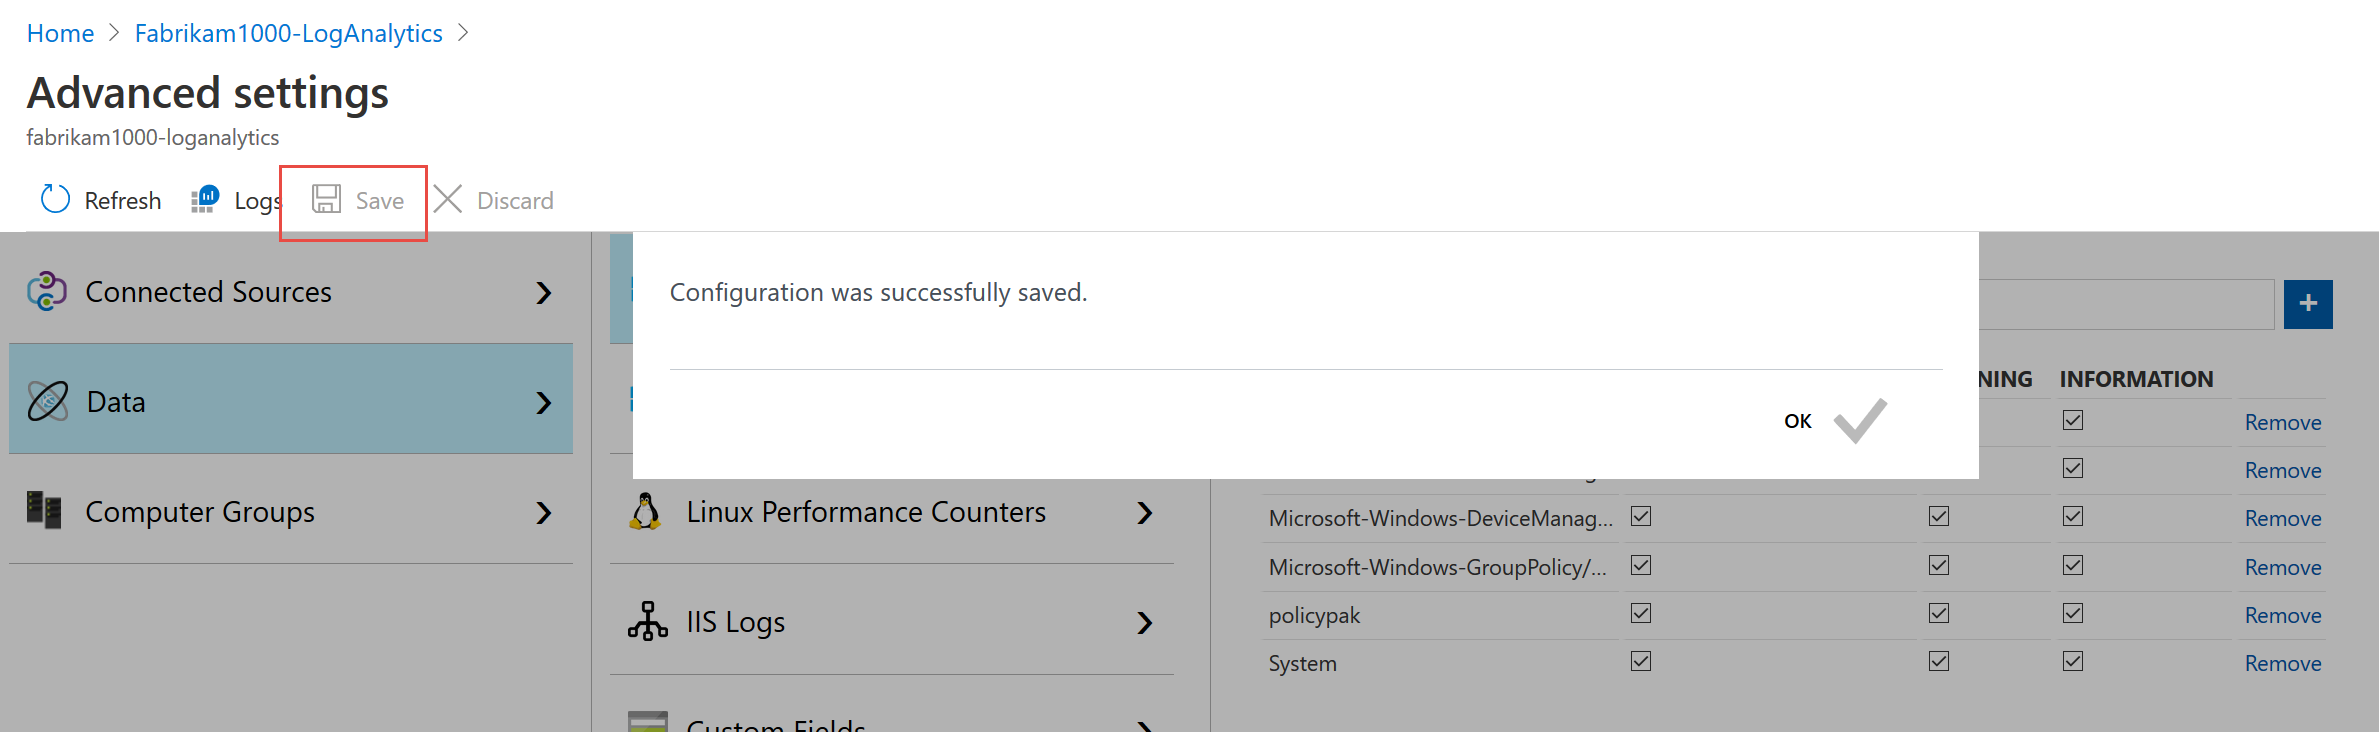
Once I pasted in all the logs and added them, I clicked Save and got this !
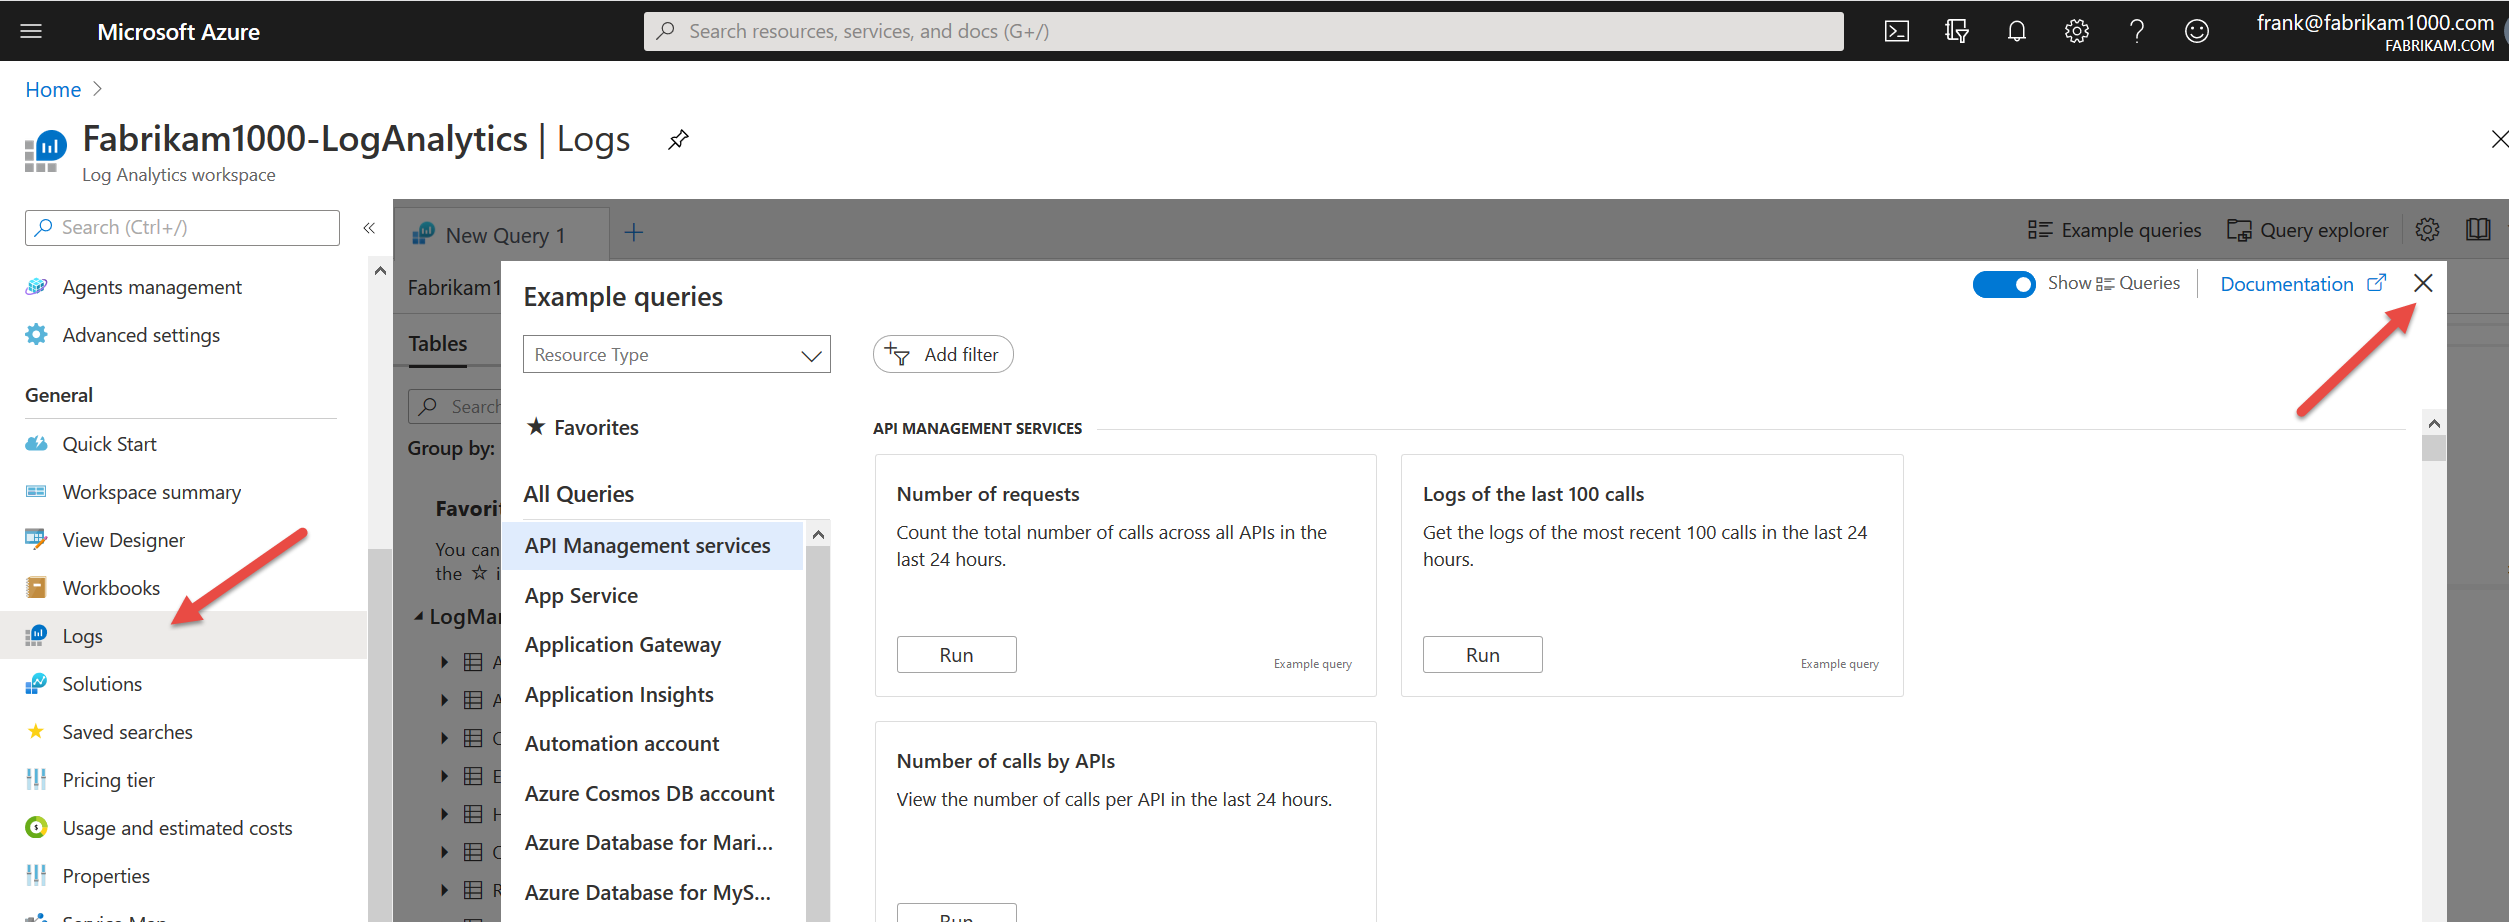
Data.. data? Do we have data ? Click on Logs and close the sample queries. Let’s just see what have. All of it (which shouldn’t be much.)
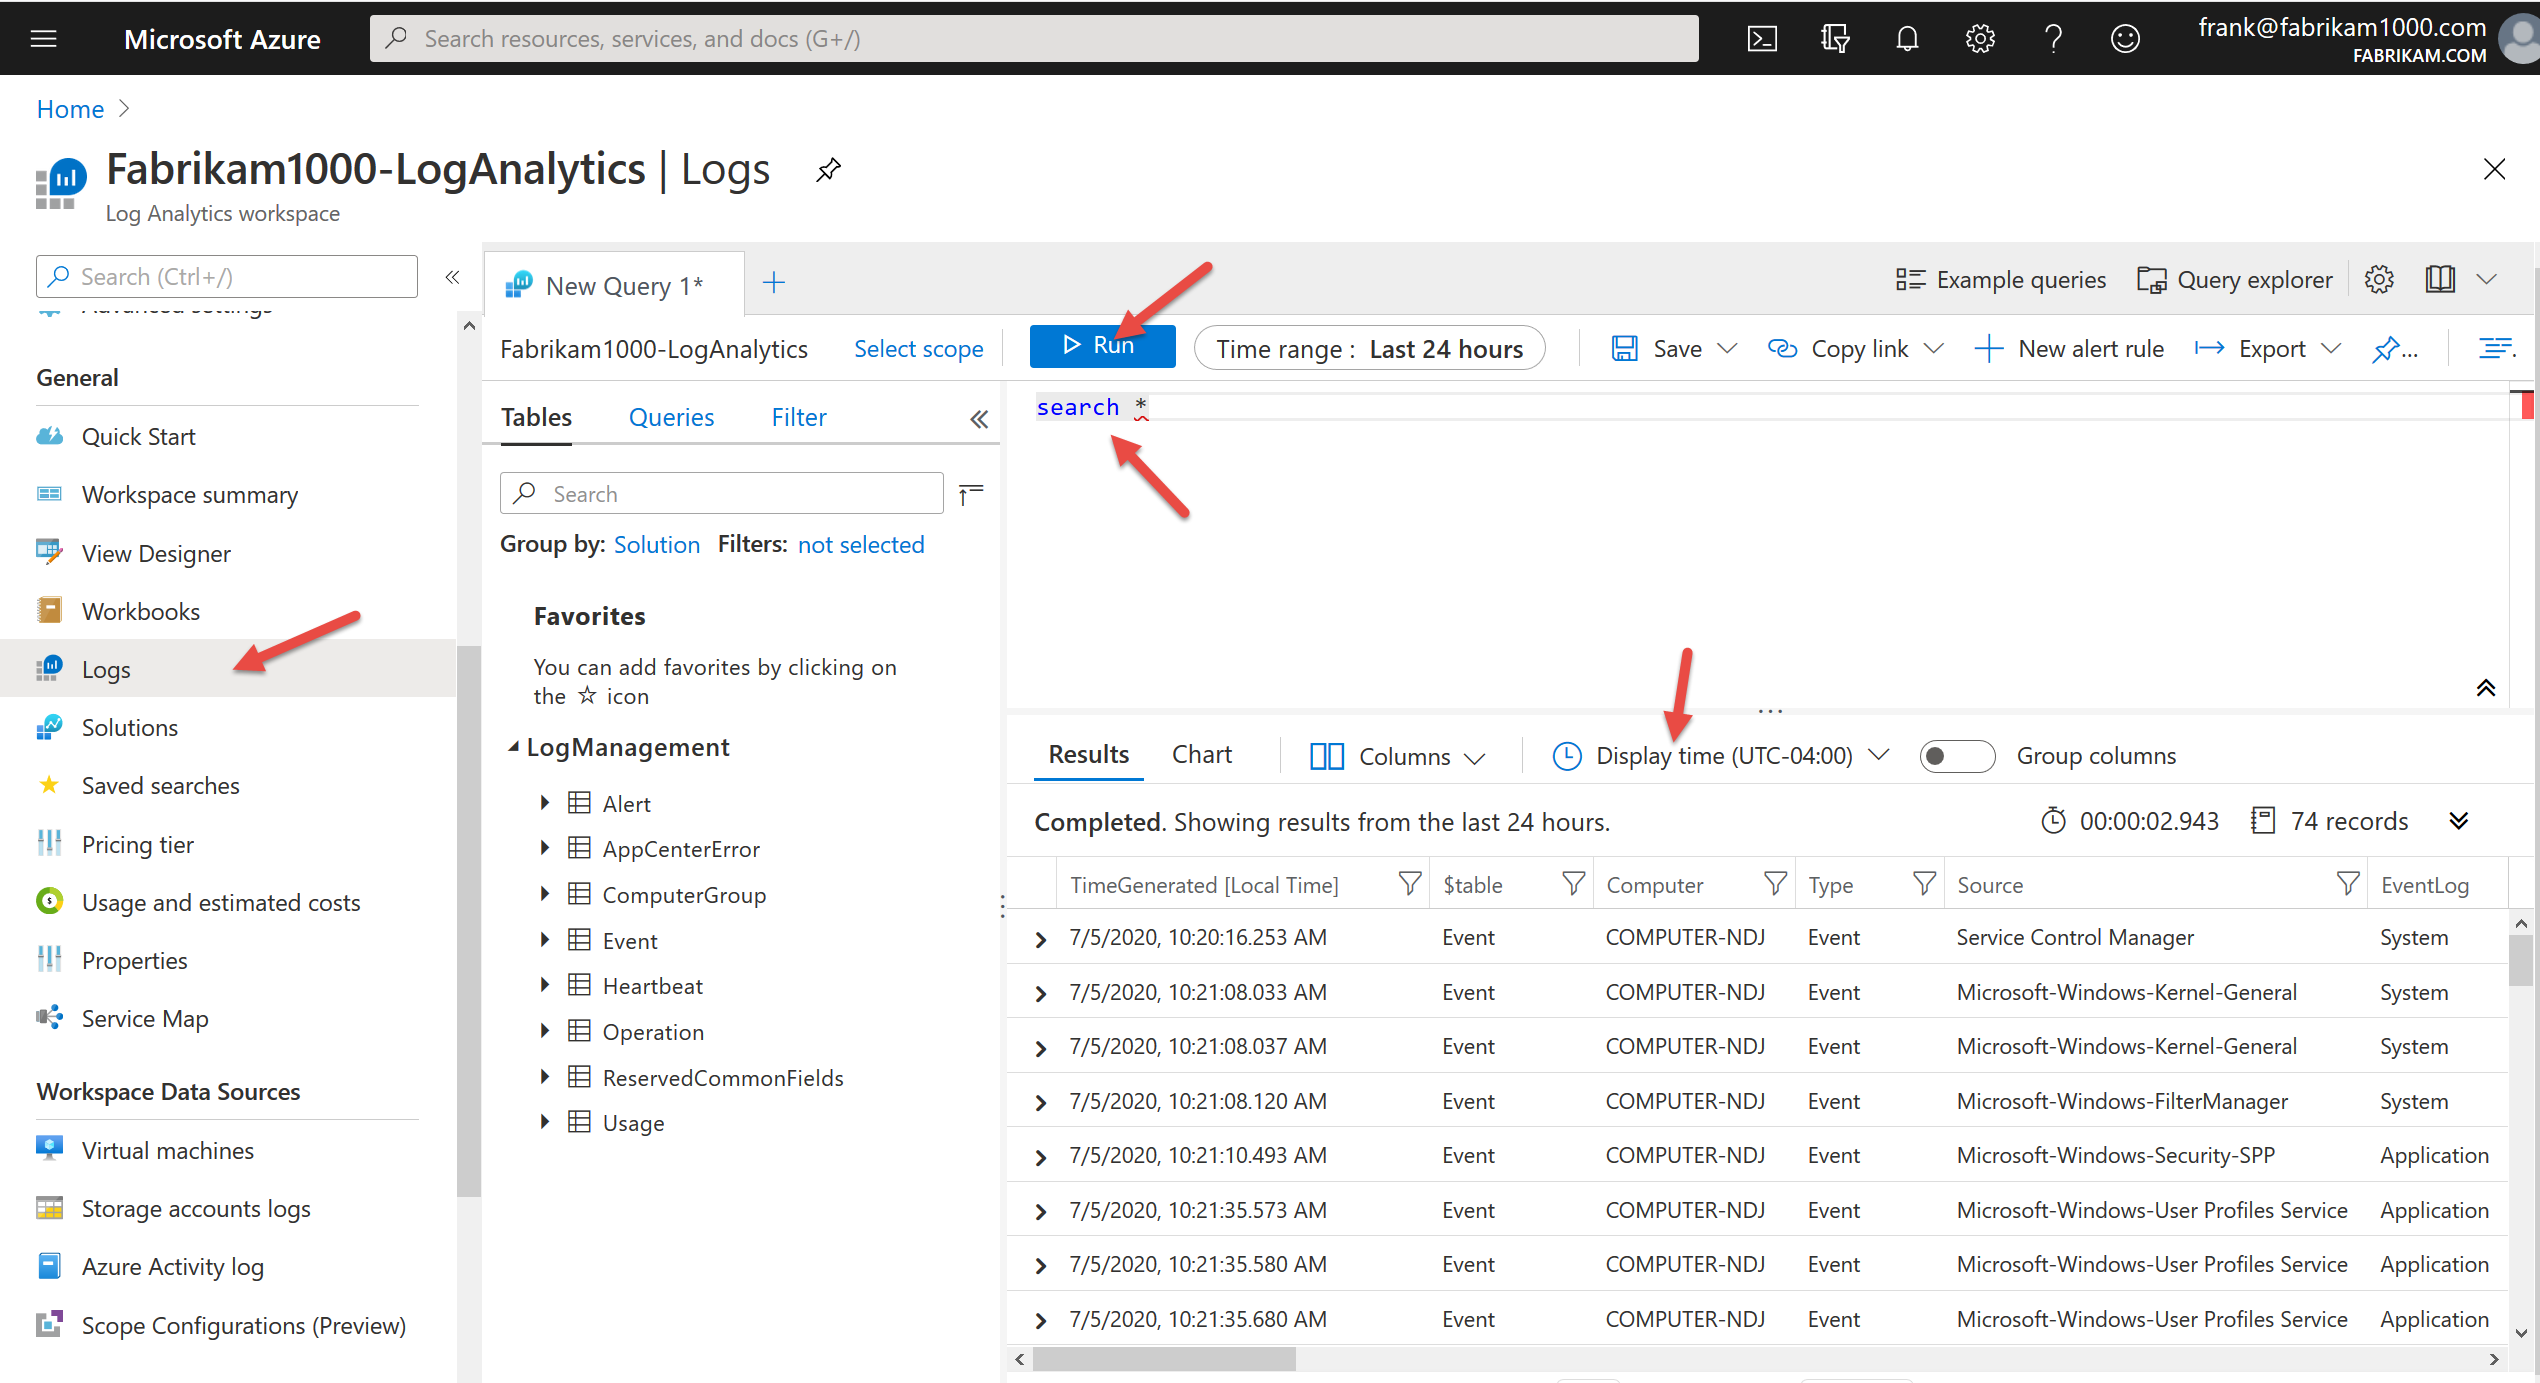
In the top box, type SEARCH *
Then click Run. Bingo.. out should pop all the events that have been captured. You can change the Display Time to make sure that you’re getting the right events, right now.
It took a little while for the non-well-known logs to show up. But maybe it will work faster for you than for me. If you want to give it a shot and try your non-well-known logs, like this, give it a go. Event | where Eventlog == "PolicyPak"
Then click Run again.
Pow! Here come your logs.
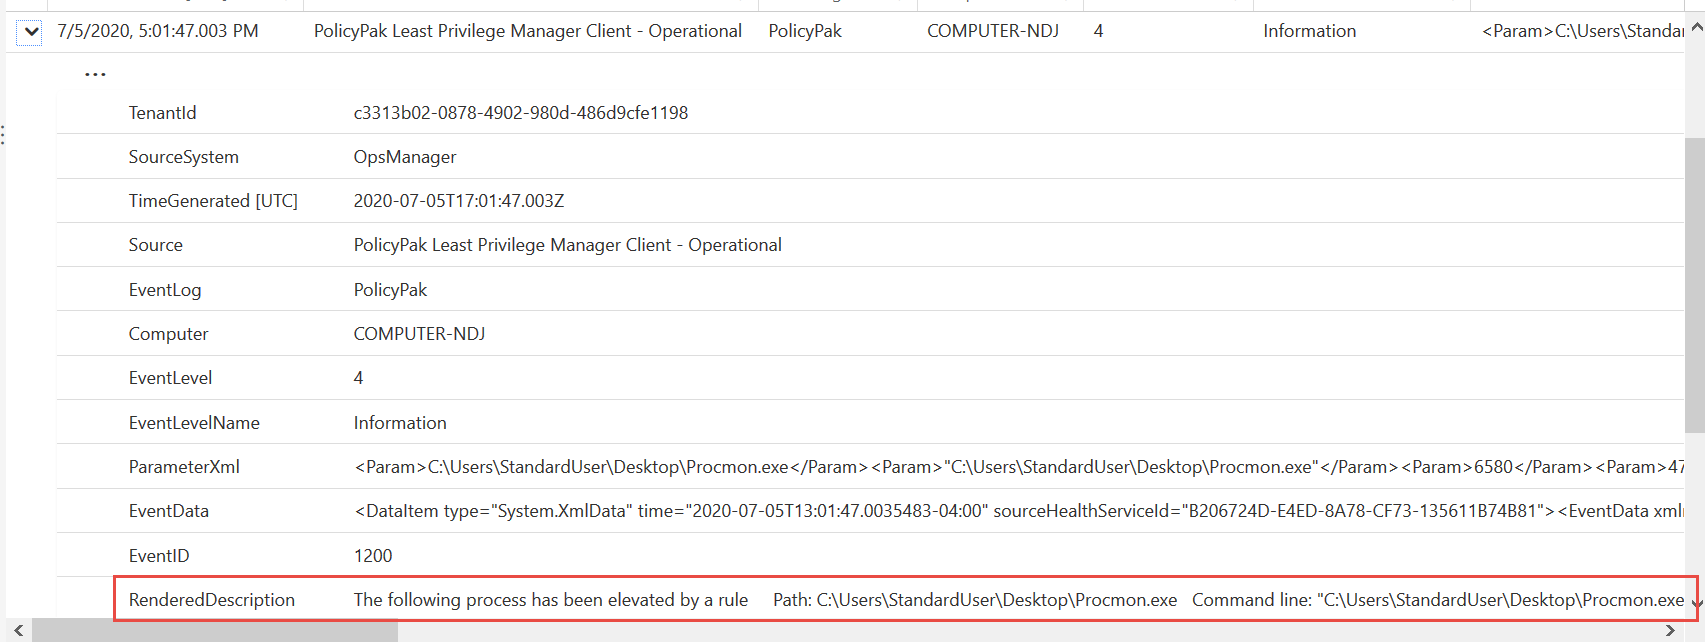
Then I can also dig into an event, and … hey look ! EastSalesUser1 ran Procmon, and PolicyPak did the elevation ! Amazeballs !
That’s it. Well, that’s basics anyway.
Remember this blog is a simple walkthrough / getting started. This isn’t “Magic Tricks with Windows Analytics.” But if I had this guide, I would have been up and running about 10x faster. So I hope this helps you out and shows how you can take on-prem or “Always on the go” Windows 10 machines and record their logs, then sort thru them for actionable items and trends.
There were two big news items this week in GP-land:
1. The Windows "May 2020 Release" for ADMX templates is out. You can get them here. Martin Briklmann on gHacks.Net already did a breakdown of what's new in the ADMX templates, so I don't have to. That review / overview is here. Nice job.
2. A research team uncovered a flaw in GPPrefs CSE User Based items.The basic gist is that GPPrefs User Side items (were) storing user policies in a user-writable %localappdata%\Microsoft\Group Policy\History directory when Remove this Item when it is no longer applied option is enabled. When GPupdate is called, the contents are read. If "evil" contents are present, the GPupdate process will perform the processing of those evil contents. As such, Microsoft fixed this in CVE-2020-1317. More reading about it and the direct download links to the patches can be found here.
This isn't an underlying problem in GP "the engine" itself; but rather GPPrefs and then specifically the user-side policies, and specifically, the printer policies. The patch will then change the location from user-space to ProgramData space when GPPrefs User side stores these values.
MDM administrators that utilize Microsoft Endpoint Management (Intune) are familiar with the concept of Security Baselines. A security baseline is a collection of Microsoft recommended configuration settings that help secure and protect enterprise users and devices. For instance, MEM offers security baselines for Windows 10, Microsoft Defender ATP and Edge. Security baselines are an easy and effective way for admins to ensure that they are consistently enforcing a minimum security level that will address fundamental security and compliance issues. Some admins may be surprised that security baselines are available for Group Policy as well.
The Benefits of Using Security Baselines
While it is perfectly ok to configure your own MDM profile or GPO to select and configure available settings, baselines are a quick and easy way to enforce a default baseline that prevents users from making changes that will result in an insecure state. There are a number of benefits of using security baselines offered by Microsoft.
They are already configured by Microsoft security experts
They enforce settings that mitigates contemporary security threats.
Baseline settings have been pretested to ensure that they do not cause operational issues that are worse than the risks they mitigate
They ensure that users and device configuration settings are compliant with the baseline
Security Baselines are not just for MDM
Microsoft has been releasing Security baselines since the Windows XP days. Because Group Policy offers far more settings than MDM, the simplification that they offer for AD environments is even more of a benefit. For instance, there are more than 200 Microsoft Edge Group Policy settings for Windows, but only some of these are security related. By implementing Microsoft Edge baselines, you can rest assure that you are deploying the most up-to-date security settings for Microsoft Edge using your GPO environment.
Security Baseline for Microsoft Edge v83
Microsoft just recently announced the release of the Microsoft v83 of Microsoft Edge. Microsoft continues to release new versions and settings for the new Chromium Edge browser. Version 83 includes 19 new computer and user based settings. The accumulated total of Edge settings currently stands at 311 Computer policy settings and 286 User configuration policy settings. The current baseline involves 12 of these settings which are identical to the v80 security baseline.
To obtain the security baseline for Microsoft Edge, you need to download the Security Compliance Kit. The compliance kit the following:
Importable GPOs
A script to apply the GPOs to local policy
A script to import the GPOs into Active Directory Group Policy
A spreadsheet documenting all recommended settings in spreadsheet form
Policy Analyzer rules
GP Reports
Documentation
Implementing the Baseline into your AD Environment
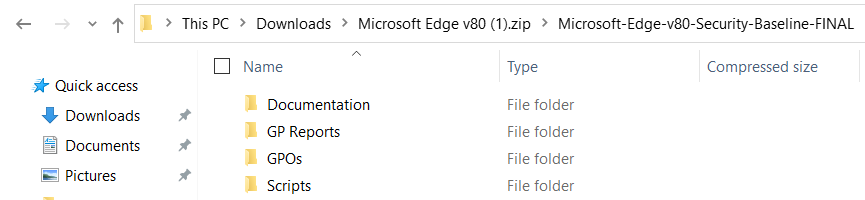
Keep in mind that you must have the Edge v83 ADMX files contained within your Central Store as a prerequisite. Once you download the toolkit, open the Scripts folder and run either the local policy script or the AD import script as shown below.
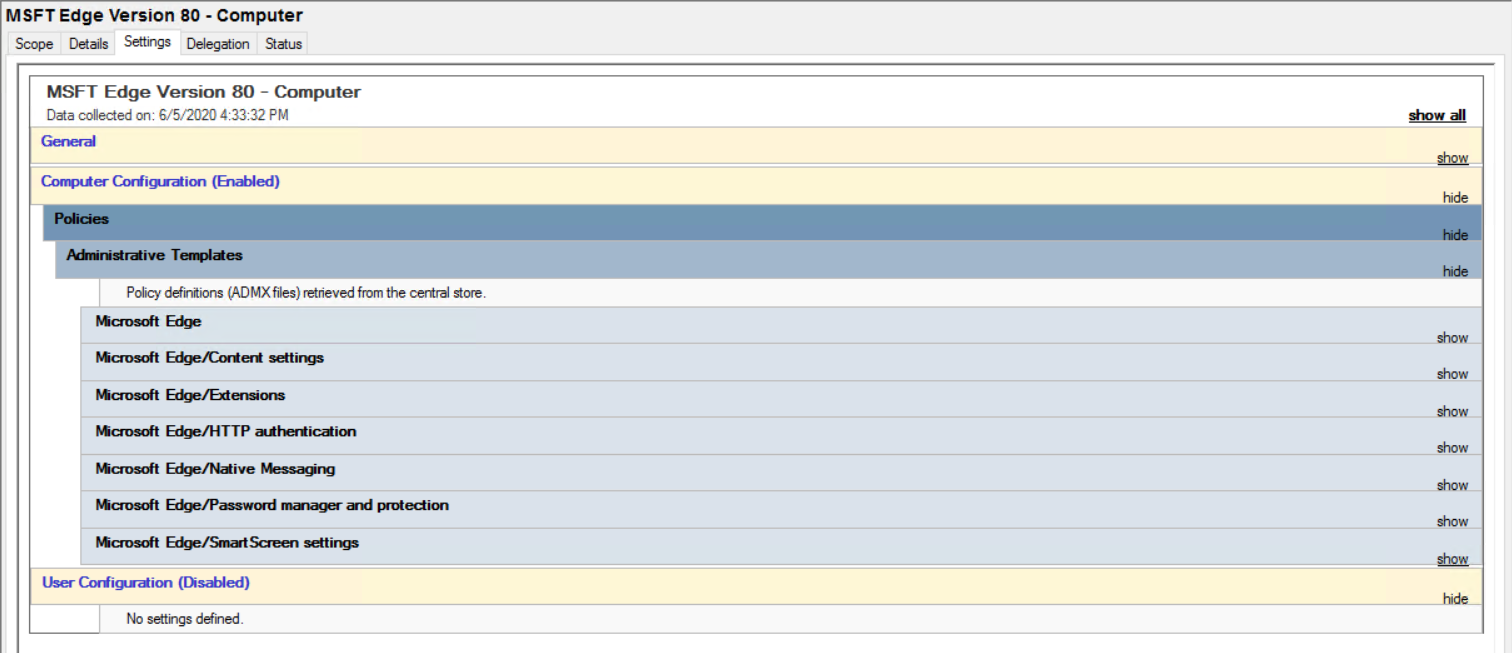
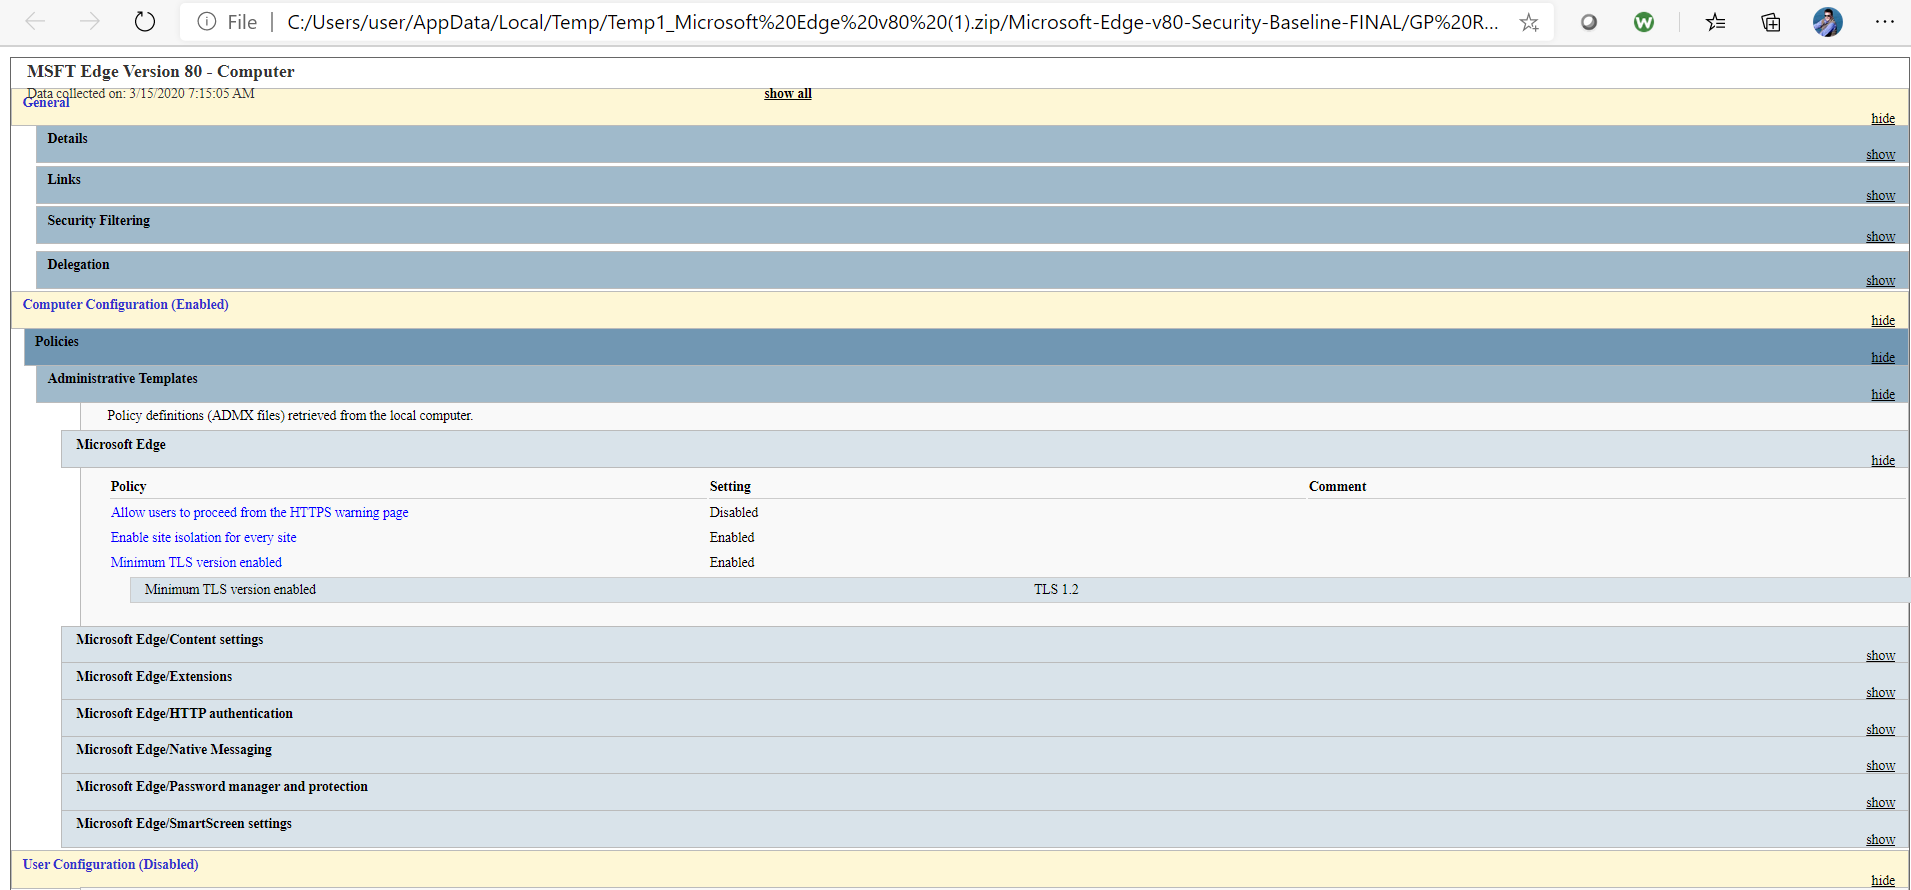
In this example we using the Baseline-ADimport script. The script will then import a GPO called MSFT Edge version 80 – Computer that involves the following Administrative Templates.
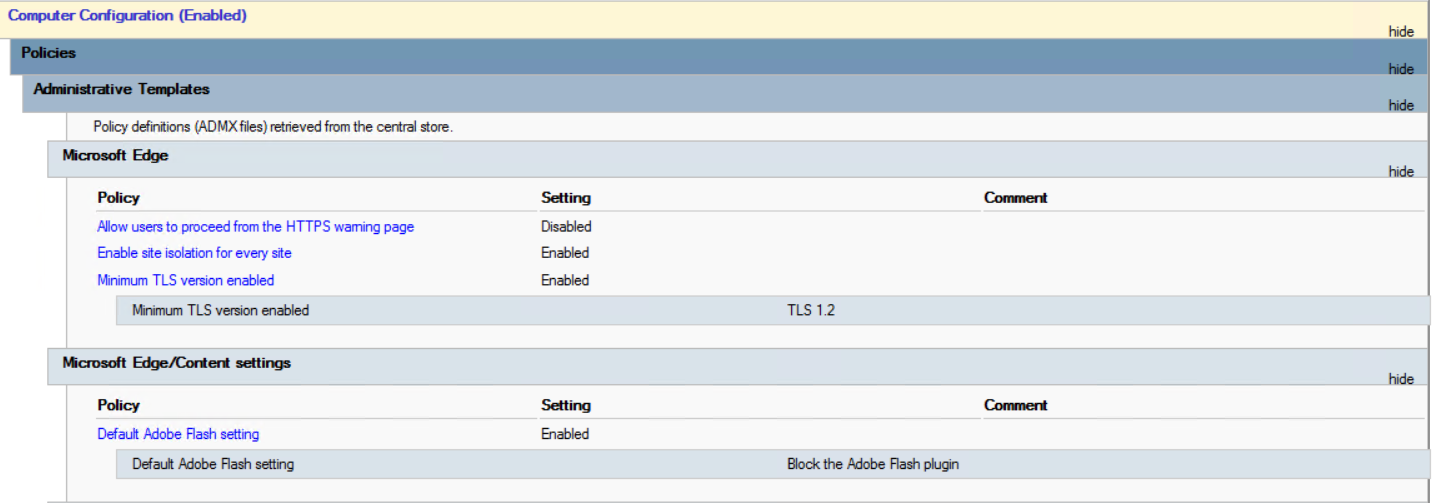
Some of the configured settings include the following:
The toolkit includes a GP Reports Folder that contains an HTML report of GPO templates available in the baseline.
It is recommended that you stay current with the latest security baselines of Edge and Windows 10. You can keep abreast of future baselines as they become available through the Microsoft website.
You can learn about the newest policy settings available with Edge v83 on the Microsoft website.
MSIX App Attach: How do you do it? Find out in this blog.
That being said, let's first understand the problem MSIX App Attach tries to solve:
For a long time, golden images were used with a myriad of applications... leading to a myriad of golden images.
NOT a great way to streamline. Images can quickly become bloated and the task of updating and maintaining them is cumbersome and overly time consuming. VDI and application streaming has been another alternative, but these require complex infrastructure that has to be implemented and maintained. Now with remote work on everyone's mind, we need an easier way deliver applications.
As such, Microsoft recently unveiled their new MSIX App Attach solution and is positioning it as their main technology for modern application packaging and provisioning. As its name implies, it allows you to attach an application to the OS. Some of the benefits of MSIX App Attach include:
No special deployment servers are needed
No agents: Everything is just "built into Windows" natively.
You can use existing MSIX packages without altering or repackaging them.
There is ultra-low / no performance impact.
Can be used on-premise or cloud
To help you get started with this new methodology approach to application delivery, I have composed a called “MSIX: Walk before you run” to help you get familiar with the basic approach of how it works. To keep things simple, we aren’t going to create any MSIX packages here but will use existing ones just to show how to implement an MSIX App Attach solution.
Then you can use the material below to "follow along" and try this yourself.
Step 1: Get a compatible OS
So first and foremost, you need an OS that supports it all. That means getting a copy of Windows 2004 which is the latest version of Windows 10. Then you need to upgrade to Build 19631 which at this time may require you to utilize the Windows Insider Program to get it.
Step 2: Get MSIX packages
So of course we need some MSIX packages. Now we could use the MSIX Packaging Tool that you can download from Microsoft, but I am skipping that step for take advantage of some existing packages already available. There is a great Microsoft repository site called Github Winget Package Manifest Page that features all types of prepackaged applications. Pull the page up in a browser and do a search for MSIX. In my video, I then chose MSIX Commander as my feature application and copied it’s URL in order to download it. Now I have an MSIX package that I can use for my example. Place it and all other downloads in a separate folder. In my video, I am using a directory called “Demo.”
Step 3: Using the Script
I went and logged on my local my machine as a domain admin in order to perform the remaining tasks. Throughout my video I refer to a conglomerated script that I pieced together for you. I obtained the script from several sources. I got some from the official Microsoft Setup Document which guides you along in much the same format that I take in the video. I also used several scripts made available by Tom Hickling’s Github page. I then cobbled all of these scripts together and I have included the final script in its entirety at the end of this blog. Now let’s go through the script.
Step 4: Create a VHD Package
While you see MSIX App Attach associated with Azure and WVD a lot, keep in mind that what we are doing can be performed on local desktops or laptops as well as VDI and WVD machines. I am doing everything locally in this video. You will need to download the MSIXMGR Tool and place it in the same directory as your MSIX file (in my case MSIX Commander). Now we need to utilize the script to create the VHD. To do this, I used Tom Hickling’s script. Since he was using VLC as his package, I modified it to accommodate MSIX Commander. Go create the VHD, I am using the section titled “Make an MSIX into a VHD”
Open an elevated PowerShell session and go to the directory that contains all of the required files I mentioned earlier. Then paste the VHD script and let PowerShell do its thing. Now your MSIX VHD file is created with your MSIX file expanded into the VHD. The VHD will already be mounted. In my case it mounted as drive E so you can browser its contents. Be sure to view the package name and copy that name and paste it into Notepad for future reference. You will also need to know the Volume ID of the VHD file which you can find by using the “mountvol” command. Then paste in your Notepad as well.
Step 5: Package Staging
In this video, I chose to skip the Certificate section for simplicity which takes us to the next step called Staging. First go ahead and unmount the VHD. You will find that the Stage section of the script is broken down into regions. I advise you to paste the script into PowerShell region by region. For first region, you will need to modify the VHD name, package name and volume ID you recorded earlier. Below is what my first region looked like:
#NOTE: GET VOLUMEGUID after mounting VHD then use MOUNTVOL command to get volume GUID. Remove {}
$msixJunction = "C:\temp\AppAttach\"
The second region will mount the disk and the third region will perform what is called the junction. The final “stage region” will perform the actual attaching.
Step 6: Register Script
So now we have attached the app, but we don’t have it within the user space. I have the variables assigned to the values I mentioned earlier to run MSIX Commander so let’s copy the Register region and paste it into PS. Once completed, you will then see MSIX Commander in the Windows Start Menu like in the video. If I log on another user, in this case a standard user, I can’t see the MSIX app because the register script only applied to the user account I was logged on at the time. So for this demonstration, I will simply open PowerShell logged on as a standard user and paste the Register region script in once again. While I may have to dig a little through the Start menu to see it, it now appears for the user at hand.
Step 7: Undoing the MSIX App Attach Environment
Any MSIX package that can be registered can be deregistered as well. To do so, simply copy the De-Reregister region of the script and paste it into PowerShell and run it. Now the app will disappear from the start menu. In the video, I switched over to my original domain admin account and ran the deregistering process as well. The final step of undoing everything will be to de-stage it so it cannot be applied to users any longer.
That completes the demonstration. Go ahead and use the script I have included. Just remember to modify the mentioned variables within the script when working with other MSIX files and such. With a few run-throughs, you will be running in no time.
Jeremy’s Compiled Script below for reference... !
Make an MSIX into a VHD
#Go and package your app using the MSIX App packager
Jeremy Moskowitz Enterprise Mobility MVP & Lead Trainer
Jeremy Moskowitz is a former Microsoft Enterprise Mobility MVP and founder of MDMandGPanswers.com and PolicyPak Software.
Jeremy teaches Group Policy hands-on training to IT administrators who want to make their business more secure by using Group Policy.
He runs MDMandGPanswers.com, a forum for Group Policy enthusiasts and also founded PolicyPak Software, an innovative add-on that allows admins to dictate, enforce and remediate application settings. Jeremy is also author of several Group Policy Books, including “Group Policy: Fundamentals, Security, and the Managed Desktop, 2nd Edition”.
He has been seen speaking at Microsoft TechEd, Microsoft MMS, Windows Connections and many others.
Jeremy has performed Windows NT, Active Directory and Group Policy planning, training and implementation for some of the world’s largest organizations.
Jeremy is available for consultations with your company, speaking at your events, or writing custom publications.
The Definitive Guide to Windows Installer Technology
James Conrad
James I. Conrad, MCSE 2003, Server+, A+, Certified Ethical Hacker.
For years, James Conrad has been a sought-after consultant and trainer for Fortune 500 companies. James has been an exam writer for Microsoft MCSE exams and was a key contributor in determining MCSE exam objectives in the Microsoft Certification and Skills Assessment division.
He has trained and consulted for Intel, UCLA, Raytheon, Compaq, Hewlett-Packard, MCI Worldcom, Sprint, Exxon-Mobil, Boeing, Lockheed Martin, the U.S. Department of Justice, the Bureau of Land Management, and many others.
James writes internal training materials for current Windows products and has authored Windows 2000 Server for Computer Associates, and Windows XP Desktop Administration for the Windows Consulting Group, among others. He has also been a technical editor for many books including The Tips and Tricks Guide to Securing .NET Server by Roberta Bragg and Windows Server 2003 Security: A Technical Reference also by Roberta Bragg. James also wrote the CompTIA Server+ college curriculum for Thomson Learning.
James wrote five Personal Test Center Windows 2000 Professional exam preparation tests for Coriolis. James has also written the popular Windows 2000 Server, Windows 2000 Professional, and CompTIA Network+ certification books for ComputerPrep. James also served as the technical editor for Thomson Learning’s Network+ college curriculum. James is currently the lead instructor for CBT Nuggets, a leading Microsoft, Cisco, and Linux video training source.