MDM & GP Tips Blog

Jun 2023
05

How to Make a Basic Edge Browser Policy using Group Policy or Intune

From websites to email and SaaS applications, the web browser is now the go-to app for your users. Optimizing the user digital experience often starts with optimizing their browser environment. Whether you implement Group Policy or Intune, you need to create a policy for your organization’s preferred browser, and we are going to do just that. I have chosen Edge because it is generally easier to secure with these two management tools. There are so many settings in Edge that GP and Intune can manage. We are just going to outline some of the basics that serve as a good start.

Enforce Bing and Google SafeSearch

Most organizations want to filter out explicit or inappropriate content from search results. If you don’t have an enterprise web filter or just want to create a backup policy in case your filter goes down, you can enforce Bing SafeSearch and Google SafeSearch. For Intune, go to Devices > Configuration profiles > Create profile. Select Windows 10 and later as the platform and Templates > Administrative Templates as the Profile type. Then go to User Configuration > Microsoft Edge and find the settings “Enforce Bing SafeSearch” and “Enforce Google SafeSearch.” In the example below I chose moderate search restrictions which will filter adult images and videos but not text.

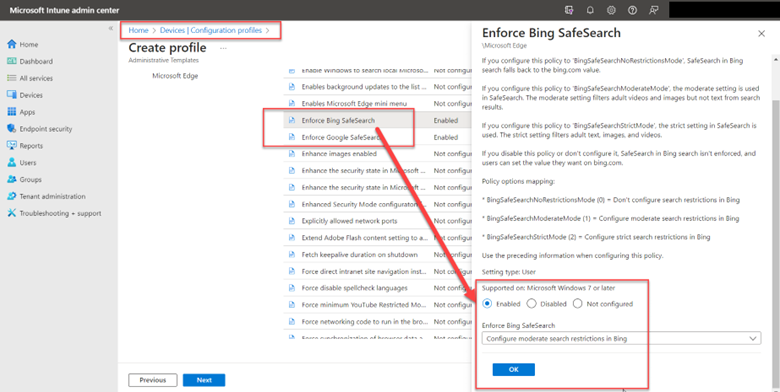
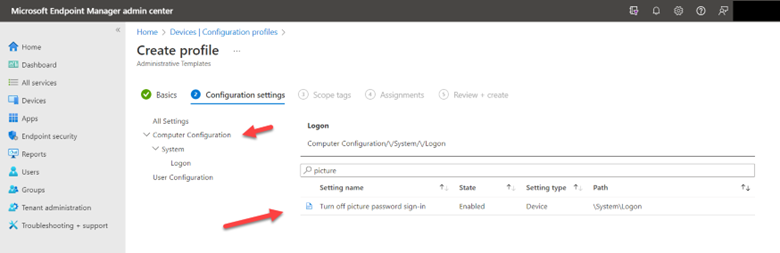
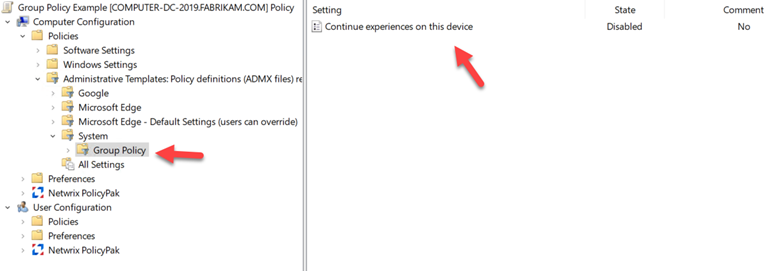
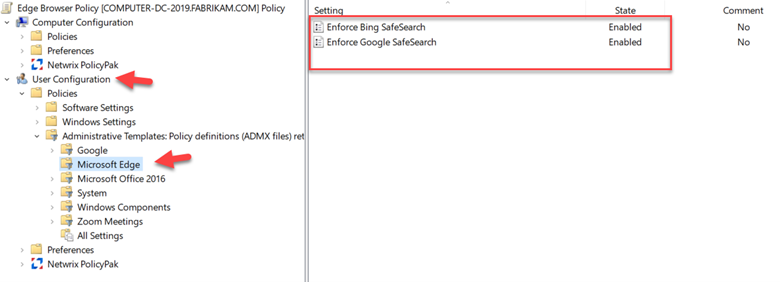
You can do the same using Group Policy by following the same Administrative Template path as shown in the screenshot below.

Restrict Access to Developer Tools

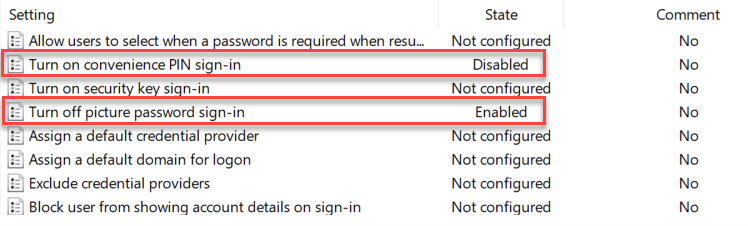
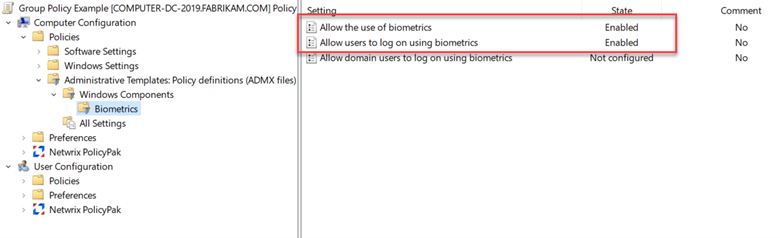
In our previous example, you had to sift through multiple pages of settings until you could access the Enforce SafeSearch settings. For instance, the first page of settings for Microsoft Edge only contains two settings as shown here.

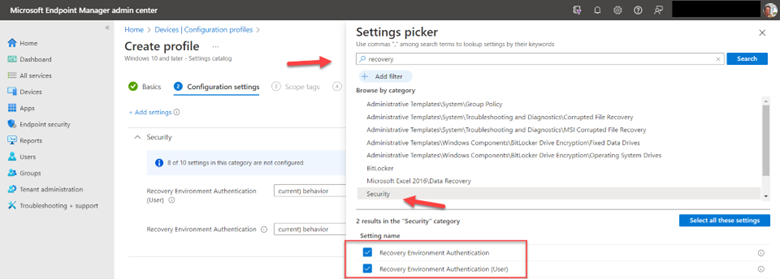
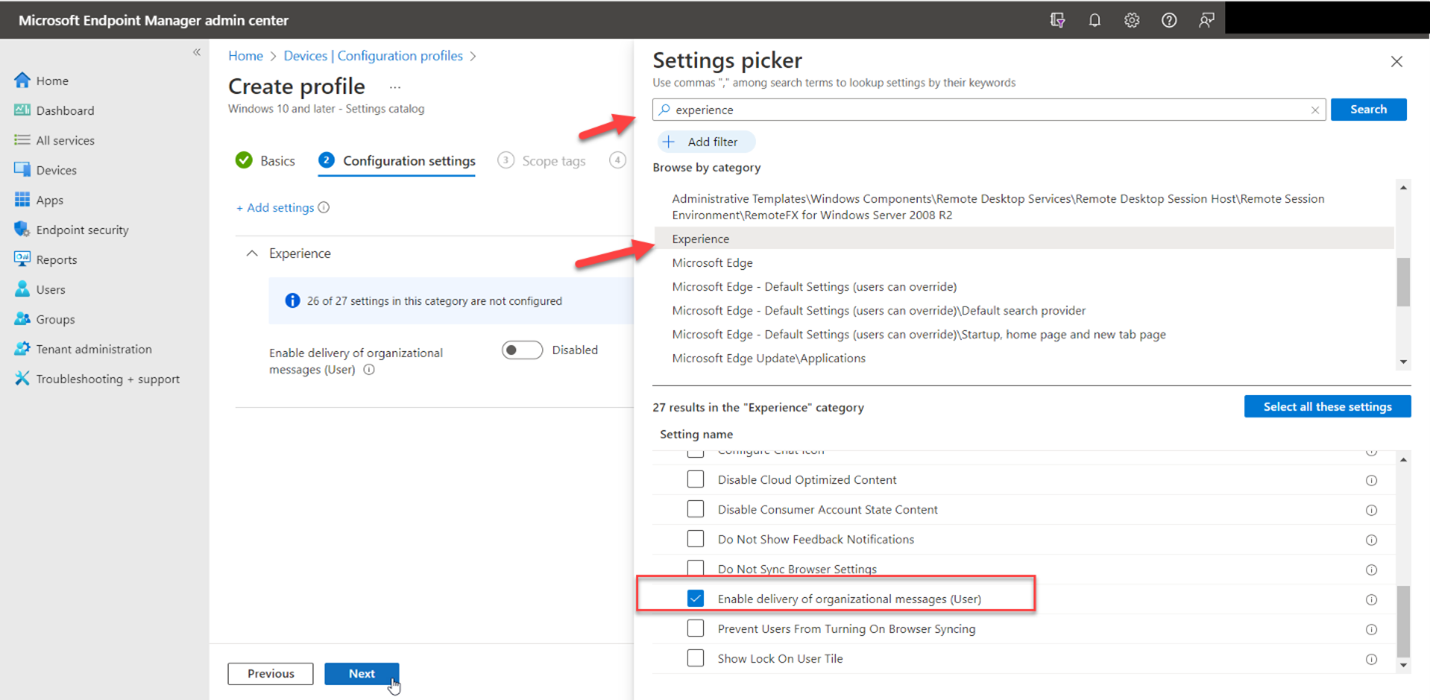
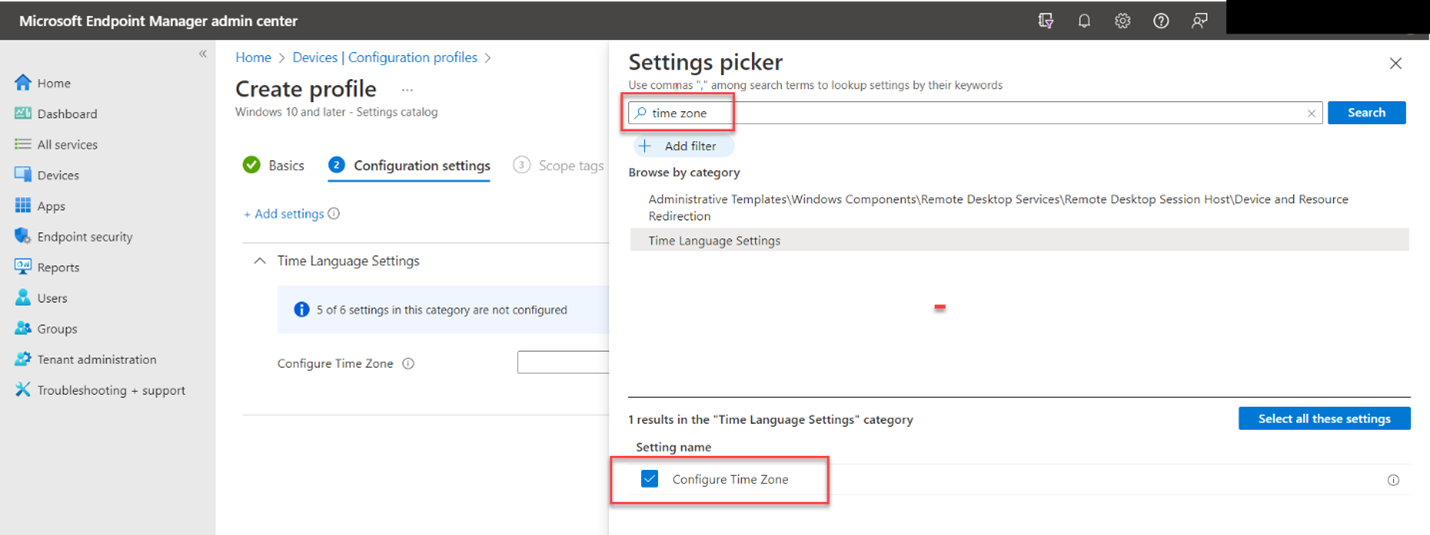
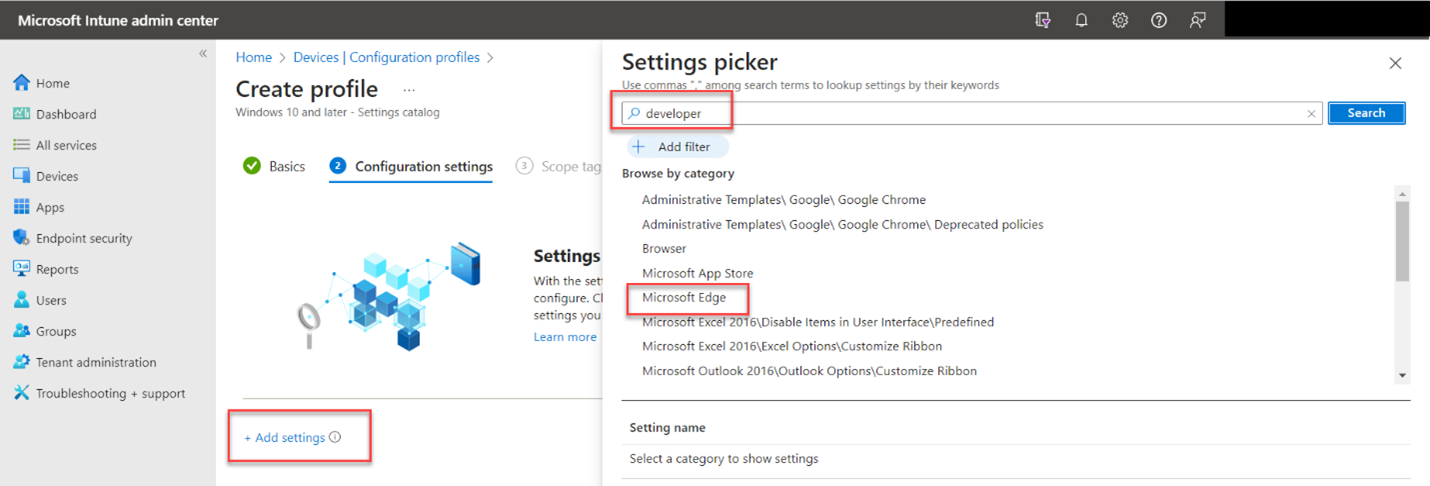
This time we will restrict user access to the developer tools in the Edge browser. To make it easier to find the desired setting, let’s use the Settings catalog for the profile type rather than the Administrative templates. Using the Settings Catalog, do a search for the word “developer” and then click on Microsoft Edge in the results as shown below.

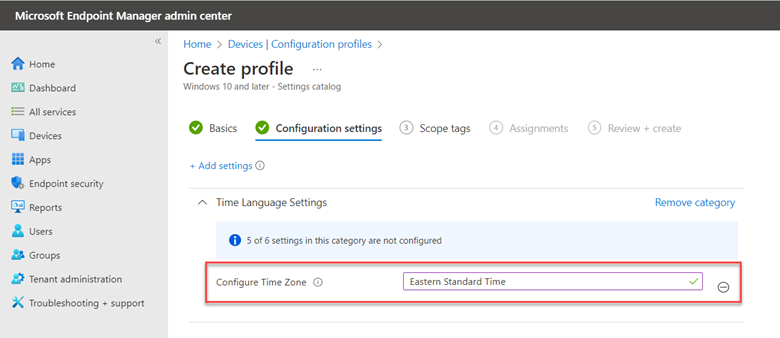
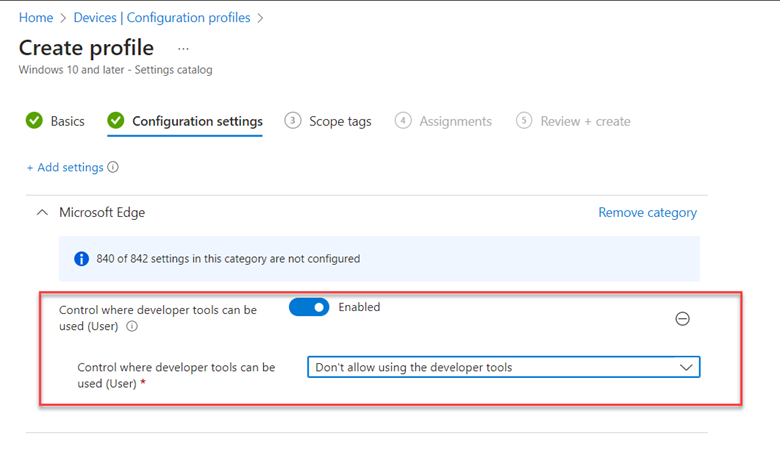
Then enable the “Control where developer tools can be used (User) and select “Don’t allow using the developer tools” in the drop-down menu as I have done in the example below.

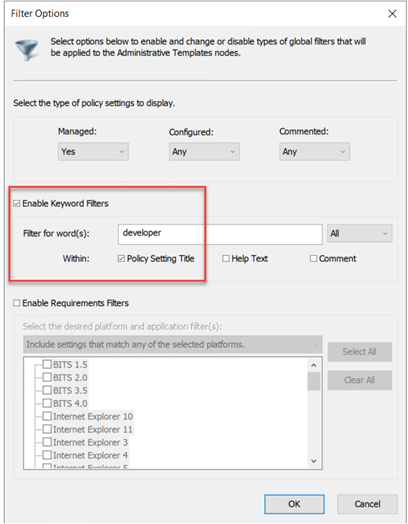
In Group Policy, you can use the Filter to quickly find the exact setting you need. Simply filter the word developer as shown in the screenshot below.

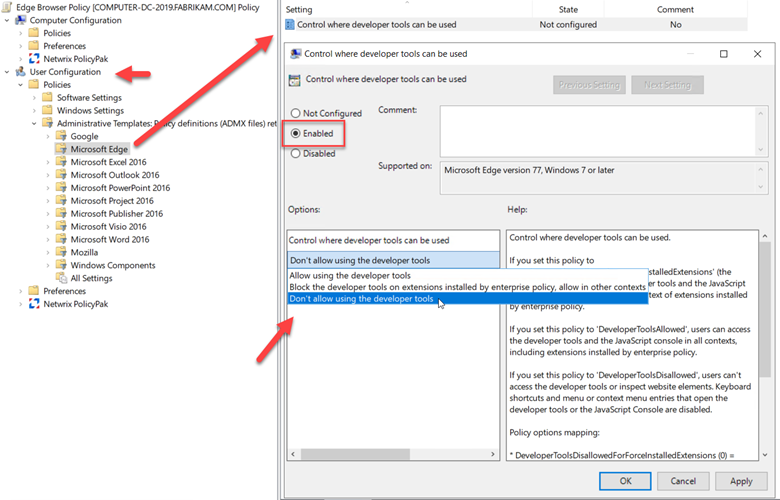
Then navigate to User Configuration > Microsoft Edge and configure the “Control where developer tools can be used” setting as shown in the screenshot below.

Managing Installed Web Extensions

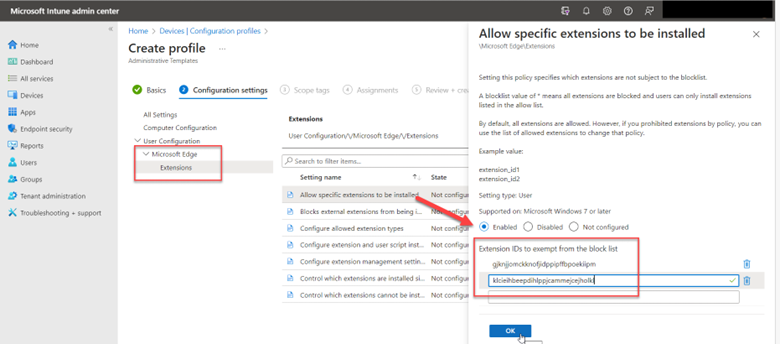
You want to have control over what browser extensions your users will have. Let’s start with which extensions will be allowed. Using Intune, use Administrative Templates once again as your profile type and navigate to Microsoft Edge > Extensions and enable “Allow specific extensions to be installed.” You will then have to input the ID for each web extension. I the example below I have added the ID for Microsoft Translator (gjknjjomckknofjidppipffbpoekiipm), followed by Adobe Acrobat (klcieihbeepdihlppjcammejcejholkl). Note that the extension IDs are different for each web browser.

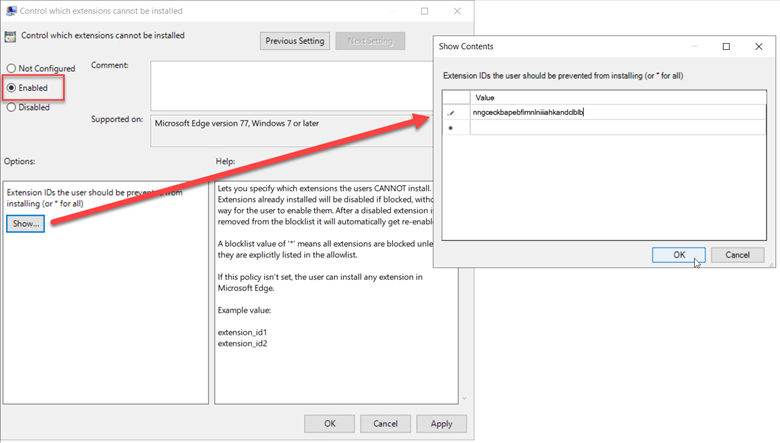
We can do the same thing using Group Policy for the LastPass web extension ID (nngceckbapebfimnlniiiahkandclblb).

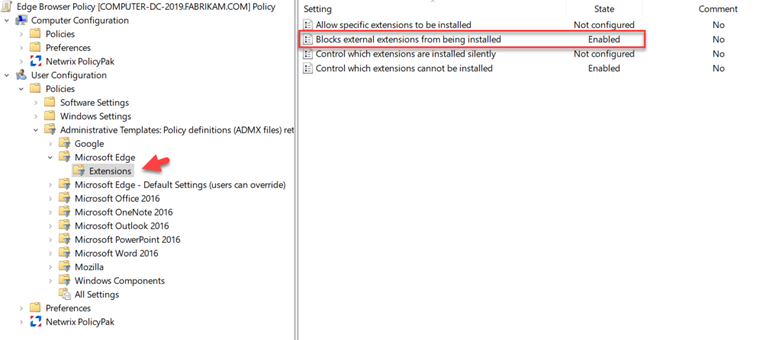
You would then follow this up by enabling the “Blocks external extensions from being installed” setting to prevent all other extensions from installing as shown in the screenshot below.

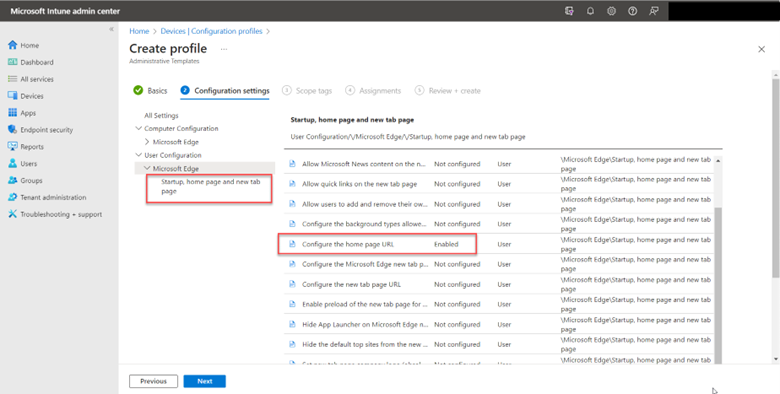
Configuring the Home Page

We will wrap up this discussion by assigning a mandatory home page for all users. You can find this setting in Group Policy by going to Administrative Templates > Microsoft Edge > Startup > and enabling the “Configure the home page URL” setting and inputting the desired home page.

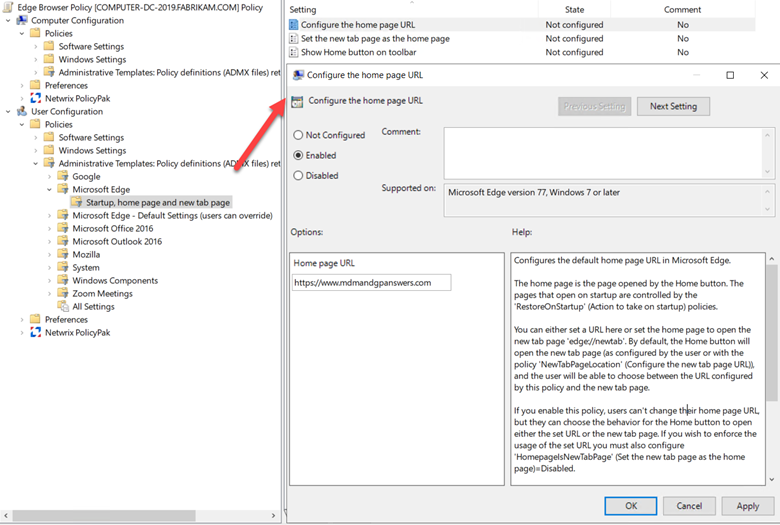
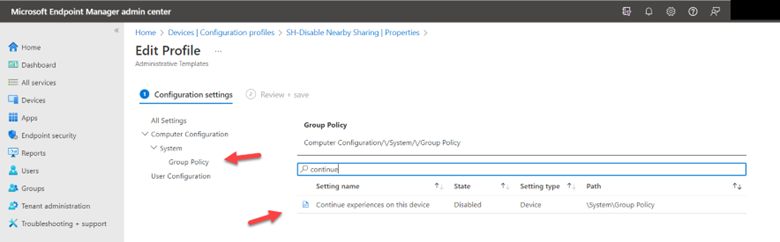
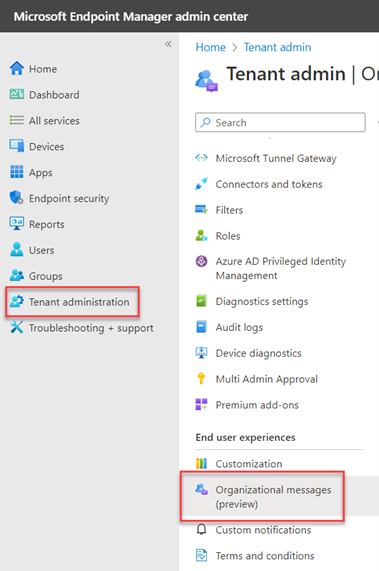
You can do the same with Intune as shown in the screenshot below.

Of course, there are many other settings you can add to your Edge policy. Always test your setting configurations first before implementing them in a production environment.


May 2023
15

Use Intune to Deploy Microsoft Take a Test

Many K12 school districts are concerned about providing a secure environment for online testing. The integrity of online testing relies on the ability to prevent students from opening a new browser tab to google for answers or copy exam question text to an archive. Take a Test is a secure browser provided by Microsoft that can be set up to only provide access to a single URL or a list of URLs. Students cannot perform the following actions when taking an exam using Microsoft Take a Test:

  • Access other applications
  • Open another browser tab
  • Print or use screen capture
  • Change system settings
  • Access Cortona
  • Access content copied to the clipboard

Microsoft Take a Test is a secured instance of Intune, not an application. There are 2 modes for Microsoft Take a Test. The first is intended for a brief test or quiz that a teacher might wish to administer. By creating a secure assessment URL and sending it to students via email or OneNote, teachers may accomplish this task quickly and easily. The assessment link is constructed in three stages using Microsoft's secure link generator.

  • Paste the link to the assessment URL
  • Select the options you want to allow during the test
  • Generate the link by selecting the button Create link

Below is a screenshot of the secure generator page.

When the students click on the link, Edge will open a secure test taking session for the student to take the exam. Keep in mind that the student must be logged on to a Windows machine already. This deployment method would be a challenge for a large-scale exam such as a high school proficiency or college entrance exam. This is where the Take a Test in Kiosk Mode is better suited. This mode can be deployed using either regular Intune or Intune Education edition.

Intune Education edition is specifically designed to meet the needs of schools and provides a simpler interface than regular Intune. Intune Education edition is the easiest way to deploy Take a Test in kiosk mode as the settings are available in the menu interface. To configure devices for Take a Test, go to Groups and select a group to configure Take a Test for. Then go to Windows device settings > Take a Test profiles and select “Assign a new Take a Test profile. Here you will specify a Profile Name, Account Name, Assessment URL, and an option Description. Finish it by selecting Create and assign profile as shown in the screenshot below.

Once deployed, test takers can log on to a Windows machine using the test taker profile. They will only be able to access the test in a single browser session.

You can also deploy this mode using regular Intune as well although it is a little messier because you must provide the following OMA-URI settings as shown below.

OMA-URI:

./Vendor/MSFT/Policy/Config/LocalPoliciesSecurityOptions/InteractiveLogon_DoNotDisplayLastSignedIn
Data Type: Integer
Value: 1

OMA-URI

./Vendor/MSFT/Policy/Config/WindowsLogon/HideFastUserSwitching

Data type: Integer

Value: 1

OMA-URI: ./Vendor/MSFT/SharedPC/AccountModel

Data type: Integer

Value: 1

OMA-URI: ./Vendor/MSFT/SharedPC/EnableAccountManager

Data type: Boolean

Value: True

OMA-URI: ./Vendor/MSFT/SharedPC/KioskModeAUMID

Data type: String

Value: Microsoft.Windows.SecureAssessmentBrowser_cw5n1h2txyewy!App

OMA-URI: ./Vendor/MSFT/SharedPC/KioskModeUserTileDisplayText

Data type: String

Value: Take a Test (or a string of your choice to display in the sing-in screen)

OMA-URI: ./Vendor/MSFT/SecureAssessment/LaunchURI

Data type: String

Value: 

The screenshot below shows all OMA-URIs fully inputted.

Finish the creation wizard out by assigning the configuration profile to a group and you are done. Students will again only have access to the active test session in a locked down desktop environment.


Mar 2023
20

Intune Makes it Easier to Deploy Microsoft Store Apps

You can use Intune to manage and deploy apps from the Microsoft Store to your managed devices. These include default store apps as well as apps that you upload to your Microsoft Store for Business or Education. While it has always been relatively easy to deploy apps in this manner, Intune just made it even easier.

To deploy Microsoft Store apps in Intune you go to Apps > All apps > Add and select the desired App type. In this example, I will select “Microsoft Store app (legacy)” to demonstrate the former way of configuring app deployment. This gets you to the following screen:

Here you need some required app details such as Name, Description, Publisher and Appstore URL. So how do you find the publisher and Appstore URL?

Let’s say I want to deploy Python 3.11 to a team of developers or student group.  To find the Appstore URL I will go to the Microsoft Store and search for Python as shown below where I will choose Python 3.11.

As you can see below, the app category is listed in the top left-hand corner. In the bottom right I will click the link for “Endpoint Manager” to get the Appstore URL.

Then simply copy the link as shown in the screenshot below.

I then paste the URL into the App Information page. Then assign the app to the designated groups and complete the creation wizard.

Now let’s add it again but this time I will choose “Microsoft Store app (new)” as the App type. That will bring me to the wizard screen once again as is shown below. Now in App information you need only click the Search hyperlink. I did a search for “Python” and selected Python 3.11.

You will then paste the URL into the App Information page. Then assign the app to the designated groups and complete the creation wizard.

Now let’s add it again but this time I will choose “Microsoft Store app (new)” as the App type. That will bring me to the wizard screen once again as is shown below. Now in App information you need only click the Search hyperlink. I did a search for “Python” and selected Python 3.11.

There is no need to surf the store itself or copy/paste links anymore. Again, finish out the creation wizard by assigning the app to your designated groups and you are done.


Feb 2023
21

Use Intune to Restrict Access to the Advanced Startup Menu

Some users will always try to get around the Windows setting restrictions you implement using Intune or Group Policy. A few will even attempt to reset their device. Denying standard users local admin rights is one way to prevent them from doing so using Recovery settings. That doesn’t prevent them from resetting their device using the Advanced Startup menu, however. There are several ways to access the Advanced Startup menu such as pressing the F8 key as the computer is booting up. From there you navigate to Troubleshoot > Reset this PC and make select the desired options such as “Keep my files” or choosing to remove everything. Besides the reset option, the Advanced Startup Menu gives users access to System Restore, Startup Repair, Command Prompt, and a few other things.

Fortunately, Intune provides a way to keep standard users out of this area. In Intune go to Devices > Configuration profiles > Create profile and select Windows 10 and later as the platform and Settings catalog as the profile type. Name the profile and go to Configuration Settings. Using the Settings picker do a search for “recovery” and choose the Security category and select both available options as shown in the screenshot below.

  • Recovery Environment Authentication
  • Recovery Environment Authentication (User)

Then assign the profile to your desired group(s) and wait for the profile to be delivered. Now when a user accesses the Advanced Startup Menu to do something such as resetting their device, they will be prompted to select a local admin account as shown in the picture below. In this case I am choosing the Tech Admin account.

The user is then prompted for the credentials of that account as shown here.

Unless the correct credentials are typed in, further access to the advanced startup options is not available.


Feb 2023
13

How to Enable Alternative Authentication Methods using Group Policy and Intune

We know the vulnerabilities of passwords today. User accounts are constantly under siege by credential stuffing attacks and malicious code and tools like key loggers that aim to capture passwords as users type them in. That’s why it is essential to support password authentication with some type of multifactor authentication such as a text messaging, authenticator apps or FIDO keys.

For Windows 10 and Windows 11, there are alternative sign-in methods available. For instance, biometric logons might be a good choice for those users that have laptops with built-in fingerprint sensors. Picture passwords may appeal to some organizations as an alternative. The Windows picture password sign-in requires a user to duplicate several gestures on a selected picture. Then again, those organizations that want to enforce standard desktop for all users may not want this option to be available. For users that always log onto the same computer, a PIN may be lucrative as a PIN is local to a specific device so a compromised pin is only good for its assigned device.

The point of this blog is just to show you how to enable/disable these alternatives using Group Policy or Intune. Let’s start with picture passwords. If you want to disable this option using Group Policy, create a GPO and go to Computer Configuration > Administrative Templates > System > Logon and enable “Turn off picture password sign-in” as shown below. The PIN setting is in the same location. In the screenshot below, I have disabled both options.

You use the same Administrative Template path in for Intune as well. Create a configuration profile and select Windows 10 and later as the platform and Templates > Administrative templates as the profile. Then navigate to Computer Configuration > Administrative Templates > System > and enable Turn off picture password sign-in as shown in the screenshot below. Once again, the PIN setting is there as well.

For fingerprint scanning or other biometric authentication options, create a GPO and go to Computer Configuration > Windows Components > Biometrics and select “Allow the use of biometrics” and “Allow users to log on using biometrics.” In the screenshot below I have enabled both of these.

To manage biometric settings using Intune, create a configuration profile and select Windows 10 and later as the platform and Templates > Identity protection as shown below.

After naming the profile, go an enable “Configure Windows Hello for Business. This will then provide access to all of its category settings. Then select, “Allow biometric authentication” with the result looking like the screenshot below.

Feb 2023
06

How to Disable Nearby Sharing with Group Policy and Intune

Nearby Sharing is a feature in Windows 10 and Windows 11 that allows you to transfer documents, pictures, and links to other compatible devices that are near each other using a combination of Bluetooth and wireless communication. It’s a great feature that fosters collaboration between team members. Maybe. So indeed, there are some instances in which you don’t want to allow this feature such as an educational environment where students are taking an online exam for instance. We will look at a couple of ways to disable this feature.

Nearby Sharing is found under Shared experiences in your system settings as shown below.

To manage Nearby Sharing using Group Policy, create a GPO and go to Computer Configuration > Policies > Administrative Templates > System\Group Policy > and disable “Continue experiences on this device” as shown in the screenshot below. When disabled, Windows device will not be discoverable by other devices and cannot participate in cross-device experiences.

If you want to use Intune, create a configuration profile, and select Windows 10 and later as the platform and choose Templates > Administrative templates as the profile. Then follow the same template path - Computer Configuration > Policies > Administrative Templates > System\Group Policy > and disable “Continue experiences on this device” as shown below.

Users will no longer be able to transfer files amongst each other on their enterprise devices.

Jan 2023
24

How to Verify Your Current Intune Service Release Version

Anyone that works with Microsoft Intune has experienced this. You read about a newly released Intune preview feature that sounds enticing. You then logon to your Intune portal only to find its not there. What’s the deal?

Microsoft regularly releases new updates to the Intune platform at least once a month. Each service release includes new features, capabilities and bug fixes. Like regular Windows updates, these service releases are deployed using a phased approach. Not all tenants receive these service releases simultaneously, however. For instance, government related tenants are updated last. Some geographcial parts of the world receive them before others as well. This methodical approach is done to identify issues before being released to all Intune customers. If your Intune portal lacks a new feature you just read about, chances are it’s because you’re not running the latest Intune service release version yet.

The Tenant Status Page

There’s an easy way to find which service release version your Intune portal is currently running. Navigate to Tenant Administration and select Tenant Status. Here you will see the Service release version as shown in the screenshot below.

Here you will also find other information such as your Tenant name, Tenant Location, the number of licensed users present and the number of Intune enrolled devices. If you find that your Service release version doesn’t match up with the latest one you read about, just be patient and check back in a week.

Dec 2022
29

New Intune Feature - Multiple Admin Approval Process

A new feature update was released in the 2211 November update for Intune. The feature is called, Multiple Admin Approval Process (MAA). The premise for the new feature is to protect against a possible compromised administrative account using something called Intune access policies. These access policies require that a change be approved by a second administrative account before being applied.  An access policy states what resource will be protected and which group of accounts are permitted to approve the changes to those resources.

Currently, MAA is supported for the following resources

  • Apps deployments
  • Script deployments to devices running Windows of macOS

Anytime any admin goes to create or edit an object that involves a resource that is protected by an access policy, it must be approved by an approver without exception.

Let’s use a scenario to demonstrate how MAA works. First let’s create an access policy. To create an access policy, you must be assigned one of the following roles:

  • Intune Service Administrator
  • Azure Global Administrator

In the Microsoft Endpoint Management admin center, go to Tenant Administration > Multi Admin Approval > Access policies and click “Create” as shown in the screenshot below.

Name the policy and then choose the resource you want to protect.

The final step is to choose an Approver group. Any user that is a member of this group can approve requests.  Now I have created my first MAA access policy as shown below.

For this demonstration, I created a temporary Intune administrator account.  When creating temporary accounts for testing purposes, it is good to define an active time window for these accounts so that they are deactivated automatically if forgotten. As shown in the example below, I created an account called testadmin and I defined a start and ending time for its active state.

Now, I will log on to Intune using the account I just created. I go to Apps > All apps and click Add. I then create a policy to deploy Windows 365 apps to Windows machines. In the final Review + Create screen of the wizard, there is a Business Justification section at the bottom, prompting the requester to state the justification for doing this. Also note the outlined banner alerting requester that they must enter a business justification and that the request must be approved before being implemented. Once the business justification has been entered, click “Submit for approval” and the request is now sent to Received requests where it can be reviewed.

In a separate session, I have logged into Intune using an account that is a member of the approver group. As shown in the screenshot below, the request now appears (in this example, I created two requests). To approve or deny the request, click the URL in the Business justification column.

After clicking on the URL, the approver is shown the requested resource changes. The request can be approved or denied and the approver can add notes for feedback as shown in the screenshot below.  

Switching back to the testadmin account, I can see the status of the requests made by that account. As shown below, one is approved while one still waits approval.

Note that any individual who submits a request and is also a member of the approval group can see their own requests, however, they cannot approve their own requests. Should no action be taken on a request for 30 days, it becomes expired and must be resubmitted.


Dec 2022
18

New Feature: Send Organizational Messages to Your Users with Intune

Intune has a new feature called Organizational Messages. It’s a way to send branded messages directly to Windows 11 devices using Intune. These messages notify and update users about key important information updates or provide onboarding information for employees.  This can be especially handy for organizations that utilize hybrid work strategies. There are three types of messaging to choose from.

  • Taskbar messages appear just above the taskbar and remain viewable until the user acts on them. Taskbar messages can be used to alert users about things like a critical Windows update that will be installed at the end of the week that will disrupt desktop operations.
  • Notification messages appear in the Notification Center as a popup before disappearing. Notification messages are good for informational messages such as a future training session.
  •  Get Started app messages appear in the Get Started app the first time a user initiates it once the device has been enrolled in Intune. These messages are good for sending welcome messages, device tips, company policy changes and new employee information.

To access the Organizational Messages feature, go to Tenant Administration in Microsoft Endpoint Manager and select Organizational Messages (preview) as shown below in the screenshot.

To configure Organizational Messages, you must be assigned one of the following roles.

  • Azure AD Global Administrator
  • Intune Administrator
  • Organizational messages manager (Microsoft Intune role)
  • Organizational messages writer (Azure AD role)

Prerequisites

Organization messages are only supported on devices running Windows 11, versions 22H2 or later. You must also have one of the following licenses for your users.

  • Microsoft 365 E3
  • Microsoft 365 E5
  • Endpoint Management + Security E3 and Windows Enterprise E3
  • Endpoint Management + Security E5 and Windows Enterprise E5

Each message type requires a logo for branding and identification purposes. This is usually the company logo. Only PNG files are supported, and each message type has a different dimensions requirement.

  • Taskbar messages must be 64 x 64 pixels
  • Notification area messages must be 48 x 48 pixels
  • Get Started app messages must be 50 pixels long and 50 – 100 pixels wide.

PNG files that don’t meet the exact dimension specifications will cause an error, preventing you from proceeding further in the message creation process as shown below.

You can include custom URLs in your messages, but they must be added to your list of verified Azure AD custom domain names.

Enabling Organizational Messages

Before creating your messages, you must enable the policy that allows the delivery of organizational messages. To do this, go to Devices > Configuration profiles and click “Create profile.” Select “Windows 10 and later” as the platform and “Settings catalog” as the profile type. Using the Settings picker, do a search for “experience” and then select it from the list of viewable categories. Then select “Enable delivery of organizational messages (User)” as shown in the screenshot below and complete the wizard by adding scope tags and user/group assignments.

Now you are ready to create your messaging.

Creating Organizational Messages

Go to Tenant Administration > Organizational messages (preview) and click on Message. You can then select the type of message you want to create as shown in the screenshot below. In this example we are creating a taskbar message.

Next you will upload your logo, which is required. You will also select which domain you want to apply the messages to and choose your preferred language. You can then preview what the message will look like.

Next you will configure a schedule for the message as shown below.

Complete the creation wizard by assigning the message to your targeted groups or users. Then review your created message.

The created message will then appear as part of your list of messages.

As mentioned previously, each of the three message types include different message templates. Below are some of the options for Notification messaging.

Some Limitations Concerning Organizational Messages

There are some limitations and issues concerning organizational messages that you should be aware of.

  • You cannot send messages to devices or mixed groups. An organizational message sent to both users and devices will only be sent to the users.
  • Users that belong to more than 200 groups are not supported by organizational messages (who knows why?)
  • You can’t assign priority levels to organizational messages so they will be received by users in random order.
  • Scope groups and scope tags aren't available in organizational messages.
Nov 2022
16

How To Set Time Zones using Intune

If you’re using Intune as your endpoint management solution, there’s a good chance you are managing devices dispersed over a wide geographical area. That may include multiple time zones. So how do you go about ensuring that each machine is matched with its correct time zone?

There are a variety of ways to assign time zones to a Windows 10 computer.

  1. You can configure it within the registry by navigating to

\HKLM\System\CurrentControlSet\Control\TimeZoneInformation

Then create GPO using Group Policy Preference to deploy the registry settings.

  1. In Windows 10/11 you can use the Windows Time Zone Utility. This is a command-line tool that you run using an Administrator command prompt. The command is tzutil.exe. You can use the question mark to see the available commands.


    To see the list of time zones supported by Windows 10, you can use the /l switch. Keep this command in mind for future reference later in the article.
  2. You can also use PowerShell. The screenshot below shows a couple of available commands. The second command is used to assign the desired time zone. Note that I am using “Hawaiian Standard Time” that appeared using the tzutil /l command above.

  3. While you could deploy the PowerShell using Intune, there is a simpler way using the settings catalog.  Log onto the Intune portal and go to Devices > Configuration Profiles and create a profile. Choose Windows 10 as the platform and Settings catalog as the Profile type. Name the profile and then click the “Add Settings” link. Using the Settings picker, do a search for “time zone” and choose “Time Language Settings” as the category. Then select “Configure Time Zone” as shown in the screenshot below.


    Then input the desired time zone as shown below. These are the same time zone names we saw using the tzutil command utility earlier. In the example below I am assigning Eastern Standard Time. Other possible assignments could be Central America Standard Time, Central Brazilian Standard Time, GMT Standard Time, Pacific Standard Time, etc.


    Then like any configuration profile, select any optional scope tags, and assign the profile to the desired group or users.