MDM & GP Tips Blog

May 2024
06

Creating Security Baselines in Microsoft Intune

Security baselines are used to standardize and enforce security configurations across devices to reduce vulnerabilities and ensure compliance. They allow organizations to rapidly deploy a hardened, secure configuration across their managed Windows devices. The baselines contain groups of pre-configured settings recommended by Microsoft's product security teams, saving significant time and effort in researching and testing individual settings. Pre-configured baselines simplify the deployment of security settings to make it easier for IT administrators to apply comprehensive security policies without having to configure each setting manually. By using predefined baselines, administrators can save time and effort compared to developing and implementing custom security policies from scratch.

Security baselines can be deployed using either Group Policy or Microsoft Intune. Group Policy baselines are typically managed by importing the latest Microsoft Security Compliance Toolkit baselines and customizing settings via GPOs while Intune security baselines are managed directly in the Intune admin console, where admins can create profiles based on the built-in Microsoft-provided baselines and customize settings.

While providing a solid security foundation, baselines can also be customized to meet the specific needs of an organization by adjusting the pre-configured security settings as required. You can assign different Intune security baselines to different user or device groups. This allows you to tailor the security configurations based on specific requirements or roles within your organization. After creating the desired security baseline profiles, you can assign each profile to different user or device groups within your Intune environment. This allows you to apply distinct security configurations to different sets of users or devices based on their roles, locations, or other criteria.

Deploying Security Baselines with Intune

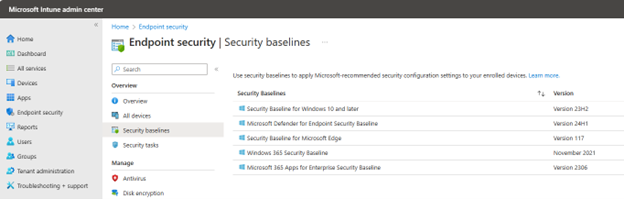
To deploy security baselines using the Microsoft Intune admin center, navigate to Endpoint security > Security baseline and select from the available security baselines. For this example, I will choose the 'Security Baseline for Windows 10 and later' and customize it.

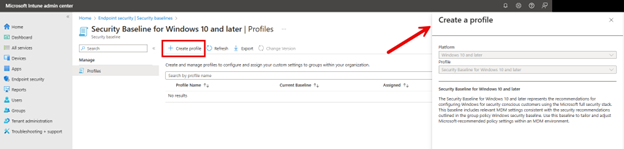
After clicking the selected baseline, click the ‘Create profile’ button to create a new profile.

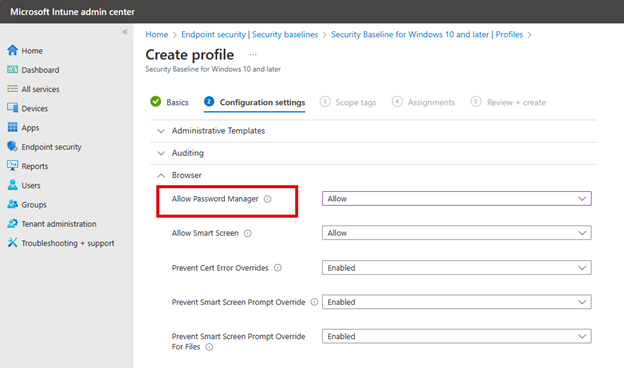
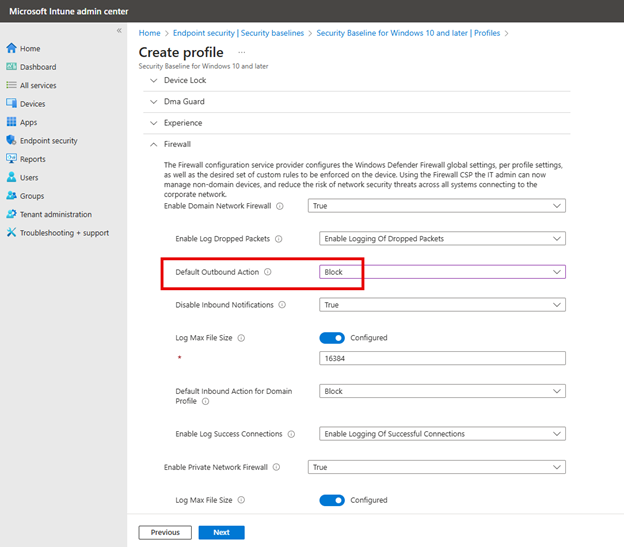
Name the new profile and then proceed to the Configuration settings section. The baseline template has all the settings configured according to best practices by Microsoft engineers. However, there are a couple of settings I want to customize in this case. For instance, the Allow Password Manager setting is configured to Block by default, but in this case, I want to allow it for certain user roles.

Another setting I chose to change is to block outbound traffic which is not the case by default.

Of course, I could also choose to accept all the preconfigured settings as they are and create a profile too. In this case, deploying the preconfigured baseline makes it convenient to blast out best practice security settings.

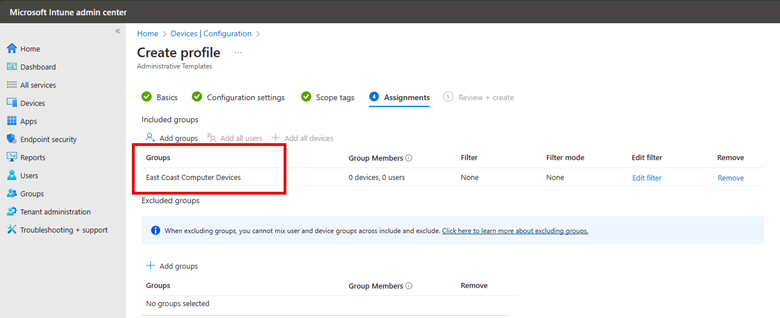
In the same manner that Intune configuration profiles are created, you need to assign this customized security baseline profile to designated groups and then finish out the wizard. You can create as many profiles of the same security baseline as you want. By assigning different Intune security baselines to different user or device groups, you can effectively implement a tailored and granular security strategy that aligns with the specific needs and risk profiles of various segments within your organization.

Apr 2024
29

How to Manage your OEM BIOS Settings with Intune

Intune provides the capability to enable or disable various BIOS features and settings, enhancing device security before the operating system even loads. Among these features is the ability to set or change the BIOS password, which is crucial for securing the boot process and protecting the device against unauthorized changes to BIOS settings. Additionally, Intune allows for the configuration of boot sequence settings, the enabling or disabling of hardware components, and the management of power management settings, among others. This comprehensive control over BIOS settings helps fortify device security and ensures a consistent configuration across the enterprise. As of right now Intune only supports Dell computers.

Create and Deploy the Dell Configuration File

To create a Dell configuration file, follow these preliminary steps to ensure your devices meet the necessary requirements for successful configuration via Intune:

1. Device and System Requirements:

  • Ensure the device is a Dell commercial client running Windows 10 or a later version.
  • The device must be enrolled in Intune's mobile device management (MDM) system.
  • .NET 6.0 runtime for Windows x64 must be installed on the device.
  • Install Dell Command | Endpoint Configure for Microsoft Intune (DCECMI) on the endpoint.

2. Creating the Configuration File:

  • Download the DCECMI tool from Dell’s official website. Using this tool, you can create a configuration file tailored to your specific needs, including any OEM-supported configuration settings.
  • When creating the configuration file, a corresponding Win32 app, provided by the OEM, will be needed. This app acts as an agent that interprets the configuration file and manages BIOS password settings among other configurations.

3. Deployment:

  • Deploy the OEM Win32 app to all relevant devices using Intune. This app is crucial as it reads the configuration file and applies the settings, including BIOS passwords, to the devices

Target the BIOS Configuration Policy

To effectively target the BIOS configuration policy, you should focus on a specific set of devices. Here are two options for doing so:

Option 1: Create a Device Group

  • Create a group comprising only the devices needing the policy. Assign both the app policy and the BIOS configuration policy directly to this group during creation.

Option 2: Use an Assignment Filter

  • Implement an assignment filter based on the device manufacturer, specifically targeting OEM devices. Apply this filter when assigning the app and BIOS configuration policies.

Creating the BIOS Configuration Policy

Now it is time to create the policy itself. Using the Microsoft Intune Admin Center navigate to Devices > Configuration and create a new policy. Select Windows 10 and later as the Platform and select ‘BIOS configurations and other settings as the Profile Type as shown in the screenshot below.

In the Configuration settings, select your hardware OEM vendor from the list of supported OEMs which is currently, only Dell. Next you will configure ‘Disable per-device BIOS password protection’ by choosing No or Yes.

  • No: Intune assigns a unique device password to each device. Users must use this password to access and modify the BIOS settings on their device.
  • Yes: The BIOS is not protected by a password. Any previously set passwords are cleared, allowing end users unrestricted access to the BIOS settings.

The final step is to point to the configuration file you made earlier with the OEM tool as shown in the screenshot below.

Then assign the profile to the group you designated earlier, and the BIOS settings will be delivered.

Apr 2024
01

How to Wrap and Deploy Apps using Intune

One of the features of Intune is the ability to deploy applications across a wide range of devices and users. For this demonstration I want to install RingCentral for my East Coast Sales users, but first there are some prerequisites to complete first. Using a Windows 11 computer you will need to:

  1. Download the Microsoft Win32 Content Prep Tool (IntuneWinAppUtil.exe)
  2. Download the installer for the designated program.
  3. Create the necessary folder structure for the setup files.

Opting for an MSI file when available is recommended for Intune deployments, as handling EXE files require additional steps and configurations. Once completed, you can begin to wrap the designated application for Intune deployment. Using either PowerShell or a Command Prompt, you will use the series of commands as shown below. In this scenario, the IntuneWinAppUtil is located within a folder named "Intune," containing both a "Source" and an "Output" subfolder for organizing the necessary files.

You can also type a single command that will look like this:

IntuneWinAppUtil.exe -c -s -o

In this example, I didn’t need to specify a catalog folder. When required, the Catalog Folder contains any configuration files, scripts, or other resources required by the application during its deployment process. Including this folder ensures that all necessary components are packaged together, facilitating a smoother and more reliable installation process when the application is deployed via Intune to end-user devices.

When you run the command successfully it should look something like the screenshot below.

The purpose of the wrapping process is to create the required ‘.intunewin’ file as shown below:

With the wrapping process complete, you are ready to upload the file to Intune. Using the Microsoft Intune Admin Center, navigate to Apps > Windows and click Add and select Windows app (Win32) from the dropdown menu as shown below.

Then you need to upload the application package file that was created using the Content Prep Tool.

Once I clicked ‘OK’ Intune filled in the required settings under App Information other than Publisher which I provided. In the next screen, Program, Intune then added the install and uninstall commands automatically as shown below.

In the Requirements screen you will need to provide the Operating System architecture as well as the minimum operating system required.

The next screen requires you to create a detection rule for Intune using. You generally define the rule within the Intune application deployment settings to verify if the application is already installed on a device. This involves specifying the path where the application is expected to be installed, and optionally, a file or executable within that path. For example, you might set a rule to check for the presence of an application executable in the "Program Files" directory. If the specified file is found, Intune considers the application installed; if not, it will proceed with the installation. This approach helps prevent reinstallation of applications already present on the device. In the screenshot below I have manually provided the path to the ProgramFiles folder where the RingCentral folder and application resides.

While dependencies and supersendence aren’t necessary here, let’s review what they are. Software dependencies section is for applications that must be installed before this application can be installed. The Supersedence section allows administrators to specify a new version of an application that should replace an older version already installed on devices. By defining supersedence relationships, Intune can automatically update or uninstall the previous version of the app when the new version is deployed, ensuring that users always have access to the latest features and security updates while maintaining a clean and optimized device environment.

Not needing scope tags either, we are ready to move to the final step which was to assign the app deployment policy to the East Sales Users group and then review and create the policy.  Once complete, the designated users will receive the application.


Mar 2024
11

Block Browser Extensions with Group Policy and Intune

The web browser today has literally become the default app in this era of the cloud and spurred the growth of browser extensions. Browser extensions provide a convenient way to customize and enhance a user’s web browsing experience with added functionalities and features directly within the browser. However, just as you don’t want users utilizing certain applications on corporate devices, you might want to restrict certain browser extensions for reasons of security, compliancy, content control, productivity, and performance. For instance, you may not want users installing a VPN extension to get around your web filtering. Fortunately, there are a couple of ways to achieve this.

Create a Browser Extension Blocklist with Intune

If you use Intune to manage your Windows 10 and Windows 11 laptops, you can create a configuration profile that will specify which extensions a user cannot install. Extensions already installed prior to the deployment of blocklist will be disabled without a way for the user to enable them. Should the blocklist be removed at some point, the extension will automatically become enabled once again.

Using the Microsoft Intune Admin Center go to Devices > Configuration and create a new profile. Choose Windows 10 and later as the platform and Administrative Templates as the Profile type. Assign a name to the profile and then navigate to User Configuration > Microsoft Edge > Extensions and then enable “Control which extensions cannot be installed” and input the extension names you want to filter out. You can look up extension names on the Internet. An example is shown below.

Then assign the profile to the designated groups and complete the wizard. You can also apply Edge browser extension restriction on the Computer side. In the example below, I have configured a block list for the Chrome browser.

Create a Browser Extension Blocklist with Group Policy

You can do the same with Group Policy. Because we are using Administrative Templates, the setting navigation is basically identical. Create a GPO and use the Group Policy Management Editor to navigate to User Configuration > Administrative Templates > Microsoft Edge > Extensions and enable “Control which extensions cannot be installed” as shown below. Once again, you will need to input the names of the browser extensions.

Feb 2024
19

How to Block Access to Windows Copilot with Group Policy and Intune

Windows Copilot is a feature designed to enhance user productivity and support through AI-powered assistance directly within the Windows operating system. It offers real-time suggestions, automates tasks, and provides contextual help based on user actions and behaviors. By integrating deeply with Windows, Copilot simplifies navigation, streamlines workflows, and helps users efficiently manage their tasks, making technology more accessible and intuitive for everyone.

Think of Copilot as a specialized variant of ChatGPT, seamlessly integrated into the Windows operating system to provide real-time assistance, task automation, and contextual support directly from the desktop environment. Despite its clear advantages, there are potential concerns that an organization might have:

  • Copilot’s ability to analyze user data and behaviors might raise privacy concerns.
  • The use of AI tools may conflict with some security compliances concerning the handling of data.
  • Copilot may not be suitable for some roles that require precise communication.
  • While it promises to boost productivity, reliance on Copilot could diminish users' problem-solving abilities.
  • The introduction of Copilot may lead to new errors that can potentially disrupt workflows
  • In scenarios such as public kiosks, the functionality of Copilot may be unnecessary or even inappropriate.

Block with Group Policy

To restrict user access to Windows Copilot, create a GPO using Group Policy Management and then navigate to Computer > Administrative Templates > Windows Components > Windows CoPilot and enabe “Turn off Windows Copilot” as shown in the screenshot below.

Block with Intune

While Intune currently lacks a direct menu option for configuring Windows Copilot, but it can be administered through OMA-URI settings. The essential settings required are as follows:

OMA-URI Path: ./User/Vendor/MSFT/Policy/Config/WindowsAI/TurnOffWindowsCopilot

Data type: Integer

Value: 1

Complete the profile by adding any desired scope tags and assign the profile to your designated groups and finish the wizard.

Feb 2024
05

Lock Down the Windows Settings App with Intune

In the past, group policy administrators focused on limiting standard users' access to various sections of the Windows Control Panel. Today, while controlling access to the Control Panel remains important, it's equally crucial to restrict access to the Windows Settings app. This approach is driven by several key objectives:

  • Prevent unauthorized modifications that could undermine system security.
  • Ensure compliance of regulatory standards
  • Enhance the reliability of client devices and systems to reduce ticket volume.
  • Safeguard against both accidental and deliberate data loss scenarios.
  • Ensure computers are optimized for business-critical functions.
  • Facilitate device management and troubleshooting by maintaining consistent settings across the organization.

One way to approach this is rather than creating an Intune policy that restricts access to specific ms-settings, you use an allow list approach that only allows access to a specific list of settings. To do so using the Microsoft Intune Admin Center go to Devices > Configuration and click “Create” to make a new profile. Choose Windows 10 and later as the Platform and Custom Templates as the Profile type.

Using custom templates, assign the profile a name and apply the following OMA-URI settings:

OMA-URI: `./Device/Vendor/MSFT/Policy/Config/Settings/PageVisibilityList`

Data type: String

For the String value, type showonly: and list each msi-setting you want immediately after the colon. Separate each msi-setting with a semicolon like this:

showonly:bluetooth;camera;about;sound;easeofaccess-audio;windowsupdate-action;workplace-provisioning;sound-devices;apps-volume;privacy-webcam

The screenshot below shows the process using Intune:

Complete the profile by adding any desired scope tags and assign the profile to your designated groups and finish the wizard.

You can find a complete list of ms-settings names on the Microsoft website

Jan 2024
30

Be Careful When Applying Intune Conditional Access Policies

Conditional Access policies in Microsoft Intune are designed to enhance security by ensuring that only authorized users under specific conditions can access your organization's applications and services. These policies are a critical component of a zero-trust security model, which assumes breach and verifies each request as though it originates from an uncontrolled network. Conditional Access Policies are a potent security mechanism, yet they require careful management to avoid inadvertently locking out individual users including yourself, or even the entire organization.

Let’s say you have all your users and computers contained within Azure Active Directory and you want to create a conditional access policy that restricts access to the Azure AD portal for only Azure administrators or other privileged users that require access to perform their job duties. To create a conditional access policy using the Microsoft Intune Admin Center you navigate to Devices > Conditional Access and create a new policy.

The default action of this policy will be to block access by default to the Azure AD portal. Thus, under “Include” I have selected All users. Note the warning directly underneath this selection that cautions me about locking myself out as the policy will apply to all users, even the person creating the policy and all high privilege administrators.

Thus, it is imperative that I assign groups that will be excluded from the default action. As shown in the screenshot below, I have selected an assembly of users and groups to exclude.

The next step is to select a Target Resource. The target resource refers to the applications, services, or data that the policy will protect. These resources are what the policy conditions apply to, determining how and when users can access them based on specific criteria such as user identity, device compliance, location, and risk level. Target resources can include cloud applications, which in this case is Windows Azure Service Management as shown below.

For this policy, I will not set any conditions, such as location or device platform, because I intend to block access irrespective of these factors. The final step is to specify what action will be granted to the Azure portal. Here I am going to block access for all users except for those specifically excluded from this policy. Since I have yet to exclude my own account or any group that includes my account, Intune is providing a final warning, cautioning that the policy I'm about to implement will prevent me from accessing the Azure portal.

Conditional Access policies are a powerful tool to enforce least privilege access to your critical resources. However, caution is necessary, as a single unintended click could lead to adverse outcomes.


Jan 2024
02

How to Use Scope Tags for Intune Configuration Profiles

How many times has this happened to you? You go about creating a new configuration profile using the Microsoft Intune Admin Center. You complete the setting creation process and now want to assign the profile to the designated groups. But before that, the wizard prompts you about Scope Tags as shown in the screenshot below.

Like other Intune administrators, you might often bypass scope tags by clicking Next, occasionally wondering about their purpose. Scope tags are vital for partitioning and controlling access to Intune resources, such as profiles, apps, and policies, to enable delegated administration. They allow for the classification of resources by department, function, or location, facilitating more efficient resource organization. This ensures administrators can readily manage resources relevant to their specific organizational segments. Although granular access control through scope tags might seem excessive for small to medium-sized organizations, it's incredibly beneficial for larger ones, enhancing security and compliance by restricting administrators' access only to their designated resources. This reduces the likelihood of unauthorized access or alterations to crucial settings.

Create Your Scope Tags

Start by generating your scope tags, envisioning them as segmentation tools that define which admins have access. Imagine a national company with offices across various regions. For this example, you'll create scope tags specifically for the administrative team stationed in this office that is responsible for managing the profiles and policies exclusive to the East Coast office. To configure this arrangement, you need to:

  • Create a member group called East Coast Admins which will contain the all admins of the east coast office that will have permission to manage policies and profiles for users and devices within the allotted scope.
  • Create a scope tag that will contain the east coast admin member group.

In this case I already have my east coast admin group. To create the scope tag using the Microsoft Intune Admin Center navigate to Tenant Administration > Roles > Scope Tags and create a scope tag and name it as shown below.

The next step is to add member group to the scope tag as shown here:

Next, finish the wizard to create your scope tag. With the scope tag established, you can apply it as necessary. The final step involves creating a configuration profile. When you reach the Scope Tag section this time, add the scope tag you've just created.

Then I will assign the device group that configuration profile will be applied to:

After finishing the wizard, I've set up a configuration profile targeted at East Coast computer devices. This allows East Coast admins to manage these devices specifically, utilizing the scope tag for focused oversight.

Dec 2023
04

Enforce the Touch Keyboard in Desktop Mode with Intune

Convertible 2-in-1 laptops, which seamlessly switch between desktop and tablet modes, offer great versatility for users requiring such adaptability. In tablet mode, these devices automatically display a touch keyboard when the physical keyboard is inaccessible. However, there are instances where activating the touch keyboard in desktop mode is beneficial. Some examples might include:

  • In educational settings or other situations where a keyboard configured for a second language is needed.
  • For individuals with mobility or dexterity challenges, a touch-enabled keyboard can be more user-friendly than a traditional keyboard.
  • At public kiosks or information stands, where a physical keyboard may be impractical or less hygienic.
  • - Certain job roles may find a touch-enabled device more convenient, eliminating the need to alternate between a touch interface and a physical keyboard.

Although the touch keyboard is available in desktop mode by default, there are scenarios where you might prefer it to appear automatically for user convenience. In certain cases, access to the touch keyboard might be restricted due to default policy settings. To enable automatic appearance of the touch keyboard on specific Windows machines using the Microsoft Intune admin center navigate to Devices > Configuration Profiles and create a new policy. Choose Windows 10 and later as the platform and Settings catalog as the Profile type. Name the policy and type “text input” into the settings picker. Then select “Enable Touch Keyboard Auto Invoke in Desktop Mode” as shown below.

Complete the setup wizard by assigning the policy to your designated groups.

Nov 2023
13

How to Configure Windows LAPS for Azure AD (when used with Intune)

In an earlier blog I talked about Windows LAPS (LAPS2) that was released in April 2023. It was designed to replace the original version of LAPS, now known as Legacy LAPS. We explored its integration in an on-prem AD setting across multiple articles. Today, let's pivot to applying it within the Azure AD framework.

Windows LAPS is designed to help bolster security by minimizing the risk associated with compromised local administrator passwords that could grant unwarranted access to networked Windows devices. A prevalent scenario in many enterprises is the use of a uniform local admin account across all Windows endpoints, characterized by an identical username and password. This poses a significant security gap because if a single account is breached, a threat actor could potentially gain administrative access to every interconnected device. In the case of a school district, once one student gets a hold of the local admin credentials, it doesn’t take long until the entire student body has admin rights, wreaking havoc on the machines.

Windows LAPS ensures each local admin account is assigned a unique password. For instance, if you oversee multiple Windows devices all having a local admin account labeled 'Admin1', Windows LAPS allows you to set a unique password for each of these accounts. Additionally, these passwords come with a specified expiration period, after which a new randomized password is created. While my earlier blog series delved into setting up LAPS via Group Policy, in this piece, we'll explore its configuration using Intune.

PRE-REQUISITES FOR WINDOWS LAPS AZURE AD

The prerequisites for Windows LAPS are few. There is nothing to install because Intune policies are used to configure the LAPS CSP already on the devices. Here is what you need:

  • An Intune license
  • All computers need to be on Windows 10 or Windows 11 with the April 2023 Cumulative Update installed
  • Requires one of the following roles in Azure AD: Global Administrator, Cloud Device Administrator, or Intune Administrator.

Because Azure is cloud based, you can access Windows LAPS from anywhere and Intune’s scalability allows you to easily manage a great many systems. It is important to remember one downside and that is the dependency on the internet. If your internet service is down and you don’t have an alternative means to reach Azure, you will have no way to retrieve the LAPS password. That being said, let’s get to configuring Windows LAPS for Azure AD.

Configuring LAPS for Azure AD

Before you create an Intune policy you must first access your Azure portal (portal.azure.com) and enable LAPS. Navigate to Devices > Device Settings and scroll down. Then turn on the “Enable Azure AD Local Administrator Password Solution” as shown below.

Once that is completed, you can move on to Intune. Using the Microsoft Intune admin center navigate to Endpoint Security > Account protection and click Create Policy. Choose “Windows 10 and later” as the Platform and “Local admin password solution Windows LAPS” as shown in the screenshot below.

After naming the policy it is time to configure settings as shown below. Of course, in this instance we will choose Azure AD only as the Backup Directory.

For the Administrator Account Name, I chose a custom account called fabadmin. If you are using Windows LAPS to manage any custom local administrator account, you must enter the name of that account here. You can leave this field blank if you are configuring LAPS for the built-in administrator, even if you have changed the name from its default name.  

For Password Complexity there are four options:

  • Large letters
  • Large letters + small letters
  • Large letters + small letters + numbers
  • Large letters + small letters + numbers + special characters

Note that four options are the default if you don’t select an option.

Post Authentication Actions is used to specify the actions to take upon expiration of the configured grace period which is 12 days in this instance. There are three options here.

  • Reset password: upon expiry of the grace period, the managed account password will be reset.
  • Reset the password and logoff the managed account: upon expiry of the grace period, the managed account password will be reset and any interactive logon sessions using the managed account will be terminated. (Default behavior)
  • Reset the password and reboot: upon expiry of the grace period, the managed account password will be reset, and the managed device will be immediately rebooted.
  • Not configured.

If no selection is made, the setting will default to the logoff option.

Post Authentication Reset Delay Sets the delay in hours before the previous actions above is executed. The default is 24 hours which is also the maximum.

With your settings configured, assign relevant scopes, and deploy the rule to the Azure Ad group you want to manage with this policy. In my next blog I will talk about how to retrieve the password from Azure and how to audit LAPS retrieval.