MDM & GP Tips Blog

Sep 2024
30

Customizing Windows Settings Visibility with Intune

You can create a "Settings Page Visibility List" policy that allows administrators to show only specific pages in the Settings app. The secret here is the "showonly:" string that appears in the custom OMA-URI settings. In this example I will choose the only the following settings to remain visible.

  • bluetooth: Bluetooth settings
  • camera: Camera settings
  • about: System information
  • sound: Sound settings
  • easeofaccess-audio: Ease of Access audio settings
  • windowsupdate-action: Windows Update actions
  • sound-devices: Sound devices settings
  • apps-volume: App volume and device preferences
  • easeofaccess-visualeffects: Ease of Access visual effects
  • appsfeatures-app: Apps & features
  • installed-apps: Installed apps list
  • privacy-webcam: Privacy settings for webcam

Using the Microsoft Intune Admin Center, navigate to Devices > Configuration > Create > New Policy. Select Windows 10 and later as the Platform and Custom as the Profile type. Name the policy and click Add to configure the OMA-URI settings as shown below.

The OMA-URI path is OMA-URI:

./Device/Vendor/MSFT/Policy/Config/Settings/PageVisibilityList

Choose String as the Data Type. The string will include the following:

Value: showonly:bluetooth;camera;about;sound;easeofaccess-audio;windowsupdate-action;sound-devices;apps-volume;easeofaccess-visualeffects;appsfeatures-app;installed-apps;privacy-webcam

When completed the OMA-URI settings will look something like this:

Then assign the designated groups to the policy and save.

Sep 2024
16

How to Configure App-Specific Intune Access Controls

If you use Azure AD to host your user accounts, you may want to create conditional access policies for when employees attempt to access certain cloud applications. An example might be an enterprise resource planning solution, an employee benefits site or a password manager. A couple of conditions you can assign might be:

  • Require MFA as an extra layer of authentication beyond passwords to reduce the risk of unauthorized access even if credentials are compromised.
  • Require that access be only granted from Azure joined devices.

Conditional access policies allow you to safeguard sensitive information and apply stricter controls only where they're most needed. They may also aid in complying with various regulatory requirements and helps mitigate risks associated with remote work.

In this example I am going to create a conditional access policy for LastPass, a password management tool. To create a conditional access policy for a specific cloud application, sign into the Microsoft Intune Admin Center and navigate to Devices > Conditional Access. Click "New policy" to start configuring the new conditional access policy.

Give the policy a descriptive name and go to assignments. For users I chose a group comprised of all IT workers that regularly access many applications. I then selected the two LastPass cloud applications that our organization uses as shown in the screenshot below:

Then under Access Controls I will create two conditions for granted access. The first is MFA and the second is that the user must be using a compliant device as shown below.

For added security you can specify a sign in frequency under the Session category. Assigning a sign-in frequency requires users to re-authenticate periodically when accessing cloud applications or resources. As shown in the screenshot below, administrators can customize the frequency based on the sensitivity of the applications or data. In this case I am requiring users to reauthenticate each day.

Sep 2024
02

How to Enable Windows 11 Dev Drive with Group Policy and Intune

Dev Drive is a new feature in Windows 11 designed to enhance performance for developers. It provides a specialized storage volume optimized for tasks like cloning repositories, building code, and copying files. Dev Drive is built on Microsoft's Resilient File System (ReFS) technology and offers improved performance and data integrity compared to NTFS. It also provides enhanced control over storage volume settings and security, including trust designation, antivirus configuration, and administrative control over attached filters.  You can learn more about Dev Drive and how to create it here in this article.

You will need to create a policy first that allows the creation of Dev Drive storage volumes on Windows 11 devices. When enabled, users with appropriate permissions can create and use Dev Drives. 

How to Enable Dev Drive using Group Policy

Create a GPO and use the Open the Local Group Policy Editor. Navigate to Computer Configuration > Administrative Templates > System > Filesystem and enable the Enable dev drive" policy as shown in the screenshot below:

Note that the optional antivirus filter setting ensures that antivirus protection remains active on Dev Drives, even if local administrators attempt to detach it. Once enabled, assign the policy to your DevOps users for policy deployment.

How to Enable Dev Drive using Intune

Using the Microsoft Intune Admin Center, you will navigate to Devices > Configuration > Create > New Policy. Select Windows 10 and later as the Platform and Administrative Templates as the Profile type. Now go to Computer Configuration > Administrative Templates > System > Filesystem just like the Group Policy example. The screenshot below shows the configured settings:

Aug 2024
19

Create your own Authentication Strengths for Intune MFA

Given the increasing ease with which passwords can be compromised, relying solely on password authentication is no longer a secure method for controlling access. In response to this vulnerability, many companies are now widely implementing Multi-Factor Authentication (MFA) to strengthen their cybersecurity defenses. MFA adds an essential layer of security by requiring multiple forms of verification, such as passwords, security tokens, or biometric scans. This added layer of protection makes it significantly harder for unauthorized individuals to access sensitive data.

Intune provides multiple secure authentication alternatives. Some built in options include Passwordless MFA that includes phishing resistant methods that use Microsoft Authenticator. It also includes the use of FIDO2 security keys and Windows Hello for Business. Intune. In the case of FIDO2 keys, you can restrict authentication to specific manufacturers.

Custom Authentication Strengths

 Microsoft Intune provides administrators with the flexibility to create tailored authentication requirements that can precisely match their organization's security needs. Administrators can create up to 15 custom authentication strength using the following authentication methods:

  • Password
  • SMS
  • Voice call
  • Microsoft Authenticator app (push notification)
  • OATH hardware token
  • OATH software token
  • Windows Hello for Business
  • FIDO2 security key
  • Certificate-based authentication

You can use different combinations to enforce specific authentication methods for different scenarios. For instance, different authentication strengths can be required based on whether users are accessing resources from inside or outside the corporate network. Stronger authentication methods can also be required for users or sign-ins deemed high-risk.

To create new authentication strengths using Microsoft Intune Admin Center and navigate to Conditional Access > Authentication strengths and click "New authentication strength". Then select the desired authentication method. In the example below I made a authentication strength for Passkeys FIDO2.

I then clicked the advanced options and chose checked Microsoft Authenticator (Preview).

Then click create and you are one.

Creating a Conditional Access Policy

Now let’s use the new authentication strength in a conditional access policy. Return back to Conditional Access and click “Create New Policy.” Then do the following:

  • Give the policy a descriptive name such as "Require FIDO2 for Passwordless Access".
  • Under "Users and groups", select the users or groups you want this policy to apply to.
  • Under "Cloud apps or actions", select the applications you want to protect as shown in the screenshot below

You can then choose the conditions that will trigger the policy such as User risk level, device platform or location.

To configure the Access controls, go to Grant and select Require authentication strength" and select an existing custom strength. You can also create a new authentication strength here as well.

The Grant section will now show 1 control selected as shown below.

Now Set "Enable policy" to "On" and create the policy. You have now created a conditional access policy with your custom authentication strength.

Aug 2024
05

Use Device Tags to Simplify Intune Management

Admins can tag devices using Microsoft Intune to enhance device management, organization, and security across their enterprise environment. Tags can be used to efficiently group and categorize devices based on various attributes such as department, location or function. This logical grouping enables IT teams to apply policies, updates and security measures more effectively. Tags can be automatically assigned and updated through dynamic rules, ensuring that device classification remains accurate and up-to-date. Some of the applications of tagging includes the following:

  • Tags can be used to filter and search for specific devices in large environments to improve management efficiency.
  • Tags can be used to apply specific policies, configurations, or software to groups of devices that share common characteristics.
  • Tags can help in tracking and managing hardware assets across an organization.
  • Tags can be used to identify devices that require specific security measures or compliance checks.
  • Tags can provide additional context about devices, which can be helpful during troubleshooting or decision-making processes.

In other words, tagging provides numerous management options and can prove a way to simplify your MDM efforts.

Create a Configuration Policy

To implement tagging using the Microsoft Intune Admin Center, navigate to Devices > Configuration > Policies > and create a new policy. Choose Windows 10 and later as the Platform and select Custom Templates as the Profile type.

You will then apply a name for the policy and configure the OMA-URI Settings. The OMA-URI path is the most critical here so use the following path:

./Device/Vendor/MSFT/WindowsAdvancedThreatProtection/DeviceTagging/Group

In the example below I selected String as the data type and made a tag called IT Employee.

You could also use a PowerShell script to create tags and deploy the script through Intune. I can then create a dynamic group in Azure AD that includes all devices with the “IT Laptop” tag. Security policies and configuration policies could then be applied to devices belonging to the IT role group.

Jul 2024
29

Configure Conditional Access Name Locations with Intune

The Microsoft Intune Admin Center enables you to create Conditional Access policies based on locations for additional granular control over access to organizational resources. This feature is particularly valuable for entities with geographically limited operations, such as school districts, government institutions, or regional businesses.

For instance, if your organization's users are primarily located within a single country, you can implement a policy that restricts logins from all other countries. This approach significantly enhances your security posture by mitigating risks associated with global cyber threats.

By leveraging Named Locations in Conditional Access policies, you can effectively:

1. Block access attempts from unexpected geographical areas

2. Reduce the attack surface for brute force and credential stuffing attacks

3. Minimize the risk of unauthorized access from foreign IP addresses

By restricting access from unfamiliar or high-risk locations, organizations can reduce the risk of unauthorized access and potential security breaches.

Create Country Locations

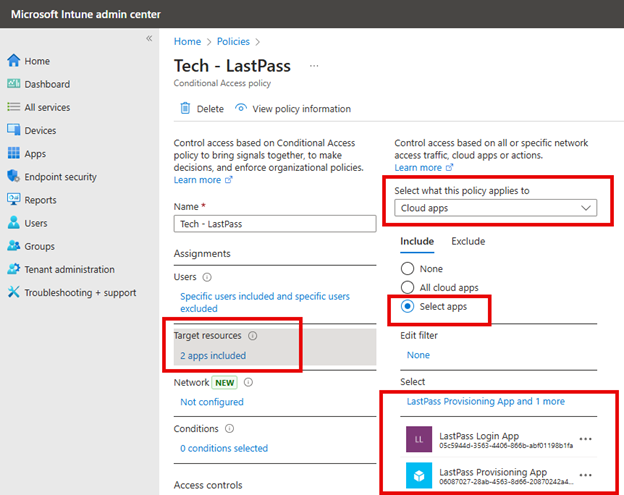
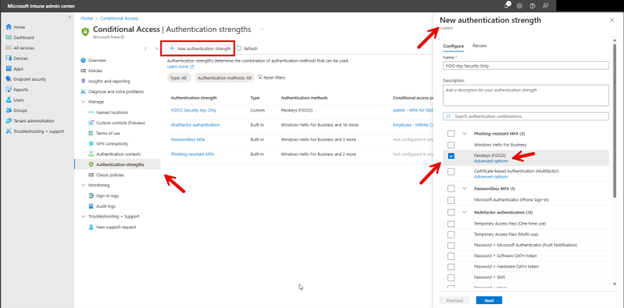
To create these location areas, you need to navigate to Devices > Conditional Access > Named Locations. Here you can create locations according to Countries, IP addresses and Multifactor Authentication Trusted IPs as shown below.

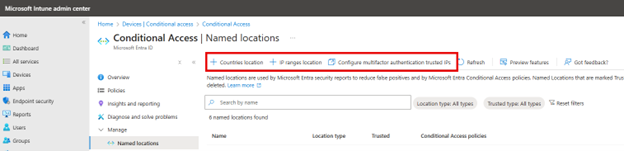
Let’s say you want to create a conditional access policy that stops all login attempts from other countries. Click Countries location and select all countries outside of your own as shown here.

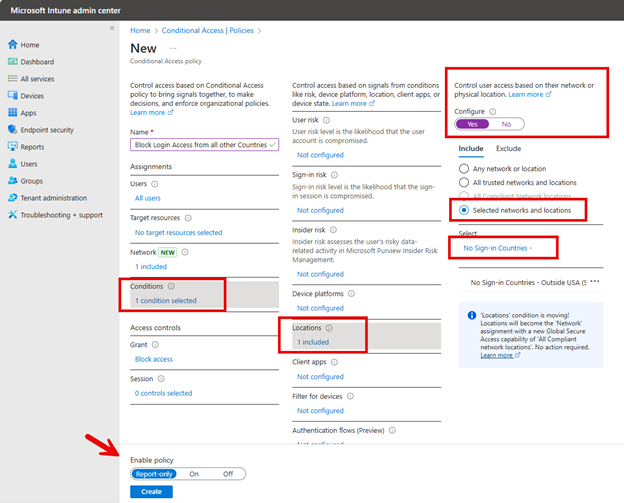
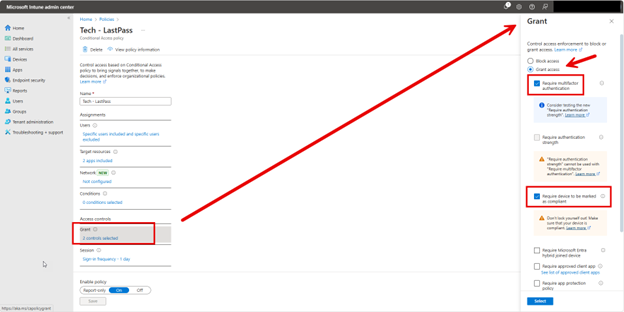
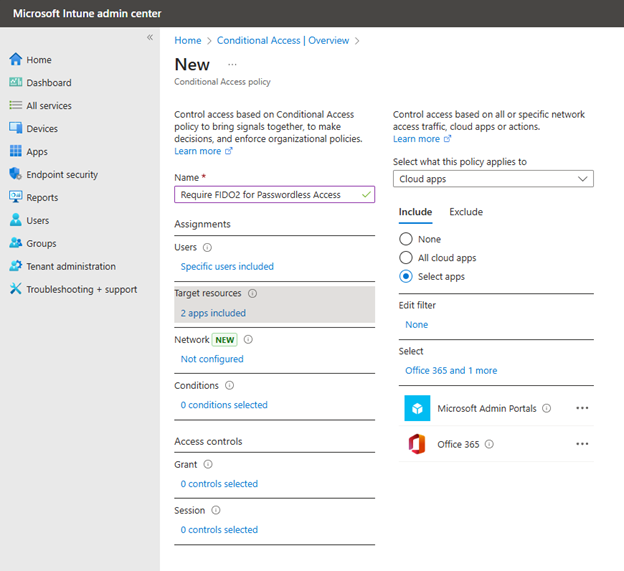
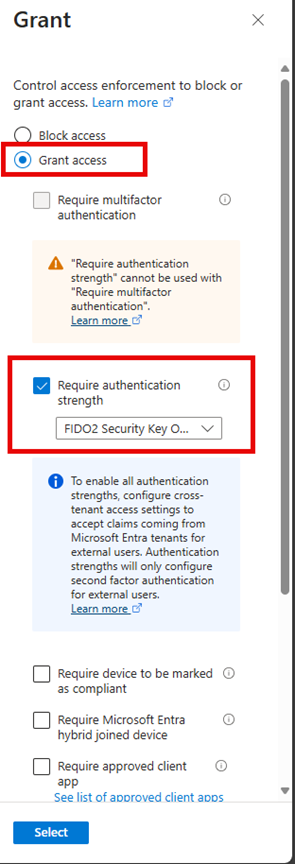
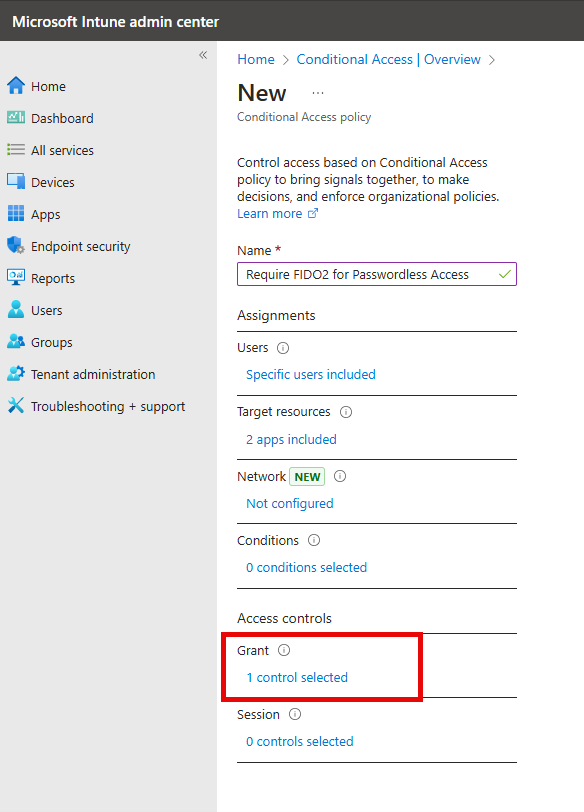
Once you've defined the Named Location, you can proceed to create a corresponding Conditional Access policy. Configure the policy to use the location condition, selecting the Named Location you've previously defined. You may want to initially enable the policy in "Report-only" mode. This allows you to monitor its potential impact without affecting user access. You also need to be mindful of employees who travel internationally as this may require you to:

a) Create exceptions for specific users or groups

b) Implement a process to temporarily modify the policy for traveling employees

c) Create a traveling policy that allows access from all countries and assign it to anyone traveling temporarily.

The screenshot below shows how anyone attempting access from all other countries of the world will be blocked.

Other Location Scenarios

You can also create locations based on IP addresses or ranges. You can use these locations for a variety of instances. For instance, you can create policies that differentiate between office locations and remote work environments that apply security measures differently for set locations. You also may be receiving failed login attempts from a certain IP address and make a conditional access policy to block it.

You can also create trusted IP locations to coincide with your MFA conditional access policies. In this scenario, all logins except those originating from your trusted IP ranges. Users connecting from trusted locations will not be prompted for MFA, while those connecting from outside these ranges will need to complete MFA.

Jul 2024
15

How to Setup Multi Admin Approval with Intune

One of the first objectives of a hacker upon infiltrating a network is to gain access to a privileged identity within your organization. One of the more powerful privileged accounts in your network is probably an Intune admin as these accounts weld a lot of power. Should one of those accounts get compromised, they can do significant list of things to your MDM environment such as deploy a malicious application to your corporate devices such as ransomware or backdoor apps. They could also deploy a harmful PowerShell script or other executable script.

MAA is like MFA

With the rapidly expanding threat landscape of today, relying on a single password to secure user accounts is no longer viable. This is why multifactor authentication (MFA) is now considered best practice, as it provides an additional security layer to protect digital identities. Now let’s apply that same logic to your Intune environment.

You cannot risk the compromise of a single Intune admin account that can then execute malicious tasks at will. Like MFA, Multi Admin Approval (MAA) adds an extra layer of security by requiring multiple administrators to approve certain critical actions before they can be executed. This means that if you create a new policy to deploy an application, that policy will not be enabled until a member of the assigned approval group authorizes the action.

When a Tenant account attempts to modify a resource protected by an access policy, Intune implements withholds applying the change until a member of the designated approval group reviews and authorizes it. This process ensures that critical changes undergo additional scrutiny before implementation. The approver has the authority to either approve the change and allow it to proceed or reject it which will block it entirely.

How to Configure MAA in Intune

Note there are some prerequisites that must be met prior to enabling MAA:

  • Multi admin approval requires a minimum of two administrator accounts within your tenant
  • Creating an access policy requires that your account be assigned either the Intune Service Administrator role or Azure Global Administrator role.
  • To qualify as an approver, an account must belong to the group assigned to the access policy for a specific type of resource.

To enable MAA for Intune go to the Microsoft Endpoint Manager admin center and navigate to Tenant Administration > Multi Admin Approval > select Access policies and click Create as shown in the screenshot below.

Create a name for the MAA policy and select either Scripts or Apps for the Profile type as shown below.

Next is the Approvers page where you will click “Add groups” and select the group of users that will act as approvers for this policy.

Then review and click Create to finalize and save the policy.

Approving Requests

So now let’s say you create an Intune policy to deploy a new application. A new step will be required for you to include the business justification for your request. Rather than an active policy, it is submitted as a request and awaits approval. You can monitor the status of your requests on the MAA page. There you will see a list of all your submitted requests, along with their current status.

The status of your requests can be one of the following:

  • Pending: The request is waiting for approval from another administrator.
  • Approved: The request has been approved and the changes have been applied.
  • Rejected: The request was rejected by an approver.
  • Canceled: The request was canceled by you or another administrator.

To approve the request of another admin, simply navigate to Pending requests and select the specific request you want to approve. Make sure that all administrators involved in the approval process are notified of pending actions.

Jul 2024
01

2 Different Ways to Manage the Control Panel with Intune

Microsoft Intune offers two primary methods for managing Control Panel settings on Windows devices: Administrative Templates and the Settings Catalog. Administrative Templates are based on ADMX files, similar to Group Policy Objects (GPOs) in on-premises Active Directory. By using the administrative templates, you can configure a wide range of settings, including Control Panel visibility and functionality. This method provides a familiar interface for administrators who have experience with Group Policy.

To use this method, open the Microsoft Intune admin center and navigate to navigate to Devices > Configuration > Create New profile and select Windows 10 and later as the platform and Administrative Templates as the Profile type. In this example I want to hide Add or Remove Programs. In the screenshot below I went to User Configuration and chose “Remove Add or Remove Programs” and then enabled the setting as shown in the screenshot below.

Another approach might be to remove the Programs and Features page altogether. To do so, navigate to User Configuration > Control panel and select “Hide specified Control Panel items” and set the option to enabled. As shown in the screenshot below, list the Control Panel items you want to hide using their canonical names. Here Is chose to hide System Settings and Programs and Features. Complete the creation process by assigning the policy to the designated groups.

Using Windows Settings

You can also manage Control Panel with Intune without using administrative templates. In this case you will use the Settings Catalog that will apply to both the traditional Control Panel and the modern Settings app. Once again, navigate to Devices > Windows > Configuration profiles and click on "Create Profile". Then select "Windows 10 and later" as the Platform but this time choose "Settings catalog" as the Profile type.

In the Settings picker do a search for “control panel” and I chose “Add or Remove Programs” but this time I had more options to choose from. I then “Hide Add New Program page for users. Then I enabled the policy to the left as shown in the screenshot below.

You can also hide specific control panel items as well as shown below.

Both administrative templates and the settings catalog can be used to manage the Control Panel using Intune. The settings catalog offers more comprehensive options, including all settings available in Administrative Templates plus additional ones. It allows administrators to search for specific settings and create custom groups. However, in many cases, both alternatives may prove equally effective for managing Control Panel settings. The choice often depends on the specific requirements of the organization and the preferences of the IT administrators.


Jun 2024
17

Setting up a Background Image for an Intune Managed Device

Companies want to control the background image on their workstations to maintain a professional appearance, reinforce brand identity, and ensure consistency across all devices. It also prevents "genreal messing around" and at least looks tidy. .

Setting up a background image for on prem corporate workstations using Group Policy was straightforward.

  • An administrator stored the background image on a network share
  • A GPO was created to point to the shared image

However, for mobile and remote machines, this approach is not feasible as these devices are often disconnected from the corporate network.

Intune provides a solution for assigning a background image to any Windows computing device it manages, regardless of location. The first step is to store your shared image on the internet as I have done below.

https://cdnsm5-ss9.fabrikam.com/UserFiles/Servers/Server_136424/Image/Departments/Technology/UserBackground.jpg

Then, using the Microsoft Intune Admin Center navigate to Devices > Configuration > Create New policy and select Windows 10 and later as the platform and settings catalog as the Profile type. Using the Settings picker, do a search for personalization. Then choose Desktop Image URL and input the URL as shown in the screenshot below.


Another key difference here is that with Group Policy, the image is not downloaded to the device. The policy simply points to the image in its shared location. Using Intune, both the policy and image file are pushed to the managed devices, and the image is stored on the device itself.

This makes Intune a preferred solution for off-premises machines. Like any configuration profile, the final step is to assign the policy to the designated groups, and you are done.

May 2024
20

Remove the Ability of Users to Change Passwords with Intune

While security professionals have traditionally recommended that users change their passwords regularly, this mantra is no longer considered a best practice. In fact, there are valid reasons why an organization may choose to even remove the ability for users to change passwords altogether. By restricting password changes, organizations can ensure that password resets and updates are centrally managed and controlled, aligning with their security policies and compliance requirements.

One scenario where restricting password changes can be beneficial is in educational institutions where student usernames are required to contain assigned student ID numbers. Allowing students to change their passwords could lead to inconsistencies and potential issues with account management.

Other examples include environments where shared accounts are used where permitting individual users to change passwords can lead to confusion, disruption, and potential security risks. By removing this ability, organizations can ensure that shared account passwords are managed centrally and consistently.

Some organizations may already have established password management solutions or processes in place, such as Local Administrator Password Solution (LAPS) or third-party password management tools. In these cases, removing the ability for users to change passwords through Intune can help prevent conflicts or inconsistencies with these existing solutions, ensuring a streamlined and cohesive password management approach.

Creating the Necessary Intune Configuration Profile

To prevent users from changing their passwords using the Microsoft Intune admin center go to Devices > Configuration and create a new policy. Select ‘Windows 10 and later’ as the platform and choose ‘Administrative Templates’ as the profile type. Then name the profile and proceed to configuration settings.

You will find the appropriate settings in User Configuration > System > Ctrl+Alt+Del Options and enable ‘Remove Change Password” as shown in the screenshot below.

While restricting the ability for users to change passwords can address certain challenges, it is recommended that organizations carefully evaluate their specific requirements, security policies, and existing processes before implementing such a policy. They should consider any potential complexity issues in terms of password management and user experience that it may introduce.