How to Setup Printing in the Cloud Using Universal Print (Part 1)
So, you’ve migrated your enterprise’s on prem AD presence to Azure AD and now and are thinking that everything will be native cloud from here on out. There’s just one problem. Your users are still printing stuff and those printers rely on on-prem infrastructure. While many consider printing to be a legacy technology, organizations still depend on it. The problem is that printer management can be a time consuming and manually intensive ordeal having to deal with so many different types of printers, associated drivers, and spoolers. What’s more, assigning printers using Intune can be challenging at best.
Fortunately, there is an option available from Microsoft that allows you to upgrade your printer environment to a cloud-based print solution. It’s called Universal Print, a subscription-based service that runs on Microsoft Azure, providing a centralized print management for print administrators. Some of the benefits of Universal Print include the following:
- No need to install printer drivers on PCs as printing takes place using the Internet Printing Protocol (IPP). There’s also no need for print servers for supported printers.
- Provides remote users the ability to print at the corporate office and integrates with Windows 365 virtual PCs.
- Printers can be assigned end-user locations at a granular level so users can easily find the right printer for their location whether it be a country, town, site, building, floor, etc. You can also assign printers using Intune.
- Extensive reporting is available to monitor your print capacity as well as obtain a daily aggregated job count for each printer or user, giving you the visibility to understand what is happening in your print environment each month.
- Enhanced security as machines must be joined to Azure AD to print and printing takes place over encrypted connections while all print data is contained in the same secure platforms that Online Exchange and Teams utilizes.
There’s obviously a lot of benefits to Universal Print so let’s look at how to implement it.
Prerequisites for Universal Print
Let’s start with the printers themselves. Some printers can integrate directly with Universal Print out of the box. Here’s a list from Microsoft of Universal Print ready printers. Chances are, most of your printers don’t support Universal print. In that case, you need to download the Universal Print Connector to an on-prem machine and add your printers to it. The Connector will serve as the intermediary between Azure and legacy printers.
Next you will need the right subscription. Universal Print is included with multiple commercial and educational Windows 365 and Windows 10 subscriptions. You can also purchase a standalone subscription as well. Applicable licenses include the following:
- Windows 365 Enterprise F3, E3, E5, A3, A5
- Windows 10 Enterprise E3, E5, A3, A5
- Microsoft 365 Business Premium
- Universal Print (standalone)
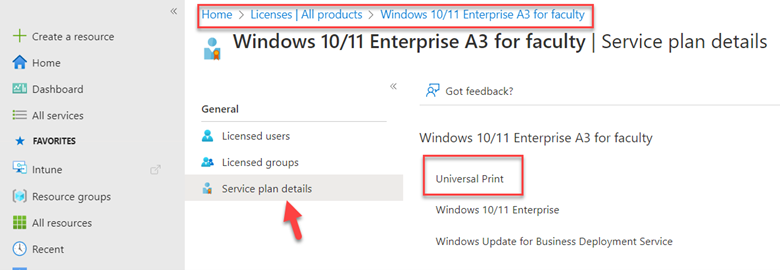
You can confirm whether your current license provides Universal Print access by going to your Azure portal and navigating to Azure Active Directory > Licenses > All products. Select a product from your list and click on “Service plan details.”

Each print user will need an assigned license. A Universal Print license is also required for all print administrators regardless of whether they print or not. Keep in mind that the designated license doesn’t allot you unlimited printing. Universal Print uses the same OPEX model that is characteristic of cloud computing services in that you only pay for the resources that you use. Universal Print comes with a pool of print jobs that equates to 5 print jobs per user per month. That means that 100 licensed users will be able to print 500 print jobs each month. A print job constitutes a single printed document regardless of how many pages or the number of copies printed. A colored printed document counts the same as a standard print job and attributes such as single vs. double sided do not matter either. Note that there is currently no way to enforce a print quota on individual users. While the license allots 5 print jobs per user, one user can consume all the print jobs over the course of a month. It is believed that quota management will be introduced down the road.
To configure or manage Universal Print, an admin must be a global administrator or be assigned the Printer Administrator role. I had to assign myself the print administrator role even though I was a global administrator to complete the configuration steps for this article series.
Finally, client devices must be running Windows client OS, version 1903 or greater.
Next: Installation and Configuration
In the next article, I will show how to install the Universal Print Connector to an on-prem machine and configure the Universal Print service. We will then assign the printers using Intune.


Comments (0)