Azure and Intune Dynamic Groups
So Assigned Groups are great and there are many uses for them. But we live in a dynamic world today and our Azure/Intune environments are often reflective of that. Things change, and sometimes we need our groups to adapt to those changes. That is why we also have Dynamic Groups. Rather than specifying the users or devices to add to a group, we set criteria to define the members of a Dynamic Group. When the specified condition applies for a user or device, it is added to the group automatically. Should a member no longer satisfy the rule, it is removed from the group. The use of Dynamic Groups can greatly reduce the administrative overhead of constantly adding and removing users for large enterprise environments that perpetually change.
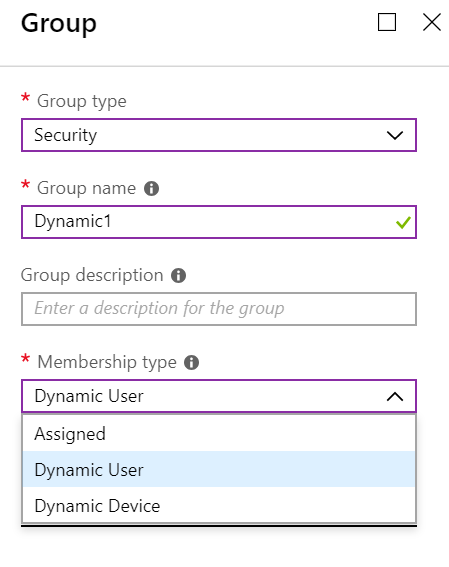
There are a couple of things that are different when creating Dynamic Groups. First off, P1 or P2 licensing is required to create and use Dynamic groups. Second of all, we must make separate groups for users and devices as is shown below.

Once we create our Dynamic Group, we need to populate it. Remember, we don’t select the users or devices ourselves. We cannot manually add or remove a member from a Dynamic group. We create membership rules which will then populate the groups by querying Azure AD to find the members that meet the criteria of that rule. Make note again that we cannot create a rule that contains both users and devices.
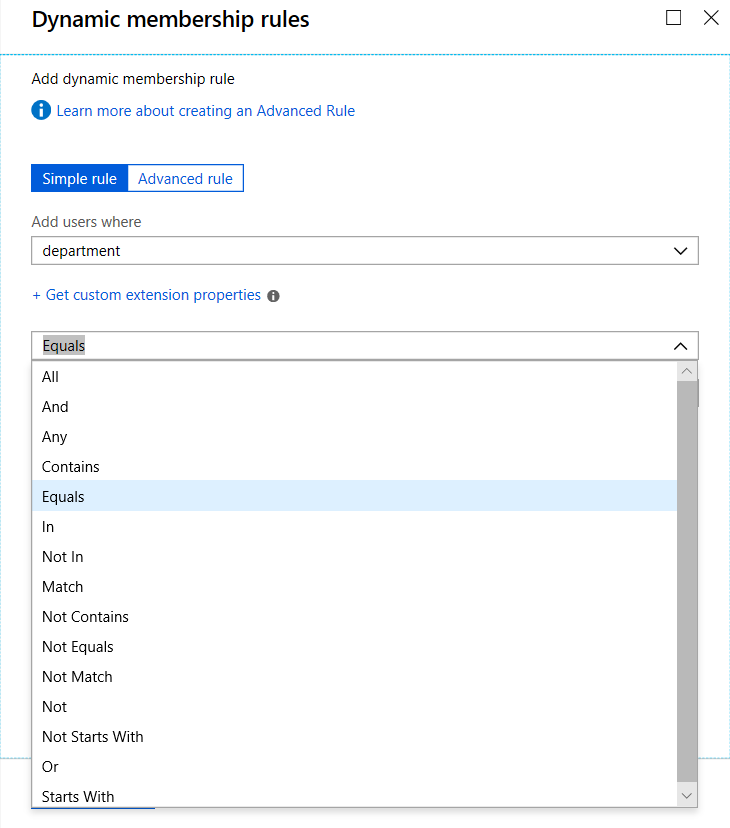
There are two types of rules, Simple and Advanced. I assume everyone wants to start with the easier one first so let’s create a Simple Rule.
A membership rule has 3 components:
- A property
- An operator
- A value
Say we wanted to create a dynamic group to include all current users of the HR Department. In this case the property would be “department,” the operator would be “equals,” and the value would be HR. If this isn’t sounding very simple, think again, because the Simple Rule creator interface does a great job of guiding you through the process. You just simply choose which option you want from each component menu. This of course means that your rules are limited to the choices made available in the GUI.

So what about Advanced Rules? Well sometimes you may want to run extensive queries that go beyond the confines of the Simple rule creation process. Creating Advanced rules may look a little intimidating because there is no easy to follow GUI menu to guide you. Instead you only get a text box where you write out your rule. Actually its not that intimidating. We could have created an Advanced rule for our previous example for those users who belong to the HR Department. The “rule equation” per say would be as follows:
(user.department -eq "HR")
A good example of when you might need to use an Advanced rule would be if you are applying multiple criteria in a single rule. For instance, you want to create a Dynamic device group for Windows 1809 devices. In this example, the rule would have to first query for Windows devices and then perform a subsequent query for the build number, which in this case is “10.0.17758.” The resulting rule would then be as follows:
(device.deviceOSType -eq “Windows”) -and (device.deviceOSVersion -startsWith “10.0.17758”)


Comments (0)