MDM & GP Tips Blog

Jan 2024
30

Be Careful When Applying Intune Conditional Access Policies

Conditional Access policies in Microsoft Intune are designed to enhance security by ensuring that only authorized users under specific conditions can access your organization's applications and services. These policies are a critical component of a zero-trust security model, which assumes breach and verifies each request as though it originates from an uncontrolled network. Conditional Access Policies are a potent security mechanism, yet they require careful management to avoid inadvertently locking out individual users including yourself, or even the entire organization.

Let’s say you have all your users and computers contained within Azure Active Directory and you want to create a conditional access policy that restricts access to the Azure AD portal for only Azure administrators or other privileged users that require access to perform their job duties. To create a conditional access policy using the Microsoft Intune Admin Center you navigate to Devices > Conditional Access and create a new policy.

The default action of this policy will be to block access by default to the Azure AD portal. Thus, under “Include” I have selected All users. Note the warning directly underneath this selection that cautions me about locking myself out as the policy will apply to all users, even the person creating the policy and all high privilege administrators.

Thus, it is imperative that I assign groups that will be excluded from the default action. As shown in the screenshot below, I have selected an assembly of users and groups to exclude.

The next step is to select a Target Resource. The target resource refers to the applications, services, or data that the policy will protect. These resources are what the policy conditions apply to, determining how and when users can access them based on specific criteria such as user identity, device compliance, location, and risk level. Target resources can include cloud applications, which in this case is Windows Azure Service Management as shown below.

For this policy, I will not set any conditions, such as location or device platform, because I intend to block access irrespective of these factors. The final step is to specify what action will be granted to the Azure portal. Here I am going to block access for all users except for those specifically excluded from this policy. Since I have yet to exclude my own account or any group that includes my account, Intune is providing a final warning, cautioning that the policy I'm about to implement will prevent me from accessing the Azure portal.

Conditional Access policies are a powerful tool to enforce least privilege access to your critical resources. However, caution is necessary, as a single unintended click could lead to adverse outcomes.


Nov 2023
20

How to Retrieve a Password in Azure LAPS


In my previous blog I showed how to setup LAPS for Azure AD. With everything configured correctly, now it is time to retrieve the password for the local administrator account that our policy addresses. To retrieve the password, go to your Azure portal and navigate to Devices > All Devices > Local administrator password recovery (Preview) and find the selected device. Click on Show local administrator password beside the listed device. Navigate to the right and either show the password or click the copy button as shown in the screenshot below.

Armed with the specified password, you can now log into the device using the local administrator credentials and execute tasks that necessitate local admin privileges.


Nov 2023
13

How to Configure Windows LAPS for Azure AD (when used with Intune)

In an earlier blog I talked about Windows LAPS (LAPS2) that was released in April 2023. It was designed to replace the original version of LAPS, now known as Legacy LAPS. We explored its integration in an on-prem AD setting across multiple articles. Today, let's pivot to applying it within the Azure AD framework.

Windows LAPS is designed to help bolster security by minimizing the risk associated with compromised local administrator passwords that could grant unwarranted access to networked Windows devices. A prevalent scenario in many enterprises is the use of a uniform local admin account across all Windows endpoints, characterized by an identical username and password. This poses a significant security gap because if a single account is breached, a threat actor could potentially gain administrative access to every interconnected device. In the case of a school district, once one student gets a hold of the local admin credentials, it doesn’t take long until the entire student body has admin rights, wreaking havoc on the machines.

Windows LAPS ensures each local admin account is assigned a unique password. For instance, if you oversee multiple Windows devices all having a local admin account labeled 'Admin1', Windows LAPS allows you to set a unique password for each of these accounts. Additionally, these passwords come with a specified expiration period, after which a new randomized password is created. While my earlier blog series delved into setting up LAPS via Group Policy, in this piece, we'll explore its configuration using Intune.

PRE-REQUISITES FOR WINDOWS LAPS AZURE AD

The prerequisites for Windows LAPS are few. There is nothing to install because Intune policies are used to configure the LAPS CSP already on the devices. Here is what you need:

  • An Intune license
  • All computers need to be on Windows 10 or Windows 11 with the April 2023 Cumulative Update installed
  • Requires one of the following roles in Azure AD: Global Administrator, Cloud Device Administrator, or Intune Administrator.

Because Azure is cloud based, you can access Windows LAPS from anywhere and Intune’s scalability allows you to easily manage a great many systems. It is important to remember one downside and that is the dependency on the internet. If your internet service is down and you don’t have an alternative means to reach Azure, you will have no way to retrieve the LAPS password. That being said, let’s get to configuring Windows LAPS for Azure AD.

Configuring LAPS for Azure AD

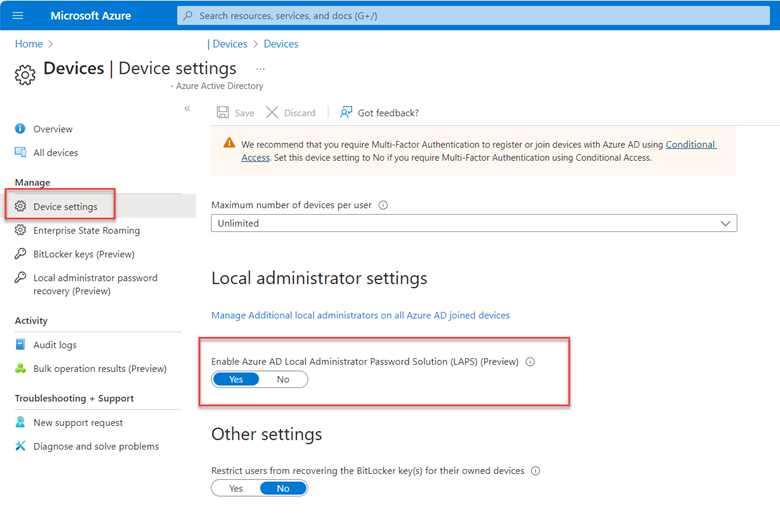
Before you create an Intune policy you must first access your Azure portal (portal.azure.com) and enable LAPS. Navigate to Devices > Device Settings and scroll down. Then turn on the “Enable Azure AD Local Administrator Password Solution” as shown below.

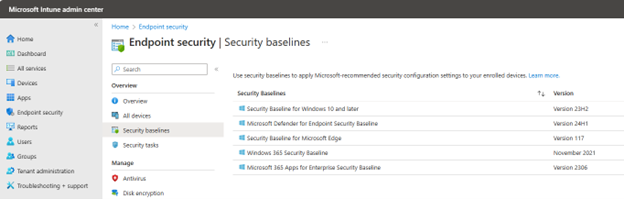
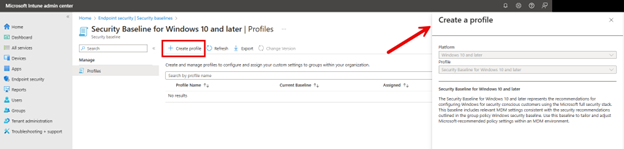
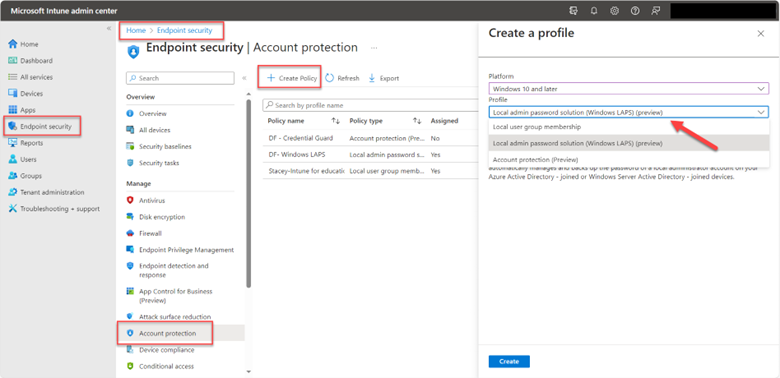
Once that is completed, you can move on to Intune. Using the Microsoft Intune admin center navigate to Endpoint Security > Account protection and click Create Policy. Choose “Windows 10 and later” as the Platform and “Local admin password solution Windows LAPS” as shown in the screenshot below.

After naming the policy it is time to configure settings as shown below. Of course, in this instance we will choose Azure AD only as the Backup Directory.

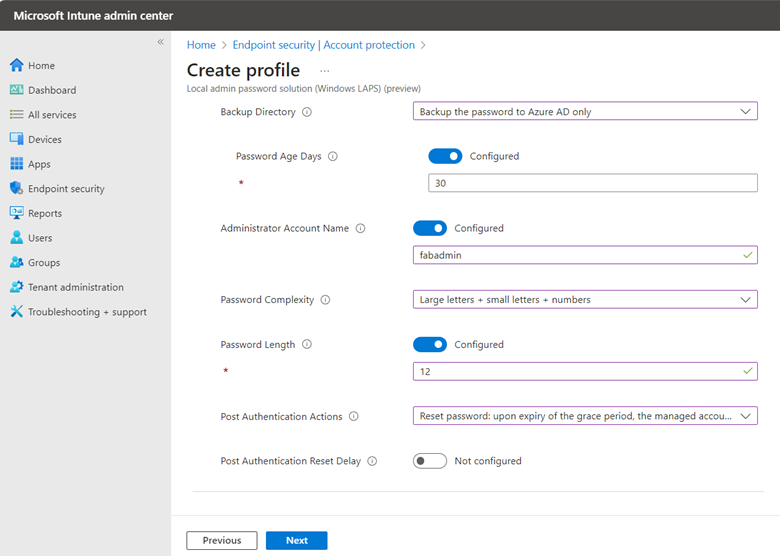
For the Administrator Account Name, I chose a custom account called fabadmin. If you are using Windows LAPS to manage any custom local administrator account, you must enter the name of that account here. You can leave this field blank if you are configuring LAPS for the built-in administrator, even if you have changed the name from its default name.  

For Password Complexity there are four options:

  • Large letters
  • Large letters + small letters
  • Large letters + small letters + numbers
  • Large letters + small letters + numbers + special characters

Note that four options are the default if you don’t select an option.

Post Authentication Actions is used to specify the actions to take upon expiration of the configured grace period which is 12 days in this instance. There are three options here.

  • Reset password: upon expiry of the grace period, the managed account password will be reset.
  • Reset the password and logoff the managed account: upon expiry of the grace period, the managed account password will be reset and any interactive logon sessions using the managed account will be terminated. (Default behavior)
  • Reset the password and reboot: upon expiry of the grace period, the managed account password will be reset, and the managed device will be immediately rebooted.
  • Not configured.

If no selection is made, the setting will default to the logoff option.

Post Authentication Reset Delay Sets the delay in hours before the previous actions above is executed. The default is 24 hours which is also the maximum.

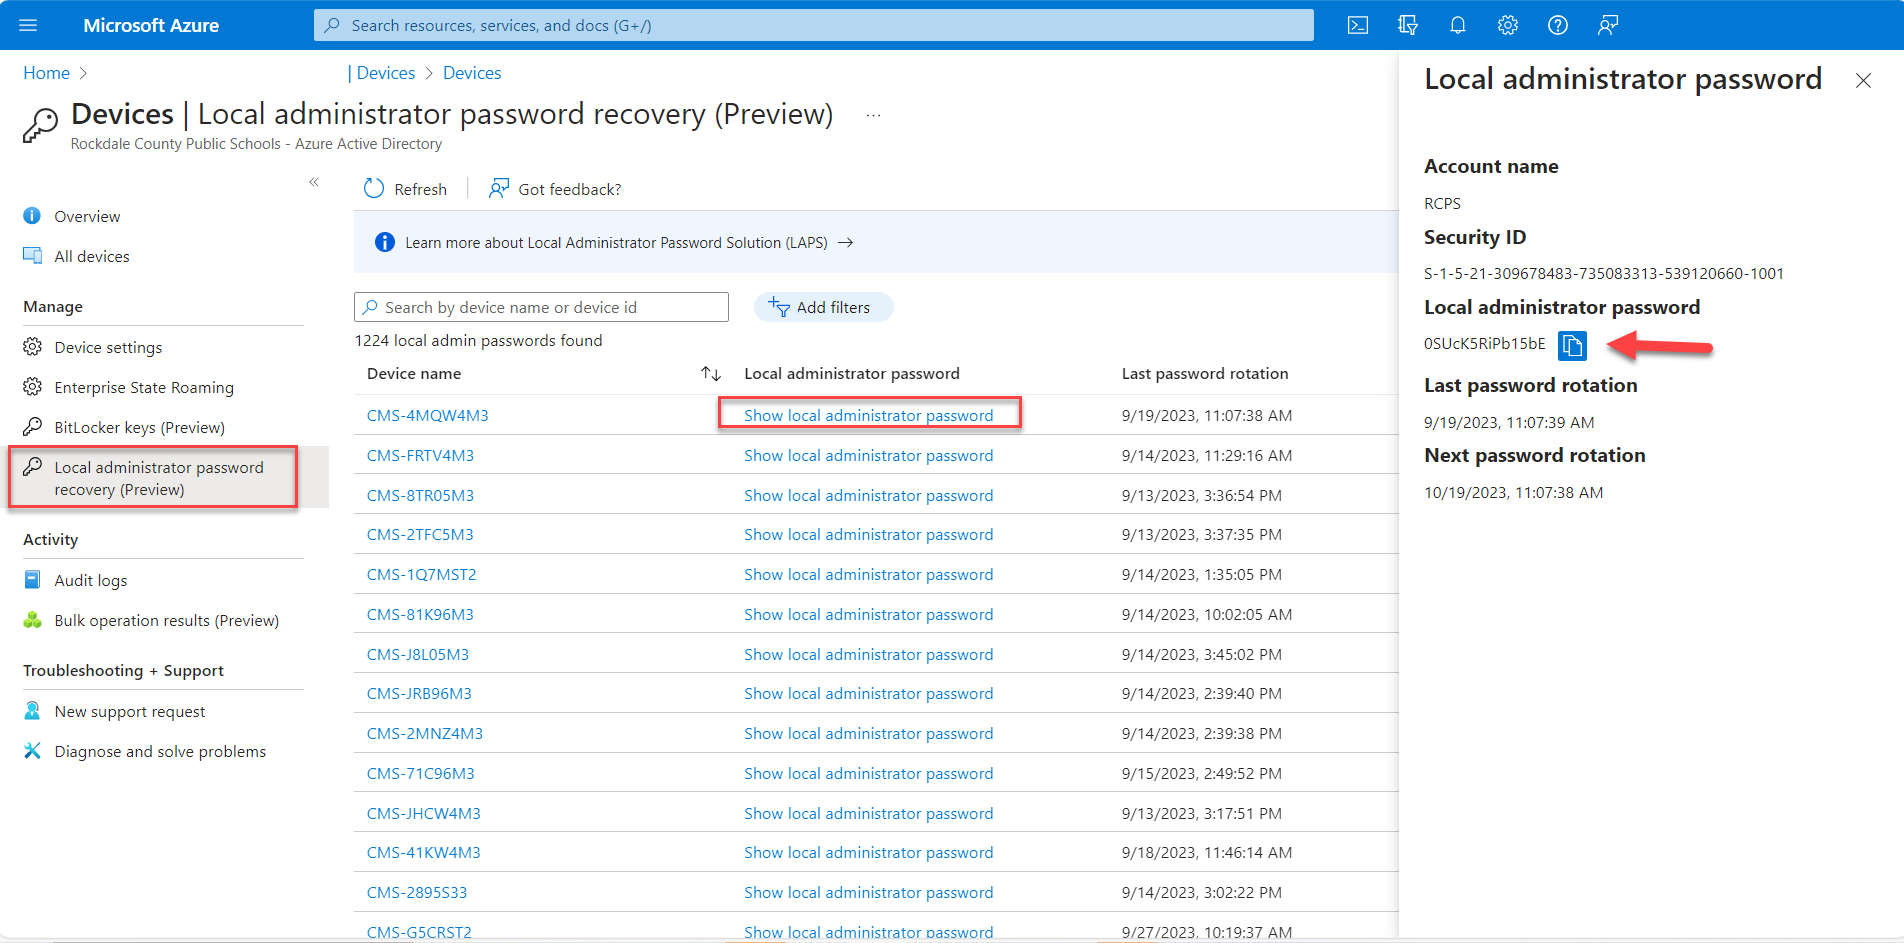
With your settings configured, assign relevant scopes, and deploy the rule to the Azure Ad group you want to manage with this policy. In my next blog I will talk about how to retrieve the password from Azure and how to audit LAPS retrieval.

Oct 2023
16

How to Audit for LAPS Grab in Azure AD (typically used with Intune)

LAPS offers an effective method to limit local administrative privileges by generating a unique password for each Windows computer in your enterprise. However, for enhanced security and compliance, it's advisable to monitor who is accessing the passwords for specific machines. For Azure-joined devices go to your Azure portal and navigate to Devices > Audit Logs and then search for “Recover device local administrator password” as shown in the example below.

You can then click on the event to view more information as shown here.

This system effectively restricts access to clear-text passwords, ensuring only individuals with specific administrative roles, like Global Administrators, Cloud Device Administrators, and Intune Administrators, can access them.


Oct 2023
02

Configure Intune or Group Policy Audit Policies for Microsoft Defender for Identity

Microsoft Defender for Identity (formerly known as Azure Advanced Threat Protection or Azure ATP) is a cloud-based security service offered by Microsoft to help protect your on-prem Active Directory environment. It leverages artificial intelligence, network, and behavioral analytics to detect abnormal behavior and activities that could be potentially threatening.  It can then provide security alerts and actionable insights to protect against cyber threats targeting identities and credentials. Some of its capabilities include the following:

  • Analyze user behaviors and activities with learning-driven metrics
  • Safeguard user identities and credentials within Active Directory
  • Identify and investigate abnormal user behaviors and advanced threat patterns
  • Provide incident details on a streamlined timeline for efficient resolution.

Requirements for Microsoft Defender for Identity

To use Microsoft Defender for Identity you will need a license for Enterprise Mobility + Security E5 (EMS E5/A5), Microsoft 365 E5 (M365 E5/A5/G5) or Microsoft 365 E5/A5/G5. Standalone Defender for Identity licenses are also available. You will also need an Azure AD tenant with at least one global/security administrator with a Directory Service account with read access to all objects in the monitored domains.

In this article I am only going to cover how to configure your on-prem Group Policy and AD environment for audit events. You can refer to this installation guide as to how to install Microsoft Defender for Identity on Active Directory or Active Directory Federation Services (AD FS) servers.

Configuring Group Policy

For Microsoft Defender for Identity to fully function, you must enable and configure certain audit events in Group Policy. Microsoft Defender for Identity then uses this audit data to detect suspicious activities and security vulnerabilities in real-time. To configure the audit events, you need use Group Policy Management Editor to either create a new GPO and link it to the Domain Controllers OU or edit and configure the Default Domain Controllers Policy. In the example below I am choosing to modify the existing policy.

Start by going navigating to Computer Configuration > Policies > Windows Settings > Security Settings > Advanced Audit Policy Configuration > Audit Policies. Start with the Account Logon policy and select “Audit Credential Validation.” Configure this and all the following audit events for both Success and Failure events as shown in the screenshot below. This will trigger Event ID 4776 in the security logs in Event Viewer.

Next will be the Account Management audit policy where you will enable the following subcategories for both Success and Failure.

Audit Computer Account Management

Event IDs 4741, 4743

Audit Distribution Group Management

Event IDs 4753, 4763

Audit Security Group Management

Event IDs 4728, 4729, 4730, 4732, 4733, 4756, 4757, 4758

Audit User Account Management

4726 *

Then move to the DS Access audit policy and enable “Audit Directory Service Access” for Event ID 4662 and then enable “Audit Directory Service Changes” for Event ID 5136. Wrap things up by moving on to the System audit policy and enable “Audit Directory Service Changes” audit for Event ID 5136.

Configure Object Auditing

Note that to collect 4662 events you will need to configure object auditing on the user, group, and computer objects. This is performed using Active Directory Users and Computers. Make sure you select the View menu and select Advanced Features as shown below.

Then right click on your domain, select Advanced Features > go to the Security Tab and click Advanced as shown here.

In Advanced Security Settings> choose the Auditing tab and Select Add.

Select Everyone as the principal. Upon returning to the Auditing Entry, configure these settings:

Choose "Success" for the 'Type'.

For 'Applies to', opt for 'Descendant User objects'.

In the Permissions section, navigate downwards and click the 'Clear all' button.

Now scroll up and choose "Full Control," which will auto-select all permissions. Next, deselect "List contents," "Read all properties," and "Read permissions." Click OK. This action sets the Properties to "Write" mode. As a result, any pertinent changes to the directory services will register as 4662 events. The final configuration is shown below.

Now complete the same steps but select the following object types for Applies to:

    • Descendant Group Objects
    • Descendant Computer Objects
    • Descendant msDS-GroupManagedServiceAccount Objects
    • Descendant msDS-ManagedServiceAccount Objects

Enable auditing on an ADFS object

In the steps above we configured auditing for the entire Domain. Some detections only require auditing in specific Active Directory objects however. Return to the Active Directory Users and Computers console, and choose the domain you want to enable the logs on.

  • Navigate to Program Data > Microsoft > ADFS.
  • Right-click on ADFS and choose Properties.
  • Navigate to the Security tab and click on Advanced.
  • Within Advanced Security Settings, go to the Auditing tab and click Add.
  • Click on 'Select a principal'.
  • In the field labeled 'Enter the object name to select', input 'Everyone'. Click 'Check Names', and then click OK.
  • You'll be taken back to the Auditing Entry. Configure the following settings:
  • For 'Type', choose 'All'.
  • For 'Applies to', pick 'This object and all descendant objects'.
  • In the Permissions section, first click 'Clear all'. Then select 'Read all properties' and 'Write all properties'.

Click OK out of all windows.

Enable auditing on the Configuration container

We just have one more step to go and here you will need to launch the ADSI Edit consol which you can access by typine ADSIEdit.msc in the Run Command.

  • From the Action menu, choose Connect to.
  • In the Connection Settings pop-up, from the 'Select a well known Naming Context' dropdown, choose Configuration, and then click OK.
  • Navigate to the Configuration container and expand it. Inside, you'll find the Configuration node, which starts with "CN=Configuration,DC=..."
  • Right-click on this Configuration node and choose Properties as shown below.

  • Now navigate to the Security tab and click "Advanced."
  • Once inside Advanced Security Settings, opt for the Auditing tab and click "Add."
  • Click on "Select a principal."
  • In the ensuing field, input "Everyone", then click "Check Names", followed by "OK."

Now, back in the Auditing Entry, adjust these settings:

  • Set 'Type' to 'All'.
  • Under 'Applies to', choose 'This object and all descendant objects'.
  • Within Permissions, first hit 'Clear all', then check 'Write all properties' as shown in the example below.

Click OK out of all windows and you are done.

Sep 2023
18

How to Assign Users their Proper Wireless Connection Using Intune

Most organizations have more than one wireless SSID for their users. For example, a school might designate separate SSIDs for staff and students. Similarly, a business could have distinct SSIDs for regular employees and those with privileged access. These SSIDs are then paired with specific access policies, managed either through the native wireless manager or external tools like SD-WAN solutions. In our school scenario, the student's SSID might provide direct internet access, whereas the staff's SSID offers connectivity to internal resources like printers. For IT teams or personnel requiring complete network access, there's typically an unrestricted SSID in place.

With Intune, you can designate a specific wireless SSID for users. Additionally, Intune facilitates the use of WPA2-Personal wireless configurations, automatically supplying computers with the pre-shared key. This eliminates the need for users to manually enter it and allows for the implementation of intricate passwords of up to 64 characters, bolstering security. With this setup, you can also keep SSIDs hidden so that the visible SSID on your premises is for the guest network.

To configure wireless policies using the Microsoft Intune Admin Center go to Devices > Configuration profiles and click Create Profile. Select Windows 10 and later as your Platform and WiFi Templates as your Profile. Name your profile and then configure the settings as shown below. Here I have enabled “Connect automatically when in range” and “Connect to this network even when it is not broadcasting its SSID.”

Once configured, assign the profile to your designated groups. When onboarding new computers using Autopilot or a package you will need to manually connect the Windows device to a wireless SSID. Once Intune delivers WiFi profile, the computer will possess the necessary SSID details to connect automatically to an assigned SSID depending on the user that signs in.

Aug 2023
21

Use Intune to Enforce Edge Typosquatting Protection

Typosquatting, often referred to as URL hijacking or domain mimicking, involves registering domain names strikingly similar to well-known websites. It preys on users who mistype web addresses, leading them to imitation websites instead of their intended destinations. Once there, users might unknowingly enter sensitive information or inadvertently download malware.

Major browsers like Microsoft Edge have built-in typosquatting protection. If users enter a potentially harmful site address by mistake, Edge alerts them. Though this feature is typically active by default, it's wise to verify its status. You can do this with Intune by creating a Configuration Profile.

Create a new Configuration Profile and select ‘Windows 10 and later’ as the Platform and choose the Settings catalog as the Profile. Click ‘Add settings’ > search for the word ‘typo’ and select:

Microsoft Edge \Typosquatting Checker Settings.

You can then choose either of the Configure Edge TyposquattingChecker options as shown in the example below. I chose both just to illustrate. Once selected you can enable the settings to the left. Then click Next and assign the policy to your designated groups and save it.

Jan 2023
12

3 Ways to Enable/Disable LSA on Windows 10 and 11

Microsoft introduced a process called Local Security Authority (LSA) a while back for Windows 8.1. LSA performs security related tasks such as the verification of logon attempts and password changes. It also creates access tokens, enforces local security policies, and protects and adds security protection for stored credentials. With the growing threat landscape out there, it’s a good thing to enable for your Windows desktops and servers.

The good news is that LSA protection is enabled by default for devices running Windows 11, 22H2 that meet the following conditions:

  • Windows 11, 22H2 was newly installed on the device and not upgraded from a previous release
  • The device is enterprise joined be it AD domain joined, Azure AD domain joined or a hybrid configuration.

While Microsoft advocates enabling LSA across your enterprise, they recommend that you first identify all LSA plug-ins and drivers that are in use within your organization and ensure that they are digitally signed with a Microsoft certificate and perform as expected. You can refer to this document for more information.

As of right now, there is no way to enable/disable LSA using Intune. Your three available management options for now are Windows Security, the registry, and Group Policy.

Enabling LSA on a Local Device

If you just have a few computers to manage, you can enable them locally on the desktops themselves by going to Windows Security > Device security > Core isolation details and enable the toggle under the Local Security Authority protection section. In the screenshot below, LSA is currently disabled.

Registry

You can manage LSA through the registry, either using the local registry editor or a GPO using Group Policy Preferences. The required key path is as follows:

SOFTWARE\Microsoft\Windows NT\CurrentVersion\Image File Execution Options\LSASS.exe.

If you want to enable LSA using Auditing mode, click on the LSA key and create a value called AuditLevel. Select REG_DWORD as the value type and type 00000008 in the value data box. This is a good option to identify LSA plug-ins and drivers that will fail to load in LSA Protection mode.

To fully enable LSA, create a value key called RunAsPPL, choose REG_DWORD and type 00000001 as shown in the screenshot below.

You can create a GPO and use Group Policy Preferences to push out these registry values. Go to Computer Configuration > Preferences > Registry > right click and choose “New registry item” and input the required values as shown below.

Group Policy ADMX

You can enable/disable LSA using Group Policy as well. In Group Policy Management Editor go to Computer Configuration > Administrative Templates > System > Local Security Authority. The setting you want is “Configure LSASS to run as a protected process.” In the screenshot below you will notice a down arrow beside the setting title. The down arrow indicates that the setting is a preference setting and not stored in the typical group policy location in the registry.

Conclusion

Hackers are constantly trying to subvert the Windows logon process which is why you need to protect it from hackers as much as possible. LSA is a great out-of-the-box utility to help you achieve that.


Jul 2022
05

4 Group Policy Settings That Can Help Prevent Ransomware

We all know how serious the ransomware threat is today and that unfortunately, there is no one magical solution to stop it. Protecting against ransomware requires a multilayer cybersecurity strategy, also referred to as defense in depth. This includes steps such as ensuring that all systems are up to date in their patching, enforcing MFA for email access, and not allowing local admin rights for standard users. There are also some group policy settings that you can use to incorporate into your strategy as well. Below are four that can help in different ways.

1. Enabling Network Protection

Network protection is a Windows features that helps prevent users from using an application inadvertently to access dangerous domains that may host phishing scams, exploits, ransomware payloads and other malicious content.  It’s a component of Microsoft Defender for Endpoint and requires Windows 10 or 11 Pro (Pro and Enterprise) and Windows Server 2019+. The list of domains is supplied by Microsoft. Network protection blocks all HTTP and HTTPS traffic that attempts to connect to these contains. Think of it as web protection for non-browser applications.

To enable this feature, create a GPO and go to Computer Configuration > Administrative Templates > Windows Components > Microsoft Defender Antivirus > Microsoft Defender Exploit Guard > Network Protection. There there are two policies for you to configure. The first step is to enable “This setting controls whether Network Protection is allowed to be configured into blog or audit mode” as shown below.

You then need to choose between Block and Audit. Block is self-explanatory in that users will not be able to access the domains in question. Audit mode allows users to still connect to the flagged domains but records the event into a log file. This allows you to get a read on what sites your users are utilizing before blocking them entirely. The screen shot below shows how to select between the two options.

2. Enable Controlled Folder Access

Controlled folder access was made available in Windows 10 and is supported in Window 11 as well as Server 2019 and 2022. It’s a component of Windows Defender Exploit Guard that prevents the data hosted in designated folders from being altered. In other words, if malware attempts to modify (encrypt) the files in these protected folders without authorization, the attempt is blocked, and an alert is generated. By default, certain system folders are protected such as a user’s Documents folder, Pictures, Desktop, etc. but you can also add folders as well. Note that the controlled folder access feature does not function if a third-party antivirus application is installed on the targeted system.

To configure Controlled folder access simply create a GPO and go to Computer configuration > Administrative templates > Windows components > Windows Defender Antivirus > Windows Defender Exploit Guard > Controlled folder access. Start by enabling “Configure controlled folder access” as shown below. You can choose to disable it, block it or choose Audit mode, both of which in the same fashion as Network Protection. You can also choose to only block or audit disk modifications which involve the writing to disk sectors by untrusted apps.

You can add additional folders to the list by clicking “Configure Protected Folders” and add the folders you want protected.

The end result will look like the example below. Note that you can also choose “Configure allowed application” to specify applications that are allowed to alter the data contained in the protected folders.


3. Disable Remote Desktop

Once a ransomware variant takes hold in your network, it then works to spread laterally across your IT estate. One of the ways is through remote desktop connection. That’s one of the reasons why Windows 11 has an account lockout policy enabled that only allows for 10 failed sign-in attempts over a 10-minute period. This blocks RDP brute-force attacks. Because some ransomware variants utilize RDP connection to spread, it’s a good idea just to disable it unless required.

Create a GPO and go to Computer Configuration > Administrative Templates > Windows Components > Remote Desktop Services > Remote Desktop Session Host and disable “Allow users to connect remotely by using Remote Desktop Services” as shown in the screenshot below.


4. Show Hidden File Extensions

Cybercriminals use multiple nefarious tactics to get users to click on a malicious file. One of these methods includes the use of double file extensions. An example may be “letter.doc.exe” in which a user mistakes the file for a Word document if the executable extension is hidden. To ensure that file extensions are visible you can create a GPO and go to User Configuration > Group Policy Preferences > Control Panel Settings > Folder Options and make sure that “Hide extensions for known file types” is unchecked as shown in the screenshot below.

We’ve only touched the surface here. There are many other group policy settings available that can aid in preventing ransomware from bringing down your systems and we will cover more in the future.


Jun 2022
29

Managing Removable Disks and Devices Using Group Policy and MEM

Your organization can invest in an entire portfolio of cybersecurity tools including email and web filtering, next generation firewall appliances and endpoint security solutions to protect your Windows computing devices. But deploying all those tools can still leave your machines vulnerable to zero-day attacks and malware infestations. That’s because all the filtering and firewall policies in the world won’t stop malicious code from being transferred from an insertable USB stick. The USB port remains a viable attack avenue for hackers and their malicious code creations to infiltrate computers thanks to users sharing USB drives. Fortunately, there are easy ways to manage removable storage access for your fleet of enterprise Windows devices.

Using Group Policy


Let’s start with Group Policy. You can manage removable storage settings on the Computer or User side. A Computer policy would prevent IT personnel with admin privileges from using USB sticks, thus preventing them from performing some of their everyday tasks. The purpose of this policy is to prevent standard users from transferring malicious code, so a User Configuration policy makes the most sense. Create a GPO and go to User Configuration > Administrative Templates > System > Removable Storage Access as shown below.

Let’s clear up any confusion concerning the various removable storage options listed. If you are younger than age 30 you probably don’t know what a floppy disk is and that’s a good thing. For most modern computers today, you need only worry about Removable Disks (USB sticks and external drives) and Windows Portable Devices which include things such as smart phones, cameras, etc. An example would be transferring pictures from a smart phone to a laptop. In the screenshot above I have enabled settings to deny read and write access to removable disks and denied write access to WPD devices.

Another option is to prevent users from installing removable devices onto their machines. You can only do this on the Computer side but there is a setting called “Prevent installation of devices not described by other policy settings” that is perfect for this situation. You can find it by going to Computer Configuration > Administrative Templates > System > Device Installation Restrictions. The enabled policy is shown below.

Using MEM


You can also configure removable storage policies using Microsoft Endpoint Manager. There are a couple of ways to do it. The first is to go to Devices > Configuration profiles and create a profile. Select “Windows 10 and later” as the platform and Templates as the Profile > then choose Administrative Templates from the list of available templates.  Name the policy and then drill down to System. Here you will find both groups of desired settings as shown below.

Drilling down into Device Installation we can enable the “Prevent installation of devices not described by other policy settings” policy for MDM enrolled devices.

You can then go up one level and scroll over to the Removable Storage Access settings. Below I have enabled the “Removable Disks: Deny execute access” setting.

You can also configure these settings using the Settings picker.  Rather than choosing Templates as the profile type, select Settings. Then use the Settings picker to search for “Removable Storage” and select the correct category. Then choose the desired settings in the section below and configure them as shown in the screenshot below. You can do the same then for Device Installation settings.