How to Manage your OEM BIOS Settings with Intune
Intune provides the capability to enable or disable various BIOS features and settings, enhancing device security before the operating system even loads. Among these features is the ability to set or change the BIOS password, which is crucial for securing the boot process and protecting the device against unauthorized changes to BIOS settings. Additionally, Intune allows for the configuration of boot sequence settings, the enabling or disabling of hardware components, and the management of power management settings, among others. This comprehensive control over BIOS settings helps fortify device security and ensures a consistent configuration across the enterprise. As of right now Intune only supports Dell computers.
Create and Deploy the Dell Configuration File
To create a Dell configuration file, follow these preliminary steps to ensure your devices meet the necessary requirements for successful configuration via Intune:
1. Device and System Requirements:
- Ensure the device is a Dell commercial client running Windows 10 or a later version.
- The device must be enrolled in Intune's mobile device management (MDM) system.
- .NET 6.0 runtime for Windows x64 must be installed on the device.
- Install Dell Command | Endpoint Configure for Microsoft Intune (DCECMI) on the endpoint.
2. Creating the Configuration File:
- Download the DCECMI tool from Dell’s official website. Using this tool, you can create a configuration file tailored to your specific needs, including any OEM-supported configuration settings.
- When creating the configuration file, a corresponding Win32 app, provided by the OEM, will be needed. This app acts as an agent that interprets the configuration file and manages BIOS password settings among other configurations.
3. Deployment:
- Deploy the OEM Win32 app to all relevant devices using Intune. This app is crucial as it reads the configuration file and applies the settings, including BIOS passwords, to the devices
Target the BIOS Configuration Policy
To effectively target the BIOS configuration policy, you should focus on a specific set of devices. Here are two options for doing so:
Option 1: Create a Device Group
- Create a group comprising only the devices needing the policy. Assign both the app policy and the BIOS configuration policy directly to this group during creation.
Option 2: Use an Assignment Filter
- Implement an assignment filter based on the device manufacturer, specifically targeting OEM devices. Apply this filter when assigning the app and BIOS configuration policies.
Creating the BIOS Configuration Policy
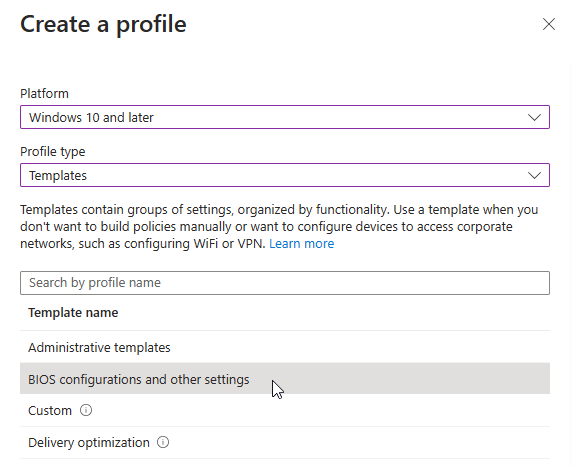
Now it is time to create the policy itself. Using the Microsoft Intune Admin Center navigate to Devices > Configuration and create a new policy. Select Windows 10 and later as the Platform and select ‘BIOS configurations and other settings as the Profile Type as shown in the screenshot below.
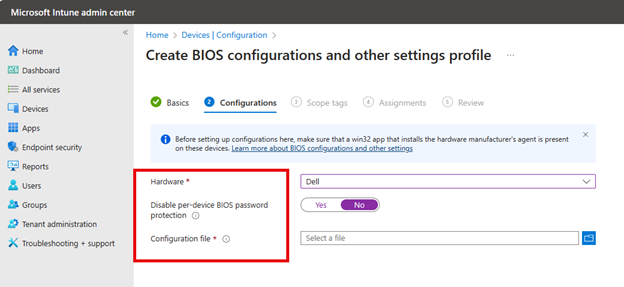
In the Configuration settings, select your hardware OEM vendor from the list of supported OEMs which is currently, only Dell. Next you will configure ‘Disable per-device BIOS password protection’ by choosing No or Yes.
- No: Intune assigns a unique device password to each device. Users must use this password to access and modify the BIOS settings on their device.
- Yes: The BIOS is not protected by a password. Any previously set passwords are cleared, allowing end users unrestricted access to the BIOS settings.
The final step is to point to the configuration file you made earlier with the OEM tool as shown in the screenshot below.
Then assign the profile to the group you designated earlier, and the BIOS settings will be delivered.


