MDM & GP Tips Blog

Oct 2024
21

6 Essential One Drive Settings in Intune and Group Policy

There are a few key items you'll likely want to tune in OneDrive settings before setting it loose in your environment. As such. Microsoft gives you the ability to manage Intune settings in both Group Policy and Intune. Those settings are: Prompt users when they delete multiple OneDrive files on their local computer, Warn users who are low on disk space, Silently sign in users to the OneDrive sync app with their Windows credentials, Use OneDrive Files On-Demand and Coauthor and share in Office desktop apps (User).

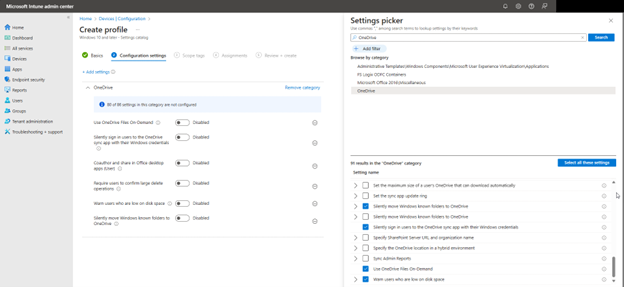
To configure OneDrive settings using the Microsoft Intune Admin Center., navigate to Devices > Configuration > Create New Policy in the Microsoft Intune Admin Center. When creating the policy, select "Windows 10 and later" as the Platform and "Settings catalog" as the Profile type. After naming the policy, type "OneDrive" into the Settings picker and select the OneDrive options. You can then choose which of the settings you want to include in the policy as shown in the screenshot below. In this example, I have chosen six settings that serve important functions in OneDrive.

  1. Prompt users when they delete multiple OneDrive files on their local computer

This is a data protection feature designed to prevent unintended bulk file deletions in OneDrive. When enabled, this setting triggers a warning prompt if a user attempts to delete multiple OneDrive files simultaneously. If a user tries to delete a large number of files larger at once that is larger than the configured threshold, they will see a pop-up message asking them to confirm the deletion action. The setting includes a configurable threshold that you can set to trigger the prompt as shown in the screenshot below.

        2. Warn users who are low on disk space

This setting monitors the local disk space on a user's device to prevent them from unexpectedly running out of storage, which could impact their ability to sync OneDrive files. It includes a configurable threshold, specified in GB, that triggers a warning notification to users when their available disk space falls below this set level as shown here below:

3. Silently sign in users to the OneDrive sync app with their Windows credentials

When enabled, this setting automatically authenticates users with their existing Windows login information to ensure a seamless Single Sign-On (SSO) experience, thus eliminating the need for manual credential entry.

4. Silently move Windows known folders to OneDrive

When enabled, this setting automatically redirects a user’s Windows known folders (such as Documents, Pictures, and Desktop) to OneDrive without user intervention. This aids in ensuring that important files are automatically backed up to the cloud by moving the contents of these folders to OneDrive. Once enabled, you must provide your tenant ID as shown below.

       5. Use OneDrive Files On-Demand

When enabled, this setting allows users to see and interact with all their OneDrive files in File Explorer without downloading them all to their device. Files are downloaded only when opened, which saves local disk space. Users can choose to make specific files or folders always available offline.

       6. Coauthor and share in Office desktop apps (User)

When enabled, this setting allows users to simultaneously work on the same document with colleagues, allowing users to edit them and see each other’s changes in real-time.

Using Group Policy

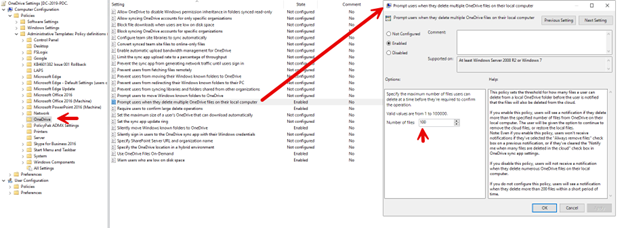
You can also manage these settings using Group Policy.  Five of the above settings are from the computer side. Navigate to Computer Configuration > Administrative Templates > OneDrive and enable any of the five settings shown in the screenshot below. Here, I have highlighted the “Prompt users when they delete multiple OneDrive files on their local computer” setting.

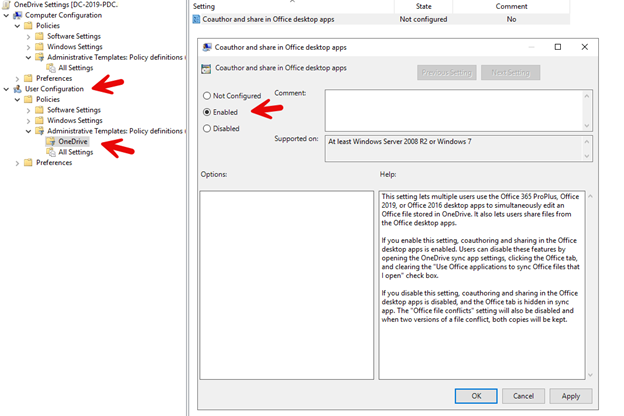
The remaining setting, “Coauthor and share in Office desktop apps (User)” is a user side setting. Navigate to User Configuration > Administrative Templates >OneDrive and enable the setting as shown in the screenshot below.

The remaining setting, “Coauthor and share in Office desktop apps (User)” is a user side setting. Navigate to User Configuration > Administrative Templates >OneDrive and enable the setting as shown in the screenshot below.


Mar 2024
11

Block Browser Extensions with Group Policy and Intune

The web browser today has literally become the default app in this era of the cloud and spurred the growth of browser extensions. Browser extensions provide a convenient way to customize and enhance a user’s web browsing experience with added functionalities and features directly within the browser. However, just as you don’t want users utilizing certain applications on corporate devices, you might want to restrict certain browser extensions for reasons of security, compliancy, content control, productivity, and performance. For instance, you may not want users installing a VPN extension to get around your web filtering. Fortunately, there are a couple of ways to achieve this.

Create a Browser Extension Blocklist with Intune

If you use Intune to manage your Windows 10 and Windows 11 laptops, you can create a configuration profile that will specify which extensions a user cannot install. Extensions already installed prior to the deployment of blocklist will be disabled without a way for the user to enable them. Should the blocklist be removed at some point, the extension will automatically become enabled once again.

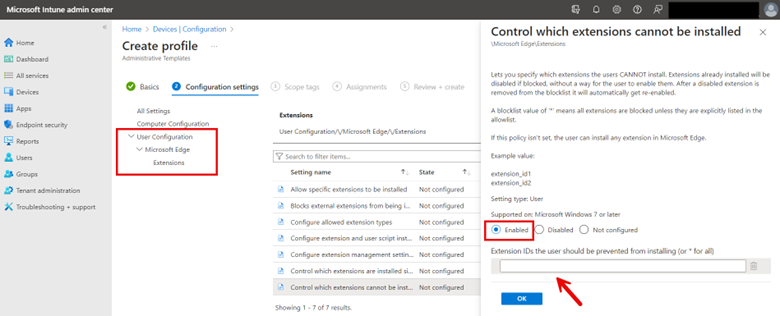
Using the Microsoft Intune Admin Center go to Devices > Configuration and create a new profile. Choose Windows 10 and later as the platform and Administrative Templates as the Profile type. Assign a name to the profile and then navigate to User Configuration > Microsoft Edge > Extensions and then enable “Control which extensions cannot be installed” and input the extension names you want to filter out. You can look up extension names on the Internet. An example is shown below.

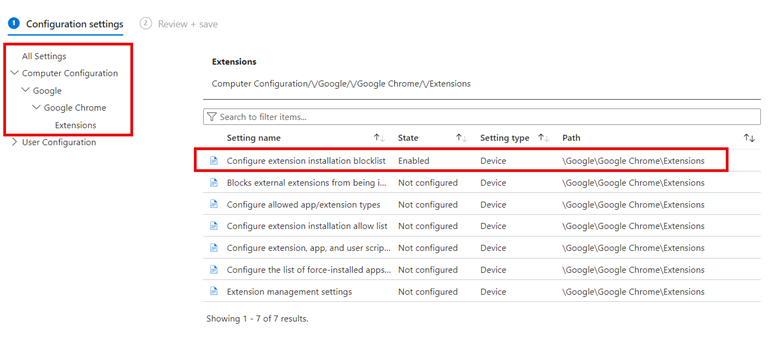
Then assign the profile to the designated groups and complete the wizard. You can also apply Edge browser extension restriction on the Computer side. In the example below, I have configured a block list for the Chrome browser.

Create a Browser Extension Blocklist with Group Policy

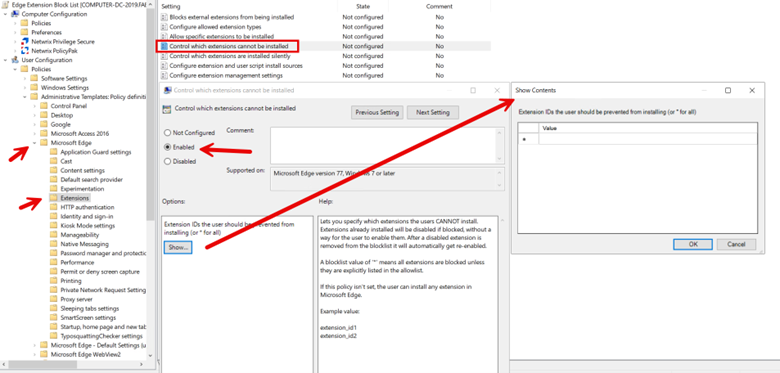
You can do the same with Group Policy. Because we are using Administrative Templates, the setting navigation is basically identical. Create a GPO and use the Group Policy Management Editor to navigate to User Configuration > Administrative Templates > Microsoft Edge > Extensions and enable “Control which extensions cannot be installed” as shown below. Once again, you will need to input the names of the browser extensions.

Feb 2024
19

How to Block Access to Windows Copilot with Group Policy and Intune

Windows Copilot is a feature designed to enhance user productivity and support through AI-powered assistance directly within the Windows operating system. It offers real-time suggestions, automates tasks, and provides contextual help based on user actions and behaviors. By integrating deeply with Windows, Copilot simplifies navigation, streamlines workflows, and helps users efficiently manage their tasks, making technology more accessible and intuitive for everyone.

Think of Copilot as a specialized variant of ChatGPT, seamlessly integrated into the Windows operating system to provide real-time assistance, task automation, and contextual support directly from the desktop environment. Despite its clear advantages, there are potential concerns that an organization might have:

  • Copilot’s ability to analyze user data and behaviors might raise privacy concerns.
  • The use of AI tools may conflict with some security compliances concerning the handling of data.
  • Copilot may not be suitable for some roles that require precise communication.
  • While it promises to boost productivity, reliance on Copilot could diminish users' problem-solving abilities.
  • The introduction of Copilot may lead to new errors that can potentially disrupt workflows
  • In scenarios such as public kiosks, the functionality of Copilot may be unnecessary or even inappropriate.

Block with Group Policy

To restrict user access to Windows Copilot, create a GPO using Group Policy Management and then navigate to Computer > Administrative Templates > Windows Components > Windows CoPilot and enabe “Turn off Windows Copilot” as shown in the screenshot below.

Block with Intune

While Intune currently lacks a direct menu option for configuring Windows Copilot, but it can be administered through OMA-URI settings. The essential settings required are as follows:

OMA-URI Path: ./User/Vendor/MSFT/Policy/Config/WindowsAI/TurnOffWindowsCopilot

Data type: Integer

Value: 1

Complete the profile by adding any desired scope tags and assign the profile to your designated groups and finish the wizard.

Feb 2024
05

Lock Down the Windows Settings App with Intune

In the past, group policy administrators focused on limiting standard users' access to various sections of the Windows Control Panel. Today, while controlling access to the Control Panel remains important, it's equally crucial to restrict access to the Windows Settings app. This approach is driven by several key objectives:

  • Prevent unauthorized modifications that could undermine system security.
  • Ensure compliance of regulatory standards
  • Enhance the reliability of client devices and systems to reduce ticket volume.
  • Safeguard against both accidental and deliberate data loss scenarios.
  • Ensure computers are optimized for business-critical functions.
  • Facilitate device management and troubleshooting by maintaining consistent settings across the organization.

One way to approach this is rather than creating an Intune policy that restricts access to specific ms-settings, you use an allow list approach that only allows access to a specific list of settings. To do so using the Microsoft Intune Admin Center go to Devices > Configuration and click “Create” to make a new profile. Choose Windows 10 and later as the Platform and Custom Templates as the Profile type.

Using custom templates, assign the profile a name and apply the following OMA-URI settings:

OMA-URI: `./Device/Vendor/MSFT/Policy/Config/Settings/PageVisibilityList`

Data type: String

For the String value, type showonly: and list each msi-setting you want immediately after the colon. Separate each msi-setting with a semicolon like this:

showonly:bluetooth;camera;about;sound;easeofaccess-audio;windowsupdate-action;workplace-provisioning;sound-devices;apps-volume;privacy-webcam

The screenshot below shows the process using Intune:

Complete the profile by adding any desired scope tags and assign the profile to your designated groups and finish the wizard.

You can find a complete list of ms-settings names on the Microsoft website

Jan 2024
02

How to Use Scope Tags for Intune Configuration Profiles

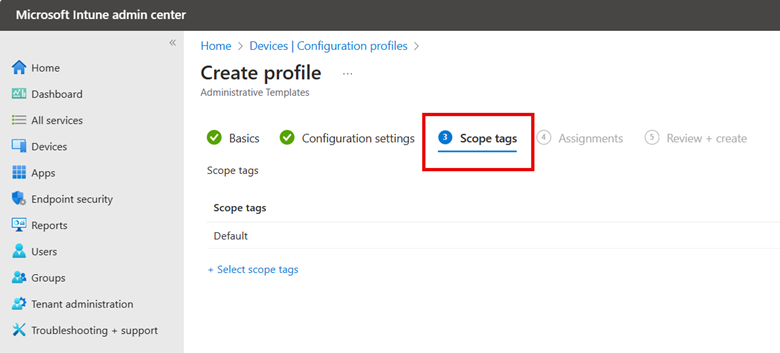
How many times has this happened to you? You go about creating a new configuration profile using the Microsoft Intune Admin Center. You complete the setting creation process and now want to assign the profile to the designated groups. But before that, the wizard prompts you about Scope Tags as shown in the screenshot below.

Like other Intune administrators, you might often bypass scope tags by clicking Next, occasionally wondering about their purpose. Scope tags are vital for partitioning and controlling access to Intune resources, such as profiles, apps, and policies, to enable delegated administration. They allow for the classification of resources by department, function, or location, facilitating more efficient resource organization. This ensures administrators can readily manage resources relevant to their specific organizational segments. Although granular access control through scope tags might seem excessive for small to medium-sized organizations, it's incredibly beneficial for larger ones, enhancing security and compliance by restricting administrators' access only to their designated resources. This reduces the likelihood of unauthorized access or alterations to crucial settings.

Create Your Scope Tags

Start by generating your scope tags, envisioning them as segmentation tools that define which admins have access. Imagine a national company with offices across various regions. For this example, you'll create scope tags specifically for the administrative team stationed in this office that is responsible for managing the profiles and policies exclusive to the East Coast office. To configure this arrangement, you need to:

  • Create a member group called East Coast Admins which will contain the all admins of the east coast office that will have permission to manage policies and profiles for users and devices within the allotted scope.
  • Create a scope tag that will contain the east coast admin member group.

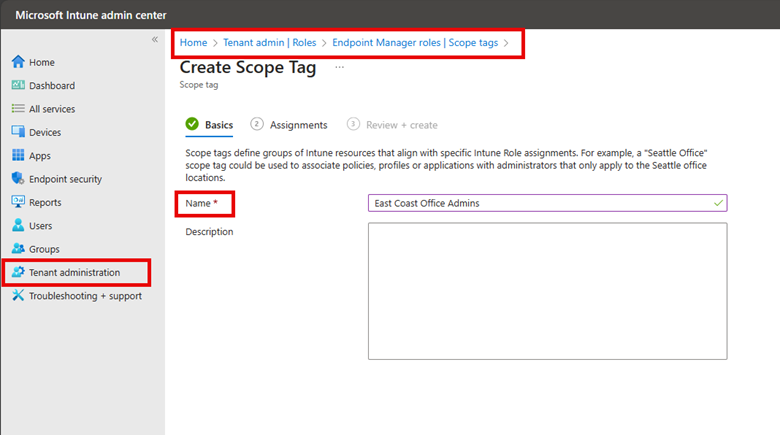
In this case I already have my east coast admin group. To create the scope tag using the Microsoft Intune Admin Center navigate to Tenant Administration > Roles > Scope Tags and create a scope tag and name it as shown below.

The next step is to add member group to the scope tag as shown here:

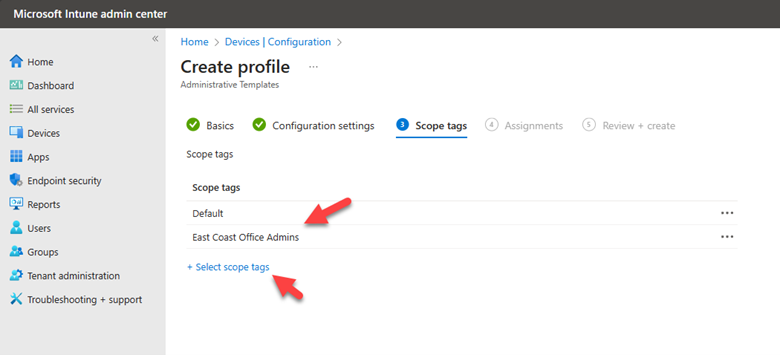
Next, finish the wizard to create your scope tag. With the scope tag established, you can apply it as necessary. The final step involves creating a configuration profile. When you reach the Scope Tag section this time, add the scope tag you've just created.

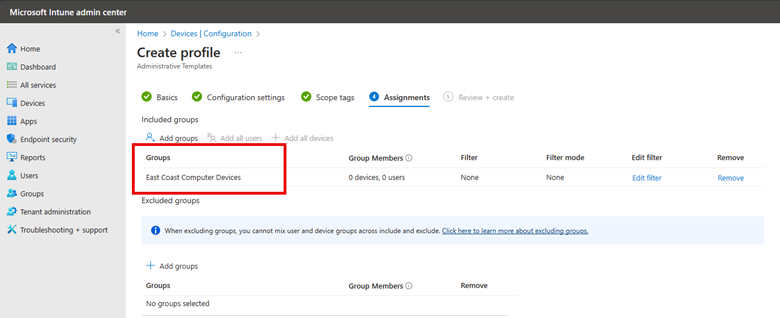
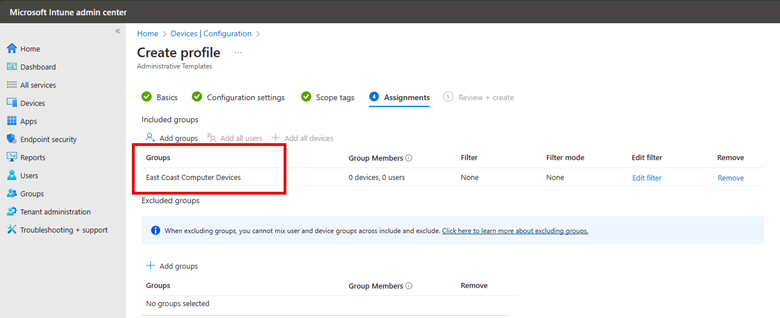
Then I will assign the device group that configuration profile will be applied to:

After finishing the wizard, I've set up a configuration profile targeted at East Coast computer devices. This allows East Coast admins to manage these devices specifically, utilizing the scope tag for focused oversight.

Oct 2023
30

How to Configure Visibility Settings in Group Policy and Intune

Group Policy and Intune both offer multiple ways to hide various components of the Windows operating system. One of these is the "Settings Page Visibility" setting that is specifically designed for managing the visibility of individual pages within the Windows Settings app introduced in Windows 10. This is distinct from the practice of hiding individual applets within the traditional Control Panel. By controlling visibility, you can streamline the user experience by ensuring they only see the settings they need, thus minimizing potential confusion or mistakes.

Note that the "Settings Page Visibility" policy only determines whether a page is visible or hidden to users. If you hide a settings page, users cannot see or access it, but this does not deactivate or override the actual functionalities or policies that might be set elsewhere.

I will show you how to configure the "Settings Page Visibility" policy in both Group Policy and Intune.

Group Policy

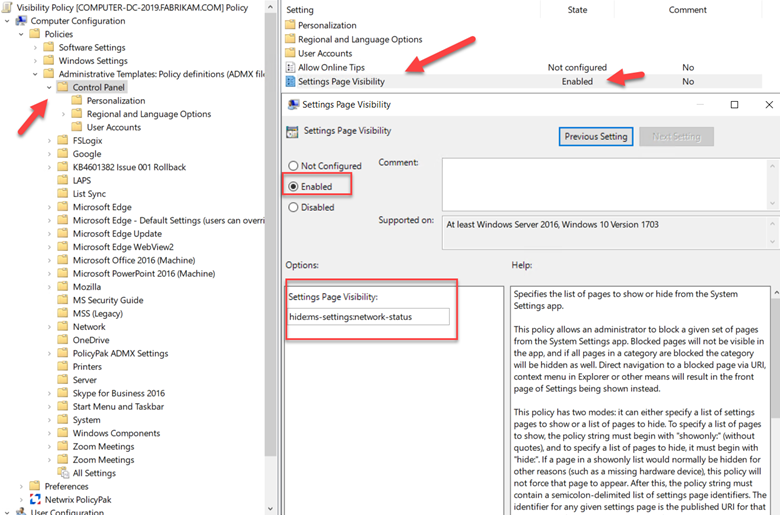
Create a GPO and go to Computer Configuration > Administrative Templates > Control Panel > Settings Page Visibility. You will then enable the policy and configure the settings as shown in the screenshot below.

You have two options for this setting.

  • Use the hide: command to hide specific pages.
  • Use the showonly: command to show only specific pages and hide all others.


You then follow either command by the Uniform Resource Identifier (URI) of the resource you want to apply the command to. For instance, if you want to hide the Window game bar you would type the following:

Hide: ms-settings:gaming-gamebar

If you want to hide additional settings, simply separate each URI by a semicolon. For instance, if you want to hide the Windows gamebar as well as advanced network and internet settings, the command will look as follows:

Hide: ms-settings:gaming-gamebar;ms-settings:network-advancedsettings

Let’s use an example for the showonly: command.

showonly:display;bluetooth

You can add as many URIs as you need to the policy. Once completed, assign the GPO to your designated groups and you are ready to deploy. You can refer here for a list of URIs.

Intune

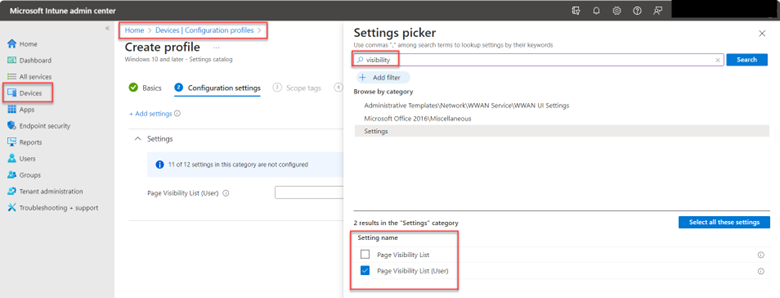
To configure the "Settings Page Visibility" equivalent in Intune go to your Microsoft Intune admin center portal and navigate to Devices > Configuration profiles.

  • Create a new profile and choose “Windows 10 and later” as the Platform and choose “Settings catalog” as the Profile type.
  • Name the profile and click Add settings.
  • In the settings picker type “visibility”
  • Choose between the 2 Page Visibility List options

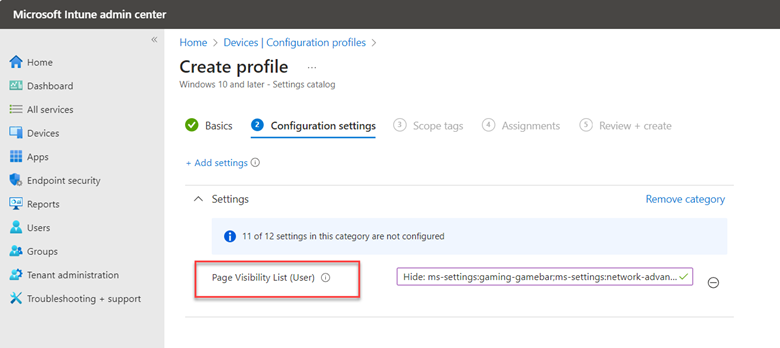
In this example I will choose Page Visibility List because I want to apply the profile to users as shown below.

Use the same command structure as in Group Policy.

Then assign any scope tags, your designated groups and complete the creation process.  


Sep 2023
04

Creating Mapped Drives with Group Policy and Intune

Group Policy admins have been mapping drives for years, while trying to map network drives using an MDM has proved challenging. The good news is that you can use both Group Policy Preferences and Microsoft Intune to map network drives for your users. Its just a lot easier with Group Policy.

Mapping Drives with Group Policy Preferences

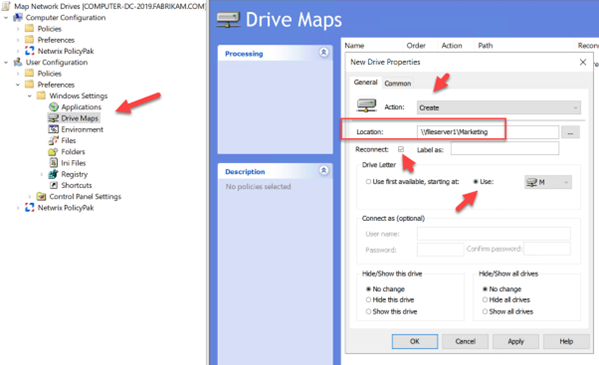
Let’s start with Group Policy. Create a GPO using the Group Policy Management Console and go to User Configuration > Preferences> Windows Settings > Drive Maps. As this is a brand-new mapping I will select Create as the Action. Then type in the UNC path of the shared folder you want users to access. Check the Reconnect box to make it a persistent connection that will appear every time they log on. Under Drive Letter, I assigned a specific drive letter as shown below.

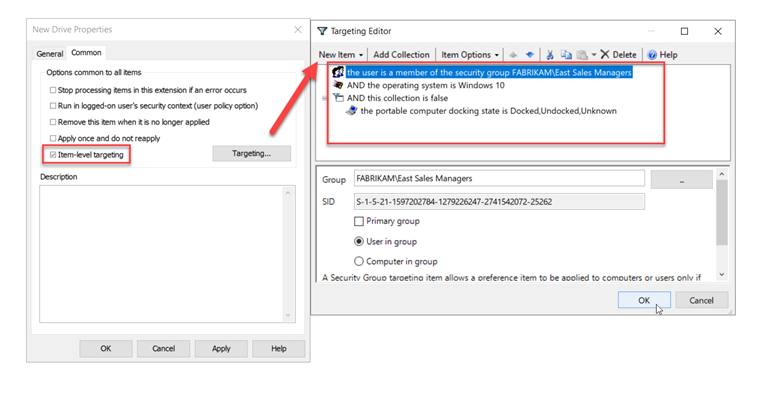
Because I am using Group Policy Preferences I can take advantage of Item-level Targeting to target the GPO more specifically at the exact users I want. Item-level Targeting is a feature not available in traditional Group Policy or Intune. In this case I want to target it to members of the managers group, but only have the mapping applied to desktop computers running Windows 10. The screenshot below shows how I did this after clicking on the Common tab.

Mapping Network Drives with Intune

For users who solely use their laptops for mobile or remote functions, mapping a network drive to a laptop managed by an MDM may not be logical. However, if all your computers are joined to Azure Domain and you wish to map drives, Intune doesn't provide a straightforward menu-driven method. You'll need to rely on PowerShell. Begin by creating a PowerShell cmdlet, structured as follows:

New-PSDrive -Name "M" -PSProvider FileSystem -Root "ADDRESSOFTHEFILESHARE" -Persist

In this instance, the cmdlet looks like this:

New-PSDrive -Name "M" -PSProvider FileSystem -Root “\\Fileserver1\Marketing” -Persist

BTW – If you wanted to use PS to map a local drive, it would look like the following:

New-PSDrive -Name "Document" -PSProvider "FileSystem" -Root "C:\Users\susan\Documents"

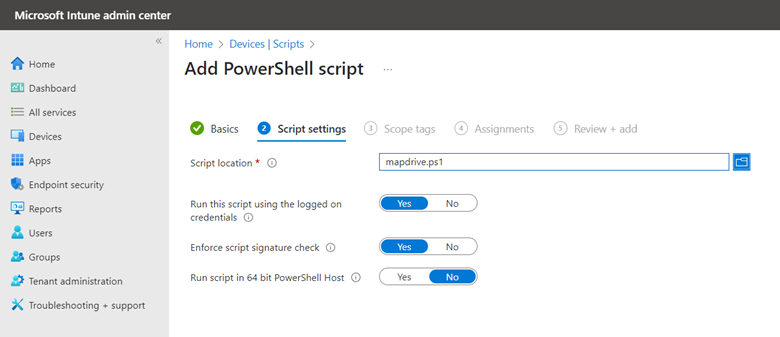
Save your PS script and now go to the Microsoft Intune Admin Center. Go to Devices > Scripts and Add a Windows 10 Script. Name the script and then configure the following settings as shown in the screenshot below.

Then assign the script to the designated users and finish out the wizard. For those who don’t want to use PowerShell, there are third-party solutions out there such as custom ADMX templates that you can download and then import into Intune

Aug 2023
07

How to Create Path Exclusion Policies for Windows Defender Using Intune

You’ve just deployed a new application or client-side extension to your Windows laptops and suddenly their system performance and battery life begin to crater. The culprit could be Windows Defender. Windows Defender automatically scans new software and its activities for potential threats as part of its real-time scanning feature. Naturally, this scanning process will manifest as higher CPU usage. If the new software handles a lot of data, such as in the case of a web filter client app, it could create perpetual CPU spikes that can degrade system performance and consume battery power.

If you trust the new software you've installed and don't want Windows Defender to continuously monitor it (and thereby use up CPU resources), you can set an exclusion path for it. An exclusion path tells Windows Defender to skip scanning the files and activities associated with a specific directory where trusted applications are installed. You can create an exclusion path policy using either Group Policy or an MDM such as Intune. Exclusions should always be used judiciously to maintain a strong security posture so only use them when you need to.

Creating Path Exclusions with Group Policy

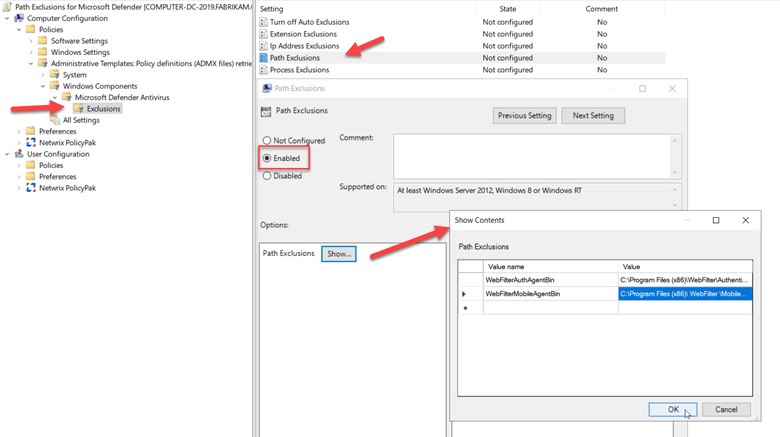
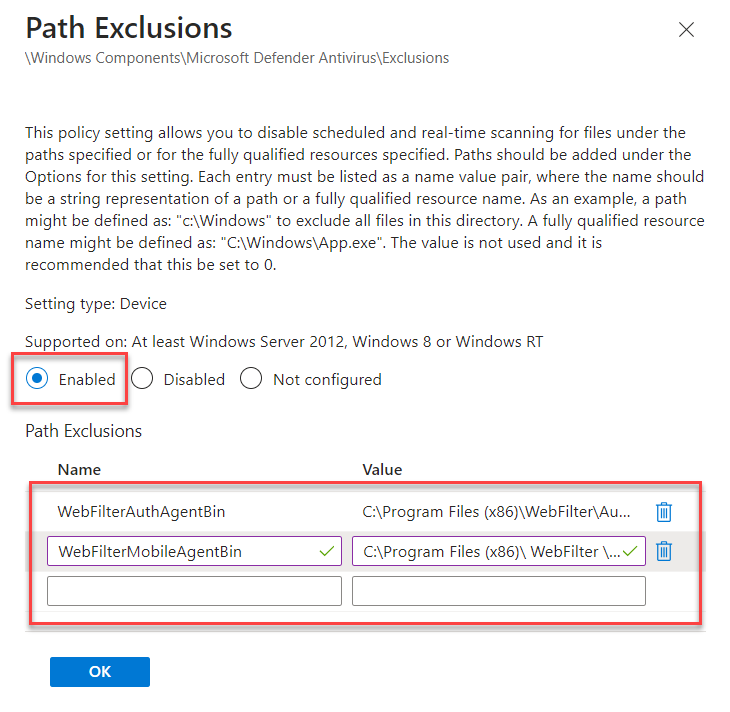
Let’s use a scenario in which I need to create an exclusion path for a web filter client application simply called WebFilter. Create a GPO and go to Computer Configuration > Administrative Templates > Windows Components > Microsoft Defender Antivirus > Exclusions and enable “Path Exclusions.”  Once enabled you must then add the path(s) to be excluded. In this case there are two paths.

C:\Program Files (x86)\WebFilter\AuthenticationAgent\bin

C:\Program Files (x86)\WebFilter\MobileZoneAgent\bin

The policy configuration is shown below.


Another option is to create a process exclusion which would exclude a designated process or executable from being scanned. In this case the process path might be C:\ProgramFiles\WebFilter\WebFilter.exe. You can also use wildcards in a process exclusion list such as C:\ProgramFiles\WebFilter\*

Creating Path Exclusions with Group Policy

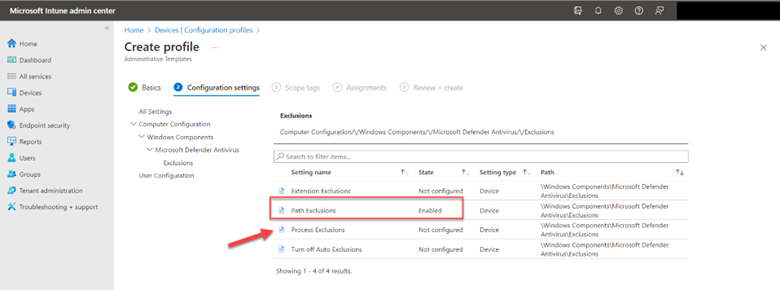
Using the Microsoft Intune Center, go to Devices > Configuration Profiles > and create a new profile using Windows 10 and later as the Platform and Administrative Templates for the Profile type. Name the policy and then navigate to Computer Configuration > Windows Components > Microsoft Defender Antivirus and Enable “Path Exclusions” as I did earlier with Group Policy as shown below.

You will then be prompted to provide the exclusion paths as shown below. Process Exclusions are also available if you want to go that way.

After implementing these path exclusions, you should witness a notable decrease in CPU utilization, effectively resolving the issue of CPU spikes and battery depletion.

Jul 2023
31

Redirect to OneDrive for Business with Intune and Group Policy

Group Policy veterans will recall when it was common practice to redirect user files from the Windows known folders (like Desktop, Documents, and Pictures) to a central shared directory on an on-prem server. This allowed for roaming profiles, easier backups, and kept files off client devices. Well, you can also redirect those same files to OneDrive for Business to accommodate real-time collaboration and accessibility, compliance, and control.

If you aren’t currently utilizing OneDrive, you should as it offers a list of great features. First off, it maintains the user familiarity with file locations so folder navigation is the same. Because OneDrive is cloud bases, your users can access their files from anywhere on any device. It also offers file versioning and deleted items capabilities that allows users to perform self-service file recovering.  Here I will show you how to redirect the Windows known folders to OneDrive as well as a couple of other tips.

Using Group Policy to Manage OneDrive

If you have any existing Folder Redirection Group Policies, you will need to disable those before moving forward. Then make sure you have the necessary administrative template files. If you have OneDrive installed on your management machine you can get them using this file path.

%localappdata%\Microsoft\OneDrive\BuildNumber\adm

Which will look something like this in Windows Explorer.

Copy both template files to your central store and then create a GPO. In the Group Policy Management Editor, go to Computer Configuration > Administrative Templates > OneDrive. If you don’t see OneDrive, then you are missing the template files. The screenshot below shows the available settings.

To redirect files from the Windows Known folders, enable the “Silently move Windows known folders to OneDrive” and provide the Tenant ID for your enterprise. By default, all three known folders are selected but you can choose to only redirect specific ones as shown in the screenshot below.

Before implementing this, you may want to alert users of your intention for them to transition to OneDrive for Business by enabling the “Prompt user to move Windows Known folders to OneDrive.” Once enabled, your tenant users that sync their OneDrive will see a popup message that reads “Your IT department wants you to protect your important folders" the next time they sign in. A reminder notification will then appear in the activity center until all three known folders are moved.

Users also may have more than one OneDrive account so you may want to prevent them from uploading files to other organizations. You can do this by enabling the “Allow syncing OneDrive accounts to only specific organizations” and then list the allowed tenant IDs as is shown below.

Using Intune to Redirect Known Folders to Intune

Let’s do the same thing using Intune now. Using the Microsoft Intune Admin Center, navigate to Devices > Configuration profile > Create profile and select Windows 10 and later as the Platform and Administrative templates as the Profile type. Give a name to the profile and go to Computer Configuration > OneDrive and enable the “Silently move Windows known folders to OneDrive” setting as shown in the screenshot below.

To discourage users from uploading excessively large files or questionable file types, you can enable “Exclude specific kinds of files from being uploaded” and input keywords for the designated file types as shown below.

Jul 2023
17

Use Intune to Block Access to the C Drive

Blocking the C drive has always been one of the common restrictions that Group Policy admins enforced for standard user accounts. There are multiple reasons for restricting access to the C Drive for non admin users.

  • The first is system stability because it prevents basic users from accessing, altering, or deleting critical system files on their computers, thus minimizing potential issues that disrupt desktop operations and initiate a help desk ticket.
  • It reduces the chances of malware being introduced into the system and prevents users from installing unauthorized applications, opening suspicious files or clicking on malicious executables.
  • Blocking the C drive in some cases may be required by compliance regulations to restrict user access to certain system resources.
  • Keeping users out of the C drive can potentially simplify troubleshooting as it eliminates user file tampering.
  • For shared desktop computers it can help protect the data of other users who have logged onto the device

Because Intune uses many of the same Windows Administrative Templates, it is easy to block C Drive access with Intune as well. Using the Microsoft Intune admin center, go to Devices > Configuration Profiles and click “Create profile.”  Select “Windows 10 and later” as the Platform and Administrative Templates as the profile. Name the configuration profile and go to User Configuration > Windows Components > File Explorer as shown in the screenshot below.

Scroll down through the settings and select “Prevent access to drives from My Computer” and choose Enabled. You can then select the drives you wish to block access to as shown below.

Click OK and click next. Then assign the configuration profile to the designated groups and you are done.