MDM & GP Tips Blog

Sep 2020
11

Microsoft Endpoint Policy Types Explained (Part 2)

Welcome to Part 2 of this article series in which we take a look at the primary policy types that you can create and utilize in Microsoft Endpoint Microsoft (Intune).  In Part 1 we looked at Configuration Profiles and how they are the rough equivalent of GPOs in a traditional AD on premise domain in which some things were hidden, others revealed.  Here we will examine some of the other major components of MEM, all pertaining to security.

Security Baselines

Also referred to Security Profiles, Security Baselines are sets of Windows settings that are preconfigured by Microsoft Security engineers.  There are currently 3 Security Baselines as is shown below.  They are

  • Windows 10 Security Baseline
  • Microsoft Defender ATP Baseline
  • Microsoft Edge Baseline

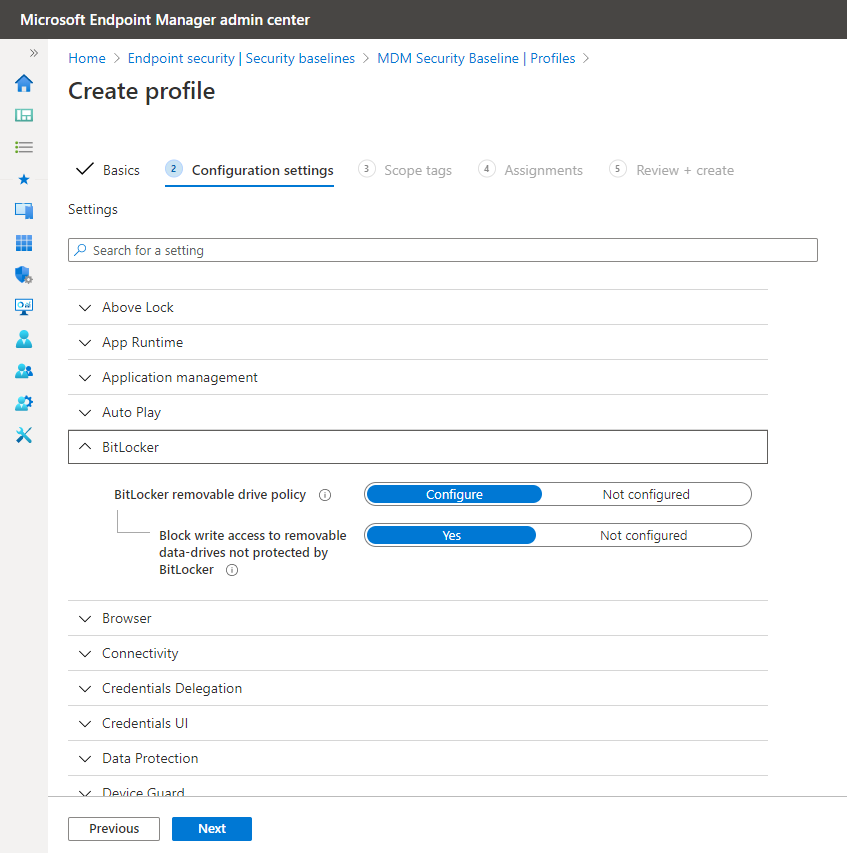
The baselines by themselves don’t really do anything until you use one of them to create a security policy.  To create a profile you simply click on the appropriate baseline and then create your desired policy.  Baselines should be looked at as minimum security standards, although for most enterprises, they would work admirably.  You can change any of the settings, but keep in mind that when you unconfigure a setting, you are making it less secure.  In most cases, you should simply accept the settings as is and deploy the policies to their targeted users and devices.  The screenshot below shows the preconfigured BitLocker settings within the Windows 10 Security Baseline.

Compliance Policies

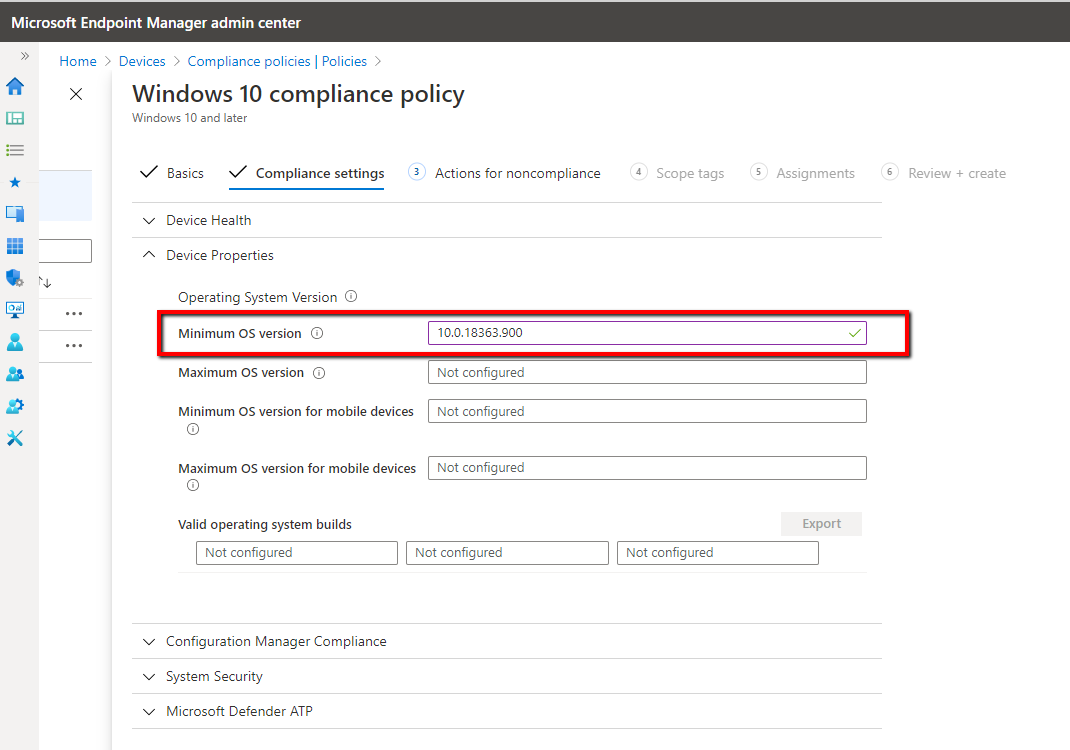
Compliance Policies are used to determine whether a device is compliant with a pre-defined baseline.  Compliance Policies vary on the platform of the device.  Some examples of Windows 10 compliant baselines can include the following:

  • BitLocker enabled
  • Minimum OS version
  • Password qualities
  • Firewall enabled and configured
  • Location of the device

You can then select a noncompliance action such as an email notification sent to the user informing them of their device’s noncompliance state.  You can even lock or retire a device that has been noncompliant for a specified duration.  An example of a Compliance Policy requiring a minimum Windows 10 OS version is shown below:

Conditional Access Policies

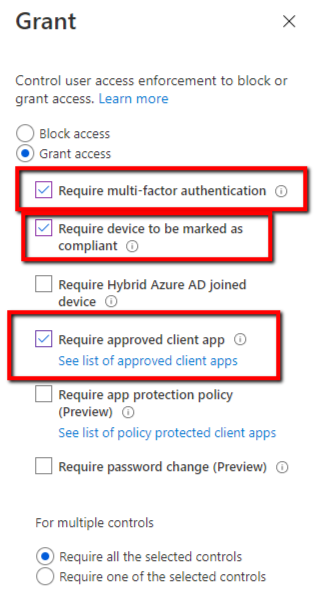
Conditional Access Policies work hand-in-hand with Compliance Policies.  They prevent access to noncompliant devices.  For instance, you can prevent devices connecting from anywhere outside of the U.S. for instance.  You can also list other conditional access requirements such as the installation of approved applications or MFA as shown in the screenshot below.  You should always test your Conditional Access Policies first as you could deny everyone access including yourself. 

Enrollment Restrictions

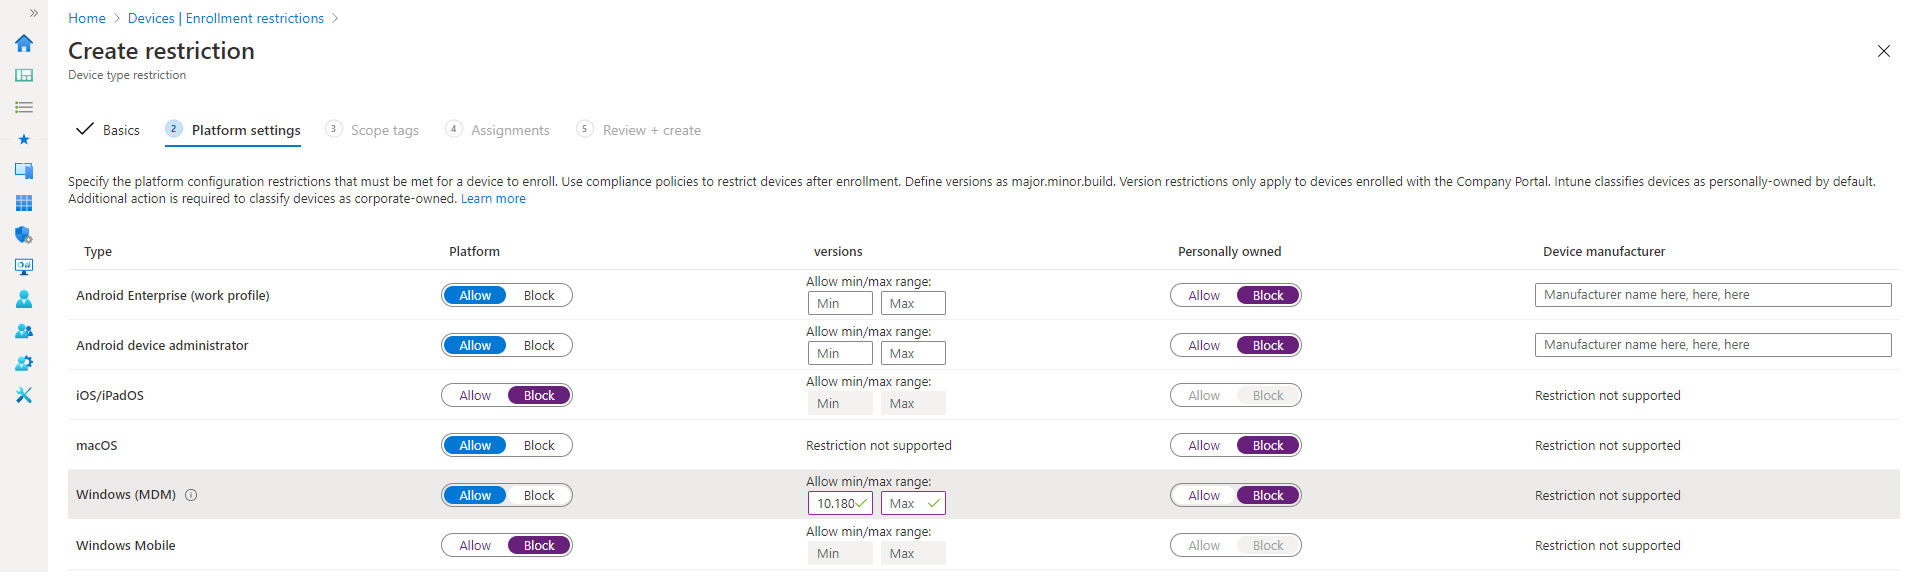
Although not a “policy” per se, Enrollment Restrictions play an important role in MEM security.  By default, authorized users can enroll 2 devices into the MEM portal.  If don’t want the default, you can create enrollment restrictions that will allow users to enroll anywhere from 1 to 15 devices.  You can also assign Device Type Restrictions that will prevent users from enrolling either personal devices, or designated device version platforms as is shown in the screenshot below.


Creating a MEM Strategy

As you can see, there are a lot of moving parts in MEM.  The key is to ensure that all of your policies and restrictive settings work in conjunction of one another in order to safeguard your organization as well as ensure that your users can perform their required digital workloads.  While MEM alone falls short of the granular setting coverability of Group Policy, it can play an important role for new startups and established companies that have significant numbers of mobile and remote devices.


Dec 2018
07

Azure and Intune Assigned Groups (and how Groups are related to Intune)

One of the principles of proper AD administration is to congregate your users into groups to make it easier to assign permissions and rights.  We use groups within Intune as well for this same reason.  In this case, Intune uses Azure AD to manage access to your company’s resources which is controlled using roles in the directory.  There are two default groups within every implementation of Intune.

  • All devices
  • All users

If you are using Intune for Education and you use School Data Sync to import you school records, you have two additional default groups.

  • All teachers
  • All users

These default groups represent a very broad scope and by themselves probably aren’t of much use.  That is why we need to create custom groups that can be tailored to the needs of our organization. There are two types of custom created groups in Intune, one being Assigned Groups.  Assigned groups are used when you want to manually add specific users or devices to a group.  You can create groups by a number of criteria such as geographic location, department, hardware characteristics, etc.  For instance, you could create one assigned group for your Windows 10 devices and one for your iPads.  You could create one for your desktop PCs and one for your mobile devices.  You can separate users into separate groups as well such as HR, Finance and Marketing.  You can then use those groups to assign policies to users or deploy apps to a set of devices.  Note that the ability to create custom groups is available in any MDM service, not just Intune.

Creating a group is easy.  Go to the Groups section of Intune and click “New Group.”  Then add the required information for that group.  In this case we would select “Assigned” as the membership type. 

Once the group is made, you can then assign users to that group.  Note that just as in domain joined AD, you can nest groups within one another.  These subgroups can be used to break down large groups into smaller more manageable sizes.  Groups have a hierarchical structure to them in Intune which allows for inheritance.  Parent groups are at the top of the hierarchy and any settings applied to these parent groups are passed down to the subgroups.  This settings inheritance feature makes it easer to apply settings to large numbers of users and devices.  Know that you can only create subgroups under assigned groups.

Dec 2018
04

Azure and Intune Dynamic Groups

So Assigned Groups are great and there are many uses for them.  But we live in a dynamic world today and our Azure/Intune environments are often reflective of that.  Things change, and sometimes we need our groups to adapt to those changes.  That is why we also have Dynamic Groups.  Rather than specifying the users or devices to add to a group, we set criteria to define the members of a Dynamic Group.   When the specified condition applies for a user or device, it is added to the group automatically.  Should a member no longer satisfy the rule, it is removed from the group.  The use of Dynamic Groups can greatly reduce the administrative overhead of constantly adding and removing users for large enterprise environments that perpetually change.

There are a couple of things that are different when creating Dynamic Groups.  First off, P1 or P2 licensing is required to create and use Dynamic groups.  Second of all, we must make separate groups for users and devices as is shown below.

Once we create our Dynamic Group, we need to populate it.  Remember, we don’t select the users or devices ourselves.  We cannot manually add or remove a member from a Dynamic group.  We create membership rules which will then populate the groups by querying Azure AD to find the members that meet the criteria of that rule.  Make note again that we cannot create a rule that contains both users and devices.

There are two types of rules, Simple and Advanced.  I assume everyone wants to start with the easier one first so let’s create a Simple Rule.

A membership rule has 3 components:

  • A property
  • An operator
  • A value

Say we wanted to create a dynamic group to include all current users of the HR Department.  In this case the property would be “department,” the operator would be “equals,” and the value would be HR.  If this isn’t sounding very simple, think again, because the Simple Rule creator interface does a great job of guiding you through the process.  You just simply choose which option you want from each component menu.  This of course means that your rules are limited to the choices made available in the GUI.

So what about Advanced Rules?  Well sometimes you may want to run extensive queries that go beyond the confines of the Simple rule creation process.  Creating Advanced rules may look a little intimidating because there is no easy to follow GUI menu to guide you.  Instead you only get a text box where you write out your rule.  Actually its not that intimidating.  We could have created an Advanced rule for our previous example for those users who belong to the HR Department.  The “rule equation” per say would be as follows:

(user.department -eq "HR")

A good example of when you might need to use an Advanced rule would be if you are applying multiple criteria in a single rule.  For instance, you want to create a Dynamic device group for Windows 1809 devices.  In this example, the rule would have to first query for Windows devices and then perform a subsequent query for the build number, which in this case is “10.0.17758.”  The resulting rule would then be as follows:

(device.deviceOSType -eq “Windows”) -and (device.deviceOSVersion -startsWith “10.0.17758”)