MDM & GP Tips Blog

Dec 2024
23

Use Device Categories to Organize and Manage Devices in Intune

If you have ever created a Device Configuration Policy with Microsoft Intune, you may have noticed a Menu Item called “Device Categories.” Device categories They provide a way to group devices based on specific criteria so you can deploy special policies for designated departments. Categories can be based on various factors such as device type, department, or location. For instance,

  • Sales devices need a CRM app installation as well as VPN configuration
  • Finance devices require stricter security and encryption policies as well as financial software deployment
  • Marketing Devices need social media management tools and content creation software deployment

By categorizing devices, your organization can ensure that sensitive departments like Finance have appropriate security measures in place. Device categories allow administrators to quickly apply policies to specific departments or device types without manual assignment. When users enroll their devices, they can select a category, which automatically adds the device to the corresponding group in Intune. Let’s say you ship your sales personnel new laptops. During the enrollment process of their new device, users can choose the appropriate category, reducing administrative overhead.

Creating a Device Category

To create or edit a device category, you must be a Global Administrator or Intune Administrator. Using the Microsoft Intune Admin Center, navigate to Devices > Device Categories > click Create device category. Enter a name for the new device category and add an optional description as shown in the screenshot below.

You can add an optional tag in the next step and then verify your settings on the Review + Create tab. Once the device category is created, you will see it in your list of device categories. Devices can be assigned to categories manually or you can allow users to make their selection during enrollment.

In addition to setting up device configurations, you can set up corresponding dynamic Azure AD groups. These dynamic groups can automatically add or remove members based on specified criteria


Dec 2024
02

Intune Administrative Templates are Now Retired

If you have recently attempted to make Intune configuration profiles using the tried-and-true Administrative Templates, you may have stumbled upon a surprise. A "(retired)" tag is now visible next to Administrative Templates, and the Create button is greyed out as shown in the screenshot below.

After all these years, Administrative Templates are being retired in Microsoft Intune. This means you can no longer create new Administrative Templates configuration profiles through the path: Devices > Configuration > Create > New policy > Windows 10 and later > Administrative Templates. Users will now be directed to use the Settings Catalog instead which hosts the same settings found in Administrative Templates.

Existing Administrative Templates can still be viewed, updated, and deleted so you can still fully utilize any configuration policies you have made in the past. The retirement of Administrative Templates does not affect other templates, which will continue to be supported.

Nov 2024
22

The Many Ways to Configure Windows Firewall Rules using Intune or Command Line

The Many Ways to Configure Windows Firewall Rules

In today's rapidly evolving threat landscape, organizations must prioritize a multilayer security strategy. That includes configuring and enforcing Windows Firewall on servers and workstations. In this article we will look at the multiple ways to deliver Windows Firewall settings to your Windows devices.

Using Intune

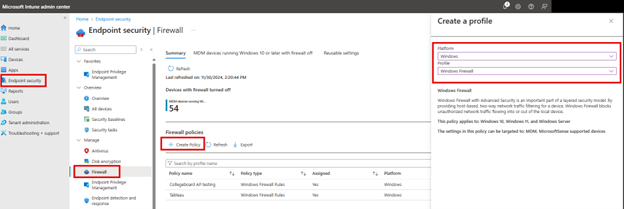
There are a several ways to configure Windows Firewall Rules and enforce them using the Microsoft Intune Admin Center. One way is to navigate to Endpoint Security > Firewall and click “Create Policy.” Then choose “Windows” as the Platform and then choose one of the two Profile options:

Windows Firewall: Choose this option to enable or disable the Windows Firewall for different network profiles and only need basic firewall settings and configurations.

Windows Firewall Rules: Use this option if you already have Windows Firewall enabled and you want to create granular custom firewall rules for inbound and outbound traffic.

In the example below I chose Windows Firewall.

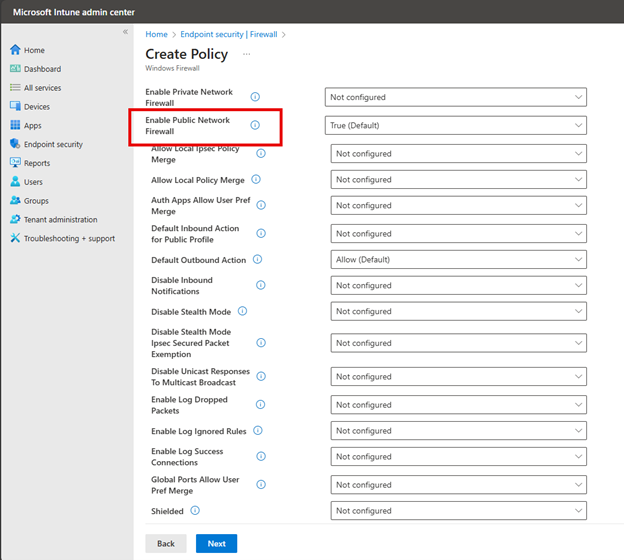
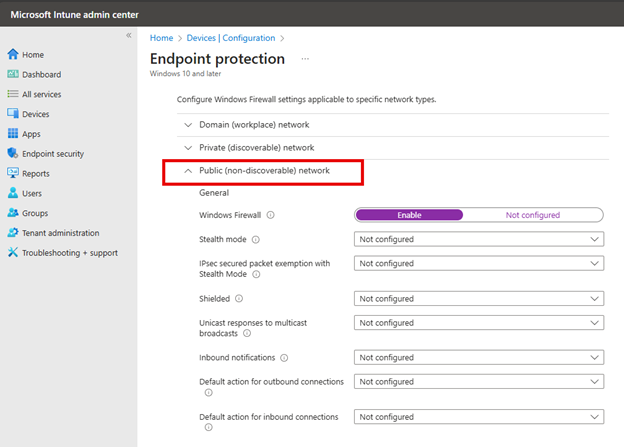
You then have the option to enable or disable the Windows Firewall for Domain, Private or Public Networks. If you aren’t sure which profile to choose, here are some tips:

  • The Domain profile in Windows Firewall is applied when a computer is connected to a network that is identified as a Domain Network. The Domain profile takes precedence over Private and Public profiles when connected to a domain network and is typically more permissive than the Public profile, as the domain network is assumed to be trusted and secure.
     
  • The Network private profile is for networks in which devices are visible to one another on the same network. Network discovery is usually enabled and file and printer sharing features are active. This profile is typically used for SOHO environments.
     
  • The Public profile is designed for use on untrusted networks such as an establishment that provides a public or guest network. The devices are not discoverable by other devices on the network stricter firewall rules are applied to limit incoming connections.

You can then configure basic settings for each of these profiles as shown below. Here I chose to enable the Public Network.

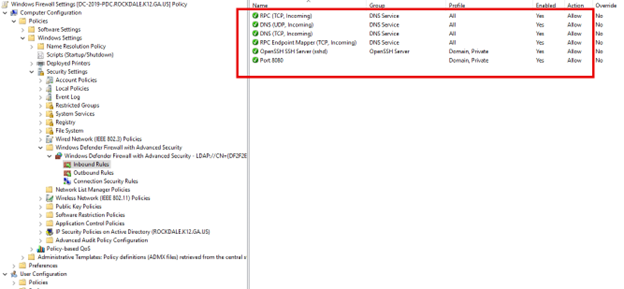
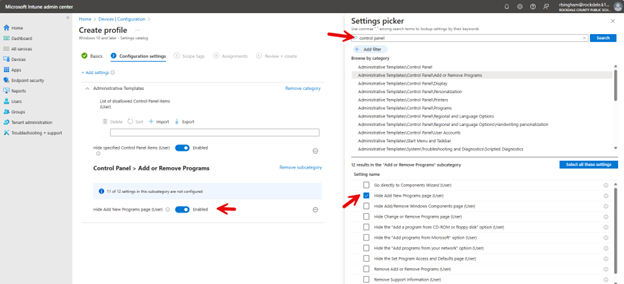
Choosing the Windows Firewall Rules option I outlined earlier provides you with a different interface to select more customized rules as shown in the screenshot below.

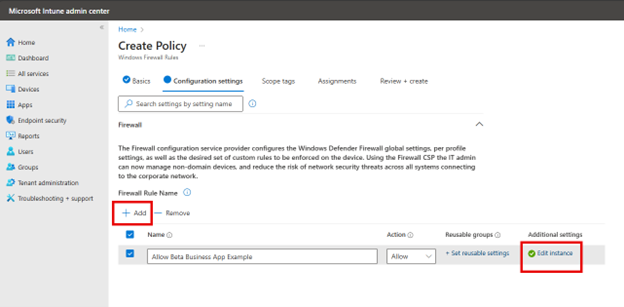
Clicking the Edit instance will prompt you with the port configuration settings.

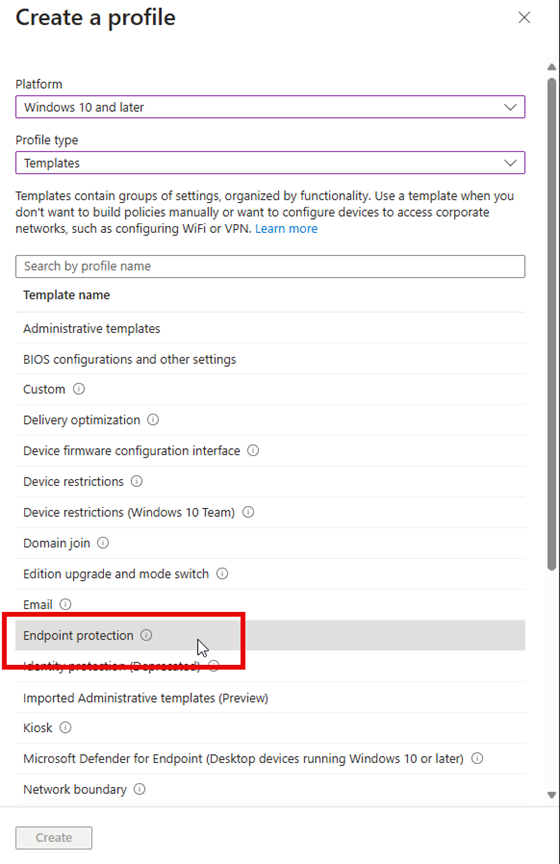
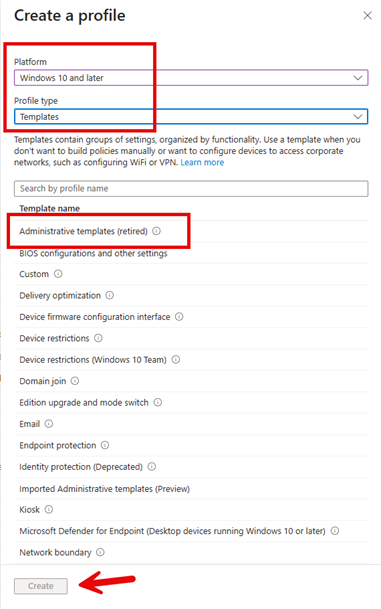
You can also configure Windows Firewall using Intune Configuration profiles. Navigate to Devices > Configuration Profiles and create a new profile. Select Windows 10 and later as the platform. Then choose Endpoint protection as the profile type as shown below.

Name the profile and then proceed to the next screen where once again, you can configure basic settings for the Domain, Private and Public profiles.

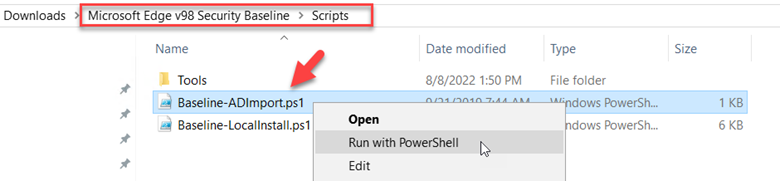
Another approach to configuring firewall rules with Intune is to use PowerShell Script Deployment. This method leverages NetFirewallRule cmdlets to define firewall rules as is shown below:

New-NetFirewallRule -DisplayName "Allow Inbound Port 80" -Direction Inbound -LocalPort 80 -Protocol TCP -Action Allow

You would then use the Microsoft Win32 Content Prep Tool and package it into an .intunewin file. You can download the Win32 Content Prep Tool from Microsoft's official GitHub repository. Then go to the Microsoft Intune Admin Center and navigate to Apps > Windows > and add a new Windows app (Win32). Then upload the .intunewin file and set the following install command:

powershell.exe -executionpolicy bypass -file .ps1

Whichever option you choose to deliver the Firewall settings, you would then assign the profile to the designated groups you want to target and then save it.

Using Group Policy

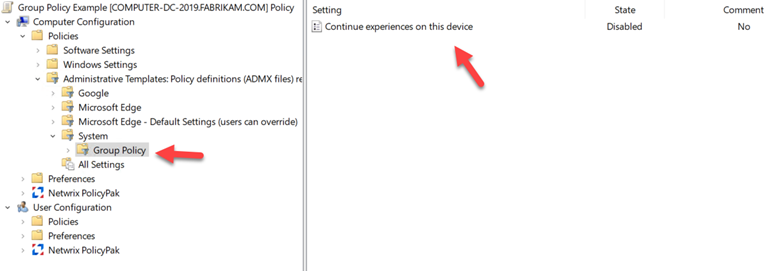
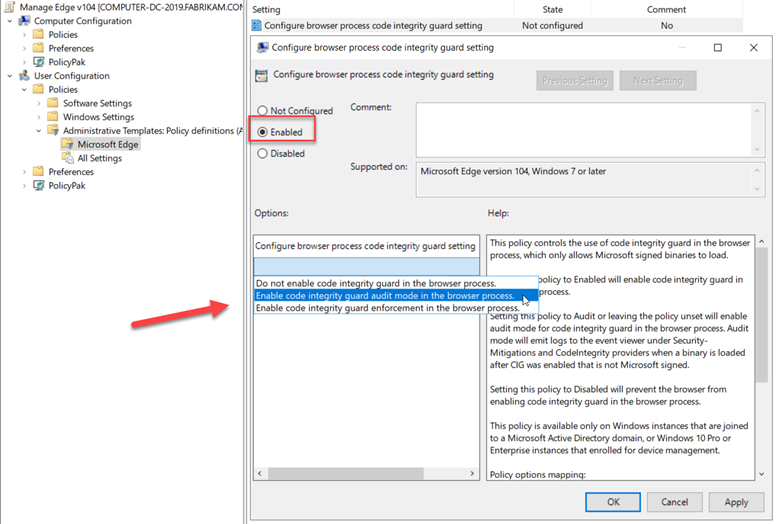
If you want to configure Firewall settings for domain-joined computers, then Group Policy is the best option. Using the Group Policy Management Console, create a new GPO and navigate to Computer Configuration > Policies > Windows Settings > Security Settings > Windows Defender Firewall with Advanced Security. You can enable your desired network profiles by right-clicking on "Windows Defender Firewall with Advanced Security" and selecting "Properties.” To add rules, you would expand either "Inbound Rules" or "Outbound Rules" and right-click and select "New Rule.” Then simply follow the wizard to define the ports, programs or custom rules you want as shown below.

Ultimately, whether using Intune or Group Policy, the goal remains the same: to protect critical assets from unauthorized access and potential threats while maintaining seamless operational efficiency. Stay safe out there.


Sep 2024
30

Customizing Windows Settings Visibility with Intune

You can create a "Settings Page Visibility List" policy that allows administrators to show only specific pages in the Settings app. The secret here is the "showonly:" string that appears in the custom OMA-URI settings. In this example I will choose the only the following settings to remain visible.

  • bluetooth: Bluetooth settings
  • camera: Camera settings
  • about: System information
  • sound: Sound settings
  • easeofaccess-audio: Ease of Access audio settings
  • windowsupdate-action: Windows Update actions
  • sound-devices: Sound devices settings
  • apps-volume: App volume and device preferences
  • easeofaccess-visualeffects: Ease of Access visual effects
  • appsfeatures-app: Apps & features
  • installed-apps: Installed apps list
  • privacy-webcam: Privacy settings for webcam

Using the Microsoft Intune Admin Center, navigate to Devices > Configuration > Create > New Policy. Select Windows 10 and later as the Platform and Custom as the Profile type. Name the policy and click Add to configure the OMA-URI settings as shown below.

The OMA-URI path is OMA-URI:

./Device/Vendor/MSFT/Policy/Config/Settings/PageVisibilityList

Choose String as the Data Type. The string will include the following:

Value: showonly:bluetooth;camera;about;sound;easeofaccess-audio;windowsupdate-action;sound-devices;apps-volume;easeofaccess-visualeffects;appsfeatures-app;installed-apps;privacy-webcam

When completed the OMA-URI settings will look something like this:

Then assign the designated groups to the policy and save.

Aug 2024
05

Use Device Tags to Simplify Intune Management

Admins can tag devices using Microsoft Intune to enhance device management, organization, and security across their enterprise environment. Tags can be used to efficiently group and categorize devices based on various attributes such as department, location or function. This logical grouping enables IT teams to apply policies, updates and security measures more effectively. Tags can be automatically assigned and updated through dynamic rules, ensuring that device classification remains accurate and up-to-date. Some of the applications of tagging includes the following:

  • Tags can be used to filter and search for specific devices in large environments to improve management efficiency.
  • Tags can be used to apply specific policies, configurations, or software to groups of devices that share common characteristics.
  • Tags can help in tracking and managing hardware assets across an organization.
  • Tags can be used to identify devices that require specific security measures or compliance checks.
  • Tags can provide additional context about devices, which can be helpful during troubleshooting or decision-making processes.

In other words, tagging provides numerous management options and can prove a way to simplify your MDM efforts.

Create a Configuration Policy

To implement tagging using the Microsoft Intune Admin Center, navigate to Devices > Configuration > Policies > and create a new policy. Choose Windows 10 and later as the Platform and select Custom Templates as the Profile type.

You will then apply a name for the policy and configure the OMA-URI Settings. The OMA-URI path is the most critical here so use the following path:

./Device/Vendor/MSFT/WindowsAdvancedThreatProtection/DeviceTagging/Group

In the example below I selected String as the data type and made a tag called IT Employee.

You could also use a PowerShell script to create tags and deploy the script through Intune. I can then create a dynamic group in Azure AD that includes all devices with the “IT Laptop” tag. Security policies and configuration policies could then be applied to devices belonging to the IT role group.

Jul 2024
01

2 Different Ways to Manage the Control Panel with Intune

Microsoft Intune offers two primary methods for managing Control Panel settings on Windows devices: Administrative Templates and the Settings Catalog. Administrative Templates are based on ADMX files, similar to Group Policy Objects (GPOs) in on-premises Active Directory. By using the administrative templates, you can configure a wide range of settings, including Control Panel visibility and functionality. This method provides a familiar interface for administrators who have experience with Group Policy.

To use this method, open the Microsoft Intune admin center and navigate to navigate to Devices > Configuration > Create New profile and select Windows 10 and later as the platform and Administrative Templates as the Profile type. In this example I want to hide Add or Remove Programs. In the screenshot below I went to User Configuration and chose “Remove Add or Remove Programs” and then enabled the setting as shown in the screenshot below.

Another approach might be to remove the Programs and Features page altogether. To do so, navigate to User Configuration > Control panel and select “Hide specified Control Panel items” and set the option to enabled. As shown in the screenshot below, list the Control Panel items you want to hide using their canonical names. Here Is chose to hide System Settings and Programs and Features. Complete the creation process by assigning the policy to the designated groups.

Using Windows Settings

You can also manage Control Panel with Intune without using administrative templates. In this case you will use the Settings Catalog that will apply to both the traditional Control Panel and the modern Settings app. Once again, navigate to Devices > Windows > Configuration profiles and click on "Create Profile". Then select "Windows 10 and later" as the Platform but this time choose "Settings catalog" as the Profile type.

In the Settings picker do a search for “control panel” and I chose “Add or Remove Programs” but this time I had more options to choose from. I then “Hide Add New Program page for users. Then I enabled the policy to the left as shown in the screenshot below.

You can also hide specific control panel items as well as shown below.

Both administrative templates and the settings catalog can be used to manage the Control Panel using Intune. The settings catalog offers more comprehensive options, including all settings available in Administrative Templates plus additional ones. It allows administrators to search for specific settings and create custom groups. However, in many cases, both alternatives may prove equally effective for managing Control Panel settings. The choice often depends on the specific requirements of the organization and the preferences of the IT administrators.


Jun 2024
17

Setting up a Background Image for an Intune Managed Device

Companies want to control the background image on their workstations to maintain a professional appearance, reinforce brand identity, and ensure consistency across all devices. It also prevents "genreal messing around" and at least looks tidy. .

Setting up a background image for on prem corporate workstations using Group Policy was straightforward.

  • An administrator stored the background image on a network share
  • A GPO was created to point to the shared image

However, for mobile and remote machines, this approach is not feasible as these devices are often disconnected from the corporate network.

Intune provides a solution for assigning a background image to any Windows computing device it manages, regardless of location. The first step is to store your shared image on the internet as I have done below.

https://cdnsm5-ss9.fabrikam.com/UserFiles/Servers/Server_136424/Image/Departments/Technology/UserBackground.jpg

Then, using the Microsoft Intune Admin Center navigate to Devices > Configuration > Create New policy and select Windows 10 and later as the platform and settings catalog as the Profile type. Using the Settings picker, do a search for personalization. Then choose Desktop Image URL and input the URL as shown in the screenshot below.


Another key difference here is that with Group Policy, the image is not downloaded to the device. The policy simply points to the image in its shared location. Using Intune, both the policy and image file are pushed to the managed devices, and the image is stored on the device itself.

This makes Intune a preferred solution for off-premises machines. Like any configuration profile, the final step is to assign the policy to the designated groups, and you are done.

Feb 2023
06

How to Disable Nearby Sharing with Group Policy and Intune

Nearby Sharing is a feature in Windows 10 and Windows 11 that allows you to transfer documents, pictures, and links to other compatible devices that are near each other using a combination of Bluetooth and wireless communication. It’s a great feature that fosters collaboration between team members. Maybe. So indeed, there are some instances in which you don’t want to allow this feature such as an educational environment where students are taking an online exam for instance. We will look at a couple of ways to disable this feature.

Nearby Sharing is found under Shared experiences in your system settings as shown below.

To manage Nearby Sharing using Group Policy, create a GPO and go to Computer Configuration > Policies > Administrative Templates > System\Group Policy > and disable “Continue experiences on this device” as shown in the screenshot below. When disabled, Windows device will not be discoverable by other devices and cannot participate in cross-device experiences.

If you want to use Intune, create a configuration profile, and select Windows 10 and later as the platform and choose Templates > Administrative templates as the profile. Then follow the same template path - Computer Configuration > Policies > Administrative Templates > System\Group Policy > and disable “Continue experiences on this device” as shown below.

Users will no longer be able to transfer files amongst each other on their enterprise devices.

Aug 2022
15

A Closer Look at Safeguard Holds

There are no guarantees in life. That’s certainly the case with software updates. Sometimes an update that offers a new operating system version just doesn’t’ work out due to compatibility issues with a particular device. This can cause the update to either fail or rollback. Even worse, it could result in data loss or a loss of connectivity or key functionality.  That’s why Microsoft monitors quality and compatibility data to identify issues before they can affect too many machines. Issues may also be reported from Microsoft partners and customers as well. Once these issues are identified, Microsoft enacts a Safeguard Hold to prevent other devices with this known compatibility issue from being offered the designated feature update. The safeguard hold is enforced long enough to give Microsoft ample time to address the issue. Once a fix is derived and verified, the hold is lifted, and the Windows update will once again be readily offered to devices.

Disabling Safeguards

While its not necessarily recommended, you can disable safeguards so that devices will ignore them. Keep in mind that the update may likely fail. If you want to take the chance, however, create a GPO and go to Computer Configuration > Administrative Templates > Windows Components > Windows Update > Windows Update for Business and enable the “Disable safeguards for Feature Updates” setting as shown below.


You can also do this using an MDM such as Microsoft Endpoint Manager with the DisableWUfBSafeguards CSP. The required custom OMA-URI settings are as follows:

  • OMA-URI: ./Vendor/MSFT/Policy/Config/Update/DisableWUfBSafeguards
  • Data type: Select Integer
  • Value: 1


Safeguards for Two Types of Issues


New Windows feature updates that are deployed using either Windows Update service or Windows Update for Business are subject to Safeguard holds for a known issue.  A “known issue” is a confirmed problem that may occur after an upgrade for a specific set of devices. In addition to known issues, there are also “likely issues.” A likely issue means that the problem has not been confirmed by Microsoft but has been discovered through machine learning out in the ecosphere. Issues could involve rollbacks, connectivity issues, app or driver malfunction as well as problems with graphics and audio. Once identified, a temporary safeguard hold is enabled on the designated update until either the issue has been confirmed and upgraded to a known issue (in which the safeguard hold is continued) or it has been identified as a false positive, in which case the hold is removed.

The Windows Update for Business Deployment Service

The Windows Update for Business deployment service is a cloud service within the Windows Update for Business product family. It provides a next level of control concerning the approval, scheduling, and safeguarding of Windows updates. Here you can use safeguard holds against likely updates issues. You can also do things such as bypass preconfigured Windows Update for Business policies to manually deploy a security update on command across your organization should an emergency arise. To utilize this service, you must have one of the following subscriptions:

  • Windows 10/11 Enterprise E3 or E5 (included in Microsoft 365 F3, E3, or E5)
  • Windows 10/11 Education A3 or A5 (included in Microsoft 365 A3 or A5)
  • Windows Virtual Desktop Access E3 or E5
  • Microsoft 365 Business Premium

You can then do a search for it in MEM and configure as you need to.

To see if you are affected by a Safeguard hold you can use Update Compliance in MEM to run a Safeguard Holds report that can provide insights into existing holds that are preventing devices from updating or upgrading. You can get more information about these reports here.


Aug 2022
01

12 New Policies and Security Baseline for Microsoft Edge v104

Microsoft just released a security baseline for Microsoft Edge version 104.  Be aware that when you go to download it you won’t see version 104 listed because it still utilizes version 98 as none of the security policies have changed yet. Microsoft v104 introduced 12 new settings that can be used within Computer and User policies. The new setting policies are as follows:

  • Allow import of data from other browsers on each Microsoft Edge launch
  • Configure browser process code integrity guard setting
  • Define domains allowed to access Google Workspace
  • Double Click feature in Microsoft Edge enabled (only available in China)
  • Enable Drop feature in Microsoft Edge
  • Get user confirmation before closing a browser window with multiple tabs
  • Text prediction enabled by default
  • XFA support in native PDF reader enabled
  • Enables Microsoft Edge mini menu *
  • Get user confirmation before closing a browser window with multiple tabs *
  • Restrict the length of passwords that can be saved in the Password Manager

* These policies are available as both mandatory and user override settings

You can download the three ADMX templates new for Edge version 104 here as shown below.

One of these settings, “Configure browser process code integrity guard setting” restricts the ability to load non-Microsoft signed binaries. When enabled, there are three mode options:

  • Disabled (0) = Do not enable code integrity guard in the browser process.
  • Audit (1) = Enable code integrity guard audit mode in the browser process.
  • Enabled (2) = Enable code integrity guard enforcement in the browser process.

Administrators are encouraged to run this setting in Audit mode (1) early on for compatibility purposes. Audit mode is currently the default but a future security baseline will change this to Enabled (2) once Microsoft has enough data to proceed.  The setting options are shown in the screenshot below:

If you haven’t yet imported the secruity baseline, you can do so by running the Baseline-ADImport.ps1 script as shown below.

You can refer to my blog on the Security Baseline for Edge v95 for more information about how to use security baselines for Microsoft Edge.