Understanding Background Refresh Delays for Remote Machines
Group Policy and Mobile Device Management (MDM) solutions like Microsoft Intune both experience a time lag between policy creation or modification and its deployment to target devices. This delay is an inherent characteristic of centralized management systems:
Group Policy:
- Policies refresh every 90 minutes by default for domain-joined computers. Domain controllers refresh every 5 minutes
- There is a random offset up to 30 minutes to prevent network congestion
Microsoft Intune:
- Check-in frequency is typically every 8 hours for Windows device
Accelerating Group Policy Deployment
In certain situations, waiting for standard Group Policy refresh intervals isn't practical, particularly when immediate policy updates are crucial. For example, when implementing a new GPO to address an emerging security threat, or when troubleshooting requires immediate policy changes affecting permissions. While it may be feasible to use Remote Desktop Protocol (RDP) to connect to critical servers and manually update policies via command prompt, this approach isn't always efficient or scalable.
A simple method to force Group Policy updates is through the Group Policy Management Console (GPMC). By right-clicking on an organizational unit and selecting "Group Policy Update," administrators can trigger an immediate policy refresh. When selected, a confirmation dialog appears as shown in the screenshot below.
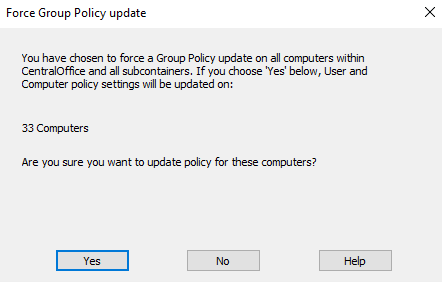
Confirming this prompt will force all computers within the selected organizational unit to immediately update their Group Policy settings.
If you have Microsoft Endpoint Configuration Manager (formerly SCCM) in your environment, you can use it to trigger gpupdate as well using the management console.
Using PowerShell for Gpupdates
Another alternative for forcing gpupdates on remote computers is to use the Invoke-GPUpdate command in PowerShell. The example below shows the command if you wanted to update the Group Policy on the local computer.
Invoke-GPUpdate -Force
The commnd template below shows how to force GPUpdates on a remote computer.
Invoke-GPUpdate -Computer "ComputerName" -Force -RandomDelayInMinutes 0
Here's a breakdown of the key parameters:
- -Computer "ComputerName": Specifies the target computer. Replace "ComputerName" with the actual name of the remote computer you want to update.
- -Force: This parameter ensures that all policies are reapplied, even if they haven't changed.
- -RandomDelayInMinutes 0: Sets the random delay to 0 minutes, which means the update will be applied immediately.
For example, to force a Group Policy update on a computer named "COMPUTER02", you would use:
Invoke-GPUpdate -Computer "COMPUTER02" -Force -RandomDelayInMinutes 0
To apply updates on more than one remote computer, you can do this:
# Define the target computer(s)
$computers = @("Computer1", "Computer2")
# Run gpupdate remotely on the target computers
Invoke-Command -ComputerName $computers -ScriptBlock {
gpupdate /force
}
You can also use a loop or pipeline as shown in the example below:
$computers = "Computer1", "Computer2", "Computer3"
$computers | ForEach-Object { Invoke-GPUpdate -Computer $_ -Force -RandomDelayInMinutes 0 }
Note that when the gpupdate command is run remotely, the remote clients will briefly see a CMD screen pop-up notifying them of the Group Policy update
Scheduling Updates
If you aren’t in a hurry to deploy group policy updates but instead want to schedule GPUpdates at a precise time for designated machines, you can use Task Scheduler. Simply configure the task to run the gpudate command and deploy the task to the remote machines via Group Policy, PowerShell, or other deployment tools.