MDM & GP Tips Blog

Feb 2025
03

How to Validate Dynamic Groups in Microsoft Intune

There are two different types of groups you can create with Intune. The first is the traditional “Assigned Group” in which administrators manually add or remove members. This means of course that group membership only changes when an administrator makes a change. These are best for small organizations or small stable groups within a larger enterprise.

“Dynamic Groups” offer an automated approach to group management, where membership is determined by specific query rules and conditions. Here, members are added or removed in real-time as they meet or no longer meet the specified criteria. These are ideal for large enterprises, large groups that change membership, or large-scale deployments based on departments, locations, or device types.

How to Create a Dynamic Group

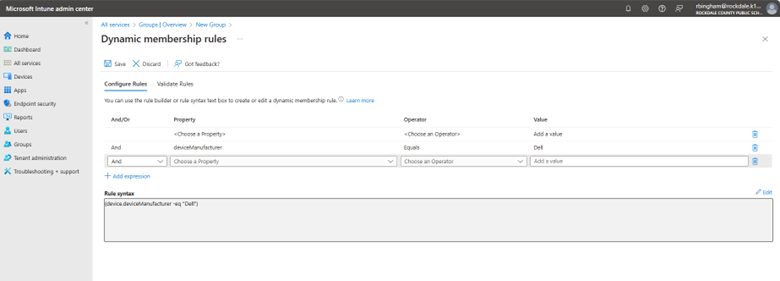
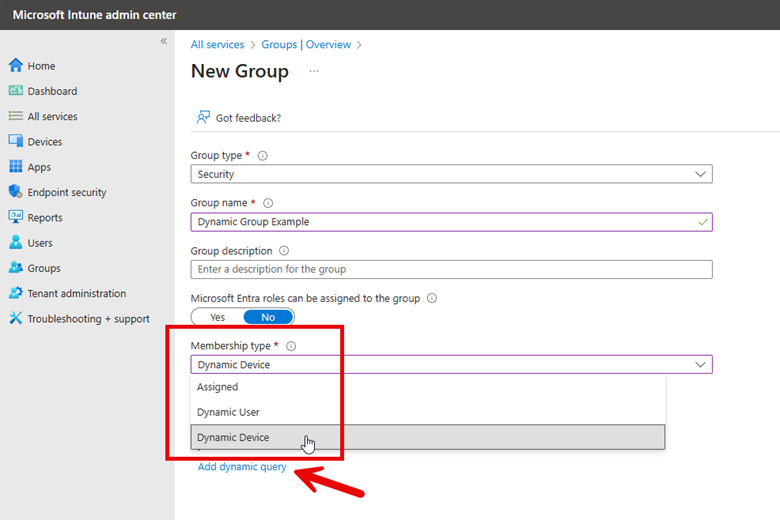
There are two ways to create dynamic groups. The first is using the Microsoft Intune admin center and navigating to Groups and select “New group.” On the next page you will create a name for the Group and state whether it is an Assigned or Dynamic group. In the screenshot below, I have selected Dynamic Device.

Now I need to create a dynamic query which will dictate the membership criteria. The screenshot above shows the “Add dynamic query” links that takes me to where I will create the Dynamic membership rules. Here you will use the wizard to create the rules that are comprised of properties, operators and values. You can add as many expressions as you want.

Here are some examples of possible groupings you can do:

  • To automatically group all devices running Windows 11 the rule would be:
    (device.operatingSystem -eq "Windows") and (device.deviceOSType -eq "11")
    You can use this group to deploy security baselines policies or upgrade legacy systems.
     
  • You can also make a group comprised of a specific Windows version such as Windows 11 24H2 Devices as follows:
    (device.deviceOSVersion -startsWith "10.0.261")
  • Group All Users in a Specific Department such as Finance:
    (user.department -eq "Finance")
  • You can build composite rule sets combining multiple criteria, for example, a group that identifies corporate Windows 10 devices by validating both the operating system version and company ownership status in a single expression:
    (device.deviceOSType -startsWith "Windows") and (device.deviceOSVersion -startsWith "10.0") and (device.deviceOwnership -eq "Company")

Dynamic Group Validation

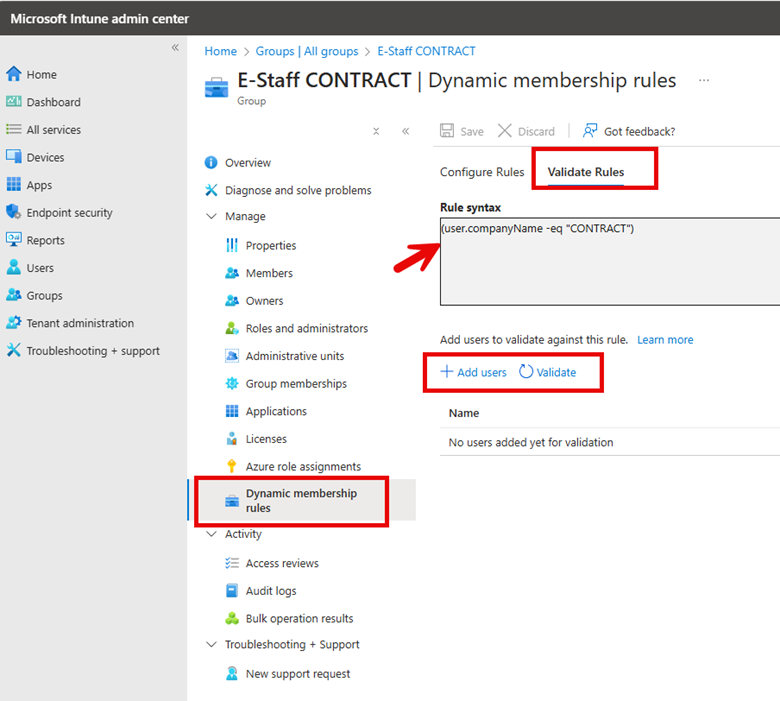
Before using new dynamic groups in a production environment, you should validate the rules to confirm that the dynamic rule results operate as expected. To do this, go to Groups in the Microsoft Intune admin center, select the group you want to validate, and navigate to the Dynamic membership rules section. Click "Validate Rules", add users or devices that should be included in the group, and then click "Validate" to confirm the proper assignment. The screenshot below outlines these steps.

Note that dynamic groups don't update instantly and may take up to 24 hours to process changes.

I mentioned there are two ways to create and validate Dynamic Groups because you can also use the Microsoft Entra ID portal using the exact steps I used in Intune. You can also use PowerShell to validate dynamic group membership using the following cmdlet:

$GroupID = ""

$UserID = ""

Get-MgGroupMember -GroupId $GroupID | Where-Object { $_.Id -eq $UserID }


If the output is empty, the user or device is not part of the group, meaning the rule might need adjustments.

As organizations continue to grow and evolve, the ability to automatically manage group memberships based on specific attributes becomes a necessity for maintaining security, compliance, and operational efficiency. By leveraging rule-based membership, these groups significantly reduce administrative overhead while ensuring that access controls, policy applications, and resource distributions remain current and accurate. 

Jan 2025
20

The Dynamic Duo: Leveraging Compliance and Conditional Access in Intune

Enterprise cloud accounts, particularly services like Office 365, face constant cybersecurity threats from malicious actors. While enforcing strict password complexity requirements can help protect these accounts, this approach alone has significant limitations. Complex passwords may lead users to create workarounds that actually reduce security such as writing passwords down or reusing them across multiple accounts. There is also a linear correlation that as password complexity increases, organizations typically see a corresponding rise in password-related help desk tickets, increasing IT support costs and reducing productivity.

However, even properly authenticated users can pose security risks when accessing systems from compromised devices. Organizations need to prevent access from endpoints that have security vulnerabilities or malware infections, regardless of valid user credentials. Of course, when users are accessing resources from their home, you can’t be sure what type of device they may be using.

If you use Microsoft Intune to manage your user accounts, you can leverage two key policy types working in tandem: Conditional Access policies and compliance policies. When implemented together, these policies ensure organizational resources are only accessible from devices that meet your security requirements. Conditional Access policies define the circumstances under which access is permitted, while compliance policies establish the security standards devices must maintain.

Create a Compliance Policy

Compliance policies in Microsoft Intune are sets of rules and conditions used to evaluate the configuration of your managed devices. These policies help secure organizational data and resources by ensuring devices meet specific configuration requirements. Devices must satisfy the conditions set in these policies to be considered compliant by Intune such as:

  • Requiring encryption (e.g., BitLocker).
  • Enforcing password complexity.
  • Ensuring the device is not jailbroken or rooted.
  • Setting minimum/maximum OS versions

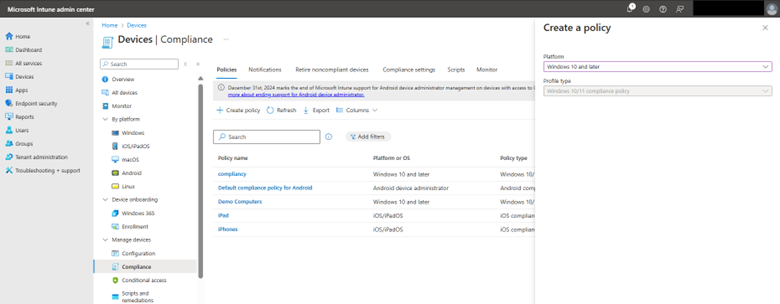
To create a compliance policy in the Microsoft Intune Admin Center, navigate to Devices > Compliance and select “Create Policy” as shown in the screenshot below.

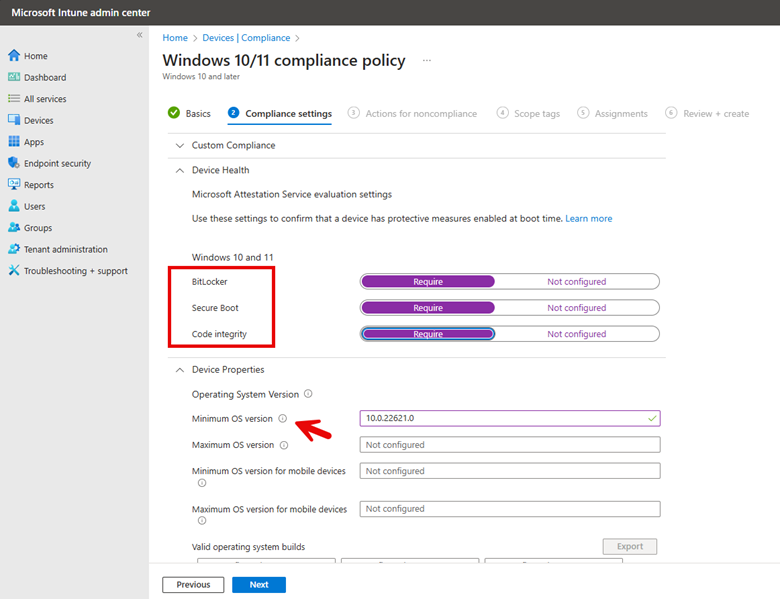
Name your policy and then choose the compliance settings you want. In the example below, I want all compliant machines to have BitLocker, Secure Boot, and Code integrity enabled. Because all my employees are running machines with Windows 11, version 22H2, I chose that as the minimum operating system to be compliant. For the minimum operating system version in Intune, you would specify:

Minimum OS Version: 10.0.22621.0

This corresponds to Windows 11, version 22H215. By leaving the maximum OS version blank, you are allowing those with later versions access. See the screenshot below.

Because I am running Microsoft Defender for Endpoint on employee machines, I will configure Microsoft Defender for Endpoint rules in the compliance policy. Here, I am requiring that all devices be at or under a machine risk score of Low. This means that Devices with "Medium" or "High" risk scores will be marked as noncompliant.

The compliance policy will immediately mark the device as noncompliant when any one of these conditions is not met. On the next screen, you can configure additional Actions for noncompliance, such as sending email notifications to users or remotely locking devices. For this example, I am going to skip this section and proceed to apply the policy to all users and groups.

Creating a Conditional Access Policy

Conditional access policies serve as a type of gatekeeper for designated resources of your organizations. These policies make real-time decisions about whether to grant, limit, or block access to resources based on specific conditions. You can create policies that do things such as:

  • Require MFA when accessing resources from outside your corporate network
  • Only allow access from devices that are encrypted and up-to-date on security patches
  • Block access from countries where your company doesn't operate
  • Enforce browser-only access for unmanaged devices
  • Require periodic re-authentication for sensitive applications

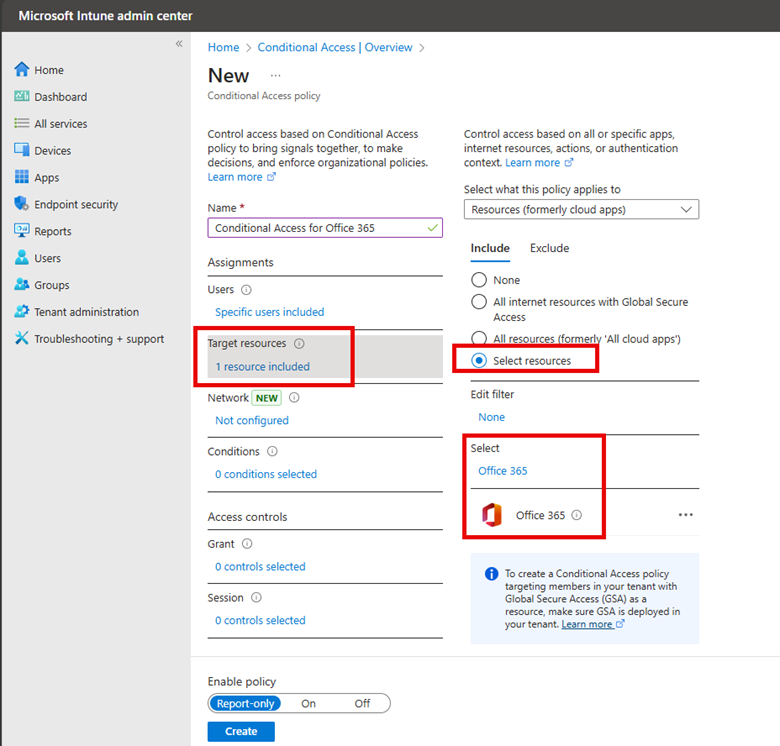
To create a conditional access policy, navigate below to Conditional access and click on “Create new policy” and name it. In my example here, I selected a group and then chose Office 365 as the target as shown below.


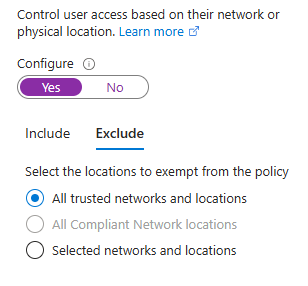
One of the purposes of this conditional access policy is to scrutinize all the login attempts from off prem locations. By excluding trusted networks from the policy, we maintain seamless access for users on known secure networks while enforcing additional security measures for connections from elsewhere.

For this configuration to be effective, trusted network locations must be pre-defined in the Microsoft Entra admin center. These typically include:

  • Corporate office network ranges
  • Known VPN network ranges
  • Other verified secure networks

The screenshot demonstrates this configuration:

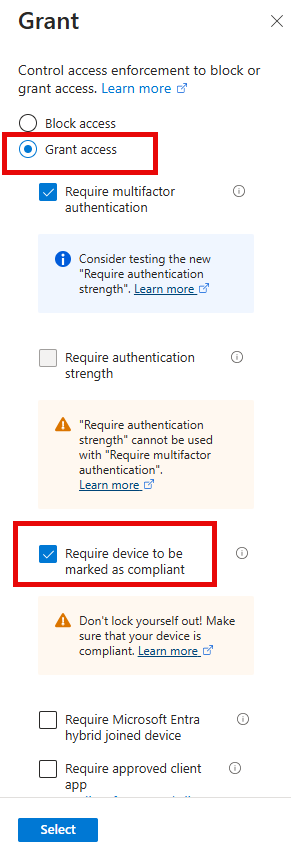
I then created two conditions that must be met to grant access:

  1. Require multifactor authentication (MFA) only for off-premises access attempts. Users accessing resources from within the corporate network (on-premises) will not need to go through MFA.
  2. Require that all computers must be compliant with the organization's policies to prevent employees from logging in using personal, potentially unsecured devices when off-prem. The associated compliance policy created earlier ensures that off-premises devices meet the same operating system and Microsoft Defender for Endpoint requirements as on-premises users.

The selections are shown in the screenshot below:

Conclusion

Of course, I have only scratched the surface here of possibilities. The configurations discussed here represent just a small sample of Intune's extensive security capabilities. Conditional Access and compliance policies can be customized with numerous additional controls and requirements to match your organization's specific security needs and risk tolerance. As threats evolve and organizational requirements change, these policies can be adjusted and you should regularly review and update your policies. By leveraging the full potential of Intune's policy framework, organizations can build a dynamic, responsive security posture that aligns with the principles of zero trust while enabling a modern, flexible workplace.


Jan 2025
06

Understanding Background Refresh Delays for Remote Machines

Group Policy and Mobile Device Management (MDM) solutions like Microsoft Intune both experience a time lag between policy creation or modification and its deployment to target devices. This delay is an inherent characteristic of centralized management systems:

Group Policy:

  • Policies refresh every 90 minutes by default for domain-joined computers. Domain controllers refresh every 5 minutes
  • There is a random offset up to 30 minutes to prevent network congestion

Microsoft Intune:

  • Check-in frequency is typically every 8 hours for Windows device

Accelerating Group Policy Deployment

In certain situations, waiting for standard Group Policy refresh intervals isn't practical, particularly when immediate policy updates are crucial. For example, when implementing a new GPO to address an emerging security threat, or when troubleshooting requires immediate policy changes affecting permissions. While it may be feasible to use Remote Desktop Protocol (RDP) to connect to critical servers and manually update policies via command prompt, this approach isn't always efficient or scalable.

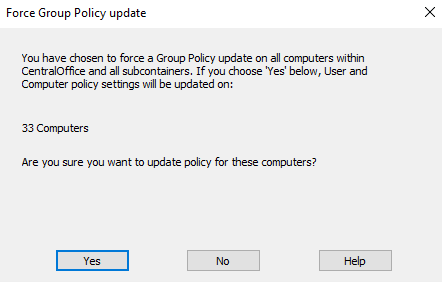
A simple method to force Group Policy updates is through the Group Policy Management Console (GPMC). By right-clicking on an organizational unit and selecting "Group Policy Update," administrators can trigger an immediate policy refresh. When selected, a confirmation dialog appears as shown in the screenshot below.

Confirming this prompt will force all computers within the selected organizational unit to immediately update their Group Policy settings.

If you have Microsoft Endpoint Configuration Manager (formerly SCCM) in your environment, you can use it to trigger gpupdate as well using the management console.

Using PowerShell for Gpupdates

Another alternative for forcing gpupdates on remote computers is to use the Invoke-GPUpdate command in PowerShell. The example below shows the command if you wanted to update the Group Policy on the local computer.

Invoke-GPUpdate -Force

The commnd template below shows how to force GPUpdates on a remote computer.

Invoke-GPUpdate -Computer "ComputerName" -Force -RandomDelayInMinutes 0

Here's a breakdown of the key parameters:

  • -Computer "ComputerName": Specifies the target computer. Replace "ComputerName" with the actual name of the remote computer you want to update.
  • -Force: This parameter ensures that all policies are reapplied, even if they haven't changed.
  • -RandomDelayInMinutes 0: Sets the random delay to 0 minutes, which means the update will be applied immediately.

For example, to force a Group Policy update on a computer named "COMPUTER02", you would use:

Invoke-GPUpdate -Computer "COMPUTER02" -Force -RandomDelayInMinutes 0

To apply updates on more than one remote computer, you can do this:

# Define the target computer(s)

$computers = @("Computer1", "Computer2")


# Run gpupdate remotely on the target computers

Invoke-Command -ComputerName $computers -ScriptBlock {

    gpupdate /force

}

You can also use a loop or pipeline as shown in the example below:

$computers = "Computer1", "Computer2", "Computer3"

$computers | ForEach-Object { Invoke-GPUpdate -Computer $_ -Force -RandomDelayInMinutes 0 }

Note that when the gpupdate command is run remotely, the remote clients will briefly see a CMD screen pop-up notifying them of the Group Policy update

Scheduling Updates

If you aren’t in a hurry to deploy group policy updates but instead want to schedule GPUpdates at a precise time for designated machines, you can use Task Scheduler. Simply configure the task to run the gpudate command and deploy the task to the remote machines via Group Policy, PowerShell, or other deployment tools.


Dec 2024
23

Use Device Categories to Organize and Manage Devices in Intune

If you have ever created a Device Configuration Policy with Microsoft Intune, you may have noticed a Menu Item called “Device Categories.” Device categories They provide a way to group devices based on specific criteria so you can deploy special policies for designated departments. Categories can be based on various factors such as device type, department, or location. For instance,

  • Sales devices need a CRM app installation as well as VPN configuration
  • Finance devices require stricter security and encryption policies as well as financial software deployment
  • Marketing Devices need social media management tools and content creation software deployment

By categorizing devices, your organization can ensure that sensitive departments like Finance have appropriate security measures in place. Device categories allow administrators to quickly apply policies to specific departments or device types without manual assignment. When users enroll their devices, they can select a category, which automatically adds the device to the corresponding group in Intune. Let’s say you ship your sales personnel new laptops. During the enrollment process of their new device, users can choose the appropriate category, reducing administrative overhead.

Creating a Device Category

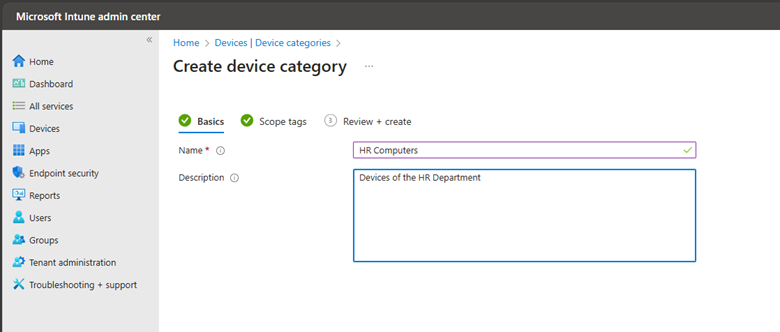
To create or edit a device category, you must be a Global Administrator or Intune Administrator. Using the Microsoft Intune Admin Center, navigate to Devices > Device Categories > click Create device category. Enter a name for the new device category and add an optional description as shown in the screenshot below.

You can add an optional tag in the next step and then verify your settings on the Review + Create tab. Once the device category is created, you will see it in your list of device categories. Devices can be assigned to categories manually or you can allow users to make their selection during enrollment.

In addition to setting up device configurations, you can set up corresponding dynamic Azure AD groups. These dynamic groups can automatically add or remove members based on specified criteria


Dec 2024
16

The Many Ways to Block Access to Windows Command Prompt using Intune or Group Policy

Since the early days of Group Policy, I have been talking about the importance of blocking Windows command prompt for non-administrative users. While it is an essential tool for IT personnel, in the wrong hands, the command prompt can be used to execute potentially harmful commands, access sensitive system files, modify system settings, run malicious scripts, or launch programs that could compromise system integrity. Even barring malicious intent, preventing access helps maintain system stability by preventing accidental misuse of powerful command-line tools that could disrupt operations or expose confidential data.

While the objective may be the same, there are multiple methods to implement this policy in modern IT environments. Let’s explore the various ways to achieve this security measure using Group Policy, Microsoft Intune and the Intune Education portal.  

Using Group Policy

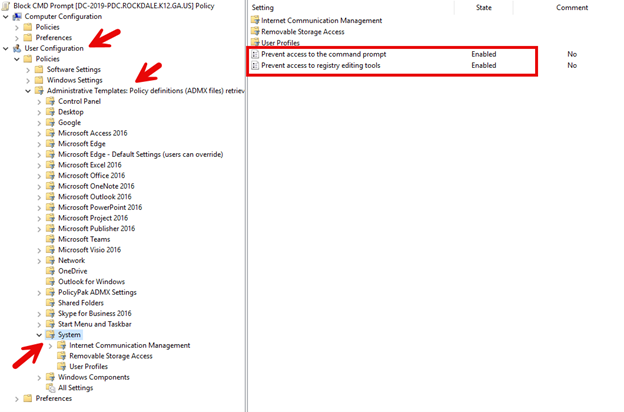
The way to block access to Windows Command Prompt using Group Policy hasn’t changed at all over the years. It is still a straightforward approach. Simply create a new GPO and navigate to User Configuration > Administrative Templates > System > and enable the policy setting “Prevent access to the command prompt" as shown in the screenshot below:

Note that the setting, “Prevent access to registry editing tools” has been enabled which as well and is highly recommended.

Using Intune Settings

Settings Picker

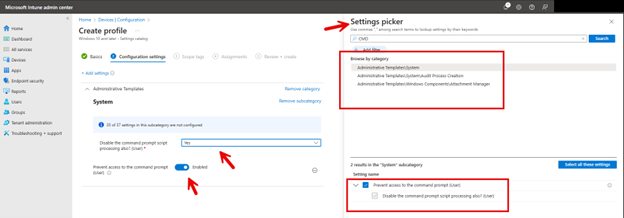
When we start talking about Microsoft Intune, there are multiple ways to block access. The simplest approach is to use the Settings Catalog Configuration Profile. Using the Microsoft Intune admin center, navigate to Devices > Configuration > Create > New policy. Choose Windows 10 and later as the Platform and Settings catalog as the Profile type. Do a search for “CMD” and browse Administrative Templates\System. Then enable the “Prevent access to the command prompt (User)" setting” and choose the “Disable the command prompt script processing also? (User)" if desired. These steps are outlined in the screenshot below.

Note that until December 2024 you could use Administrative Templates to create a new configuration profile to block CMD access. Microsoft has now phased out the use of Administrative Templates for creating new configuration profiles to block CMD access.

OMA-URI Settings

You can also create a Configuration profile using OMA-URI settings. Here are the settings:

  • OMA-URI path:  ./User/Vendor/MSFT/Policy/Config/ADMX_ShellCommandPromptRegEditTools/DisableCMD
  • Data type: Integer
  • Value: 1 (to block) or 2 (to block and disable scripting)

See the screenshot below for an example:

AppLocker Settings

If you've already created an AppLocker Group Policy that successfully blocks the CMD prompt, you can leverage this existing configuration in Intune. Extract the XML content from your Group Policy and deploy it through Intune using OMA-URI settings.

  • OMA-URI: ./Vendor/MSFT/AppLocker/ApplicationLaunchRestrictions/apps/EXE/Policy
  • Data type: String
  • Value: (Paste the XML content of your AppLocker policy here)

Education Portal Method

Some educational institutions with limited IT resources opt for the Education version of Microsoft Intune. This simplified platform is designed to be more accessible, allowing staff members with basic technical knowledge, such as teachers with some IT background, to manage and implement fundamental Mobile Device Management (MDM) policies.

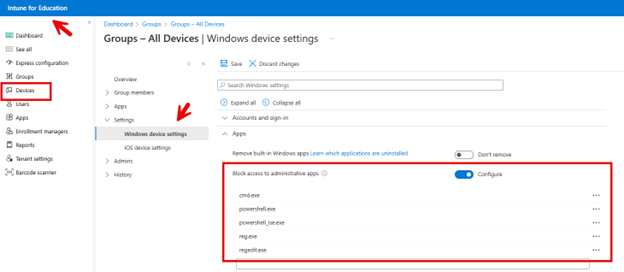
You can access the Intune Education portal at (https://intuneeducation.portal.azure.com/). Then navigate to Groups > All Devices > Settings > Windows Device Settings > Apps. Use the "Block Access to Administrative Apps" option as shown in the screenshot below.

Note that by default, this setting also blocks access to other system apps such as PowerShell and regedit.

Dec 2024
02

Intune Administrative Templates are Now Retired

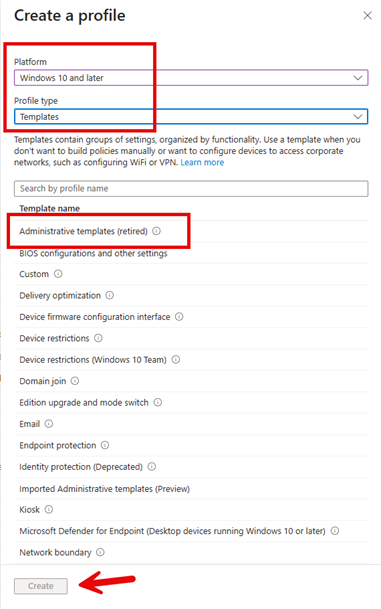
If you have recently attempted to make Intune configuration profiles using the tried-and-true Administrative Templates, you may have stumbled upon a surprise. A "(retired)" tag is now visible next to Administrative Templates, and the Create button is greyed out as shown in the screenshot below.

After all these years, Administrative Templates are being retired in Microsoft Intune. This means you can no longer create new Administrative Templates configuration profiles through the path: Devices > Configuration > Create > New policy > Windows 10 and later > Administrative Templates. Users will now be directed to use the Settings Catalog instead which hosts the same settings found in Administrative Templates.

Existing Administrative Templates can still be viewed, updated, and deleted so you can still fully utilize any configuration policies you have made in the past. The retirement of Administrative Templates does not affect other templates, which will continue to be supported.

Nov 2024
27

How to Buy a Laptop ... For the Normal Person... in 2025.

This is a yearly re-post and re-edit, originally written in 2009 and updated (irregularly) on an annual basis. What started as advice for close friends has become one of my most popular blog entries. Here’s the fully updated guide for the end of 2024 into 2025.

Tip: Search for "Final Thoughts" to just jump to the END for the TL;DR version / summary / exactly what to do if you're "in a hurry."

Quick Updates for 2024-2025:

  • The rise of ARM machines.

  • What’s the deal with CoPilot, NPUs, and AI chips?

  • My "about face" on Chromebooks—who’s using them in my life?

  • iPads... with a mouse?

  • Jeremy's laptop update: What I’m using in 2024 and where I'm going in 2025.

If you’re an IT geek like me, chances are you’ve been asked, “What kind of laptop should I buy?” more times than you can count.

And if you’re not an IT geek, you’re probably asking this very question to someone who is.

This guide is for both groups.

For the IT Pros:

This question might not seem directly relevant to you, since your organization likely provides you with a laptop. But because you carry one around or have that unmistakable geeky vibe, you’ve likely been cornered with the question, “What kind of laptop should I buy?” more than once.

You might be tempted to say, “Buy a MacBook,” partly to dodge any future support requests since you don’t use one yourself. (Here’s a great example of that problem, courtesy of The Oatmeal.) That said, MacBooks are undeniably fantastic machines. If you want to do serious work on one, you absolutely can. But this guide isn’t about Macs; it’s about how to buy a Windows PC laptop. Macs are great, and if you’re inclined to go that route, more power to you.

For Everyone Else:

Your challenges are significant, too. Ask three IT geeks, and you’ll probably get three different answers.

This guide, “Jeremy’s Guide to Buying a New PC Laptop in 2024-2025,” is what I share with friends, family, and anyone else who asks me for advice. It’s written for the everyday person who wants clear, actionable guidance without the noise.

Seriously, when someone asks me about laptops, I send them a link to this post—and I’m done.

These recommendations should work for about 90% of the people who come to you for advice. Sure, there will be exceptions, but this guide is designed to get most people pointed in the right direction.

Jeremy’s Guide to Buying a new PC-based Laptop in 2025

We’re going to answer some questions here like:

  • Laptop or Ultrabook ?
  • What "Chip" should I get in my laptop?
  • Should I opt for a Chromebook instead of a Windows Laptop?
  • Laptop or iPad or Surface (Windows Tablet)?
  • Should I get a $200 Windows laptop?
  • What is / should I get a Microsoft Surface?
  • iPad Pro? Will that work for me?
  • Where can I get good deals?
  • What kind of hardware (and warranty) should I get?
  • Should I get Windows 11 or hunt down a laptop with Windows 10?

Laptop or Ultrabook?

To make sure we all understand the marketing vocabulary you’re likely to encounter as you go to buy a machine:

  • Laptops: You know what a laptop is.
  • Ultrabook: Just like a laptop, but thinner and lighter.

For most people, they want Laptops. They’re mid priced, mid weight and have a full sized keyboard.

If you pay a little more, you can get an Ultrabook, which is just like a laptop — except lighter. Sometimes less ports and you have to drag around a dongle to increase your ports.

I think there are a ton of great options out there where you don’t have buy a HEAVY laptop, or buy an EXPENSIVE Ultrabook.

Said another way, you can get a great laptop, which approaches the weight of an Ultrabook, at a “Laptop cost.”

Non-Windows tablets (iPad, Android, Chromebooks)

Before diving into laptops, let’s take a quick detour to discuss your potential “second” device.

You might be wondering, “Do I even need a laptop? Maybe an iPad, iPad Pro, or Chromebook would work just as well?” Or perhaps you’ve heard of the Microsoft Surface and want to know where it fits in.

Here’s the bottom line: nothing beats a laptop for ACTUAL WORK.

iPads: Almost There, but Not Quite

The iPad can be pushed into doing actual work, but it’s not designed for it. Apple offers a range of iPads—the standard iPad, the iPad Mini, and the jumbo iPad Pro, which is essentially just a really big iPad with a pen. These devices have specialized apps that can mimic work functionality, but ultimately, they’re not a replacement for a laptop.

That said, I’ve found some surprising utility in using my iPad Mini for light tasks. On a recent trip, I paired it with a $15 Bluetooth travel mouse, and it was a game-changer. Websites that previously felt clunky on an iPad suddenly worked beautifully. Now, when I travel, I often bring only my iPad Mini, a Bluetooth keyboard, and that mouse—it’s “good enough” for about 90% of what I need.

But let’s be real: I’m not writing this guide on an iPad. Creating documents, delivering presentations, or building spreadsheets is technically possible on an iPad, but the experience pales compared to a laptop or desktop. Even with a Bluetooth keyboard, the software and overall workflow aren’t as smooth.

Verdict:

  • If you need a device for real work and want a travel machine that will last for years, go with a laptop.
  • If you’re lounging on a beach, bus, or couch and want to read, game, surf, or stream Netflix—occasionally handling business websites—a Bluetooth-equipped iPad might suffice.

Android Tablets and Chromebooks: Where Do They Fit?

Some people can and do use a Google Chromebook is their “daily driver” for all things. And in 2024, I got on board. In 2024, Chromebooks became part of my family. One was provided by a school for educational use, and the other I gave to my parents. Here’s why:

Chromebooks in Schools:
Chromebooks are perfect for K-12 environments. They run Google apps, store almost everything in the cloud, and are virtually disposable in terms of hardware—if one breaks, there’s no local data to lose. Schools love them for their simplicity, cost-effectiveness, and “it just works” factor.

Chromebooks for My Parents:

For my parents, it took a few hours and I put all their stuff in Google land, and gave them a laptop. With much kicking and screaming where "This can't possibly work" and "I don't know how printing or scanning will work" and "I can't live without Microsoft Word" ... 8 months into this experiment, I've had zero tech support calls and it "just totally works" for their (modest) situation.

The Chromebook has proven itself as ideal: Documents are stored and shared in Google Workspace, and I can step in remotely if necessary.

While my parents don’t use Android apps, it’s good to know the capability exists to install them if needed. Chromebooks may not work for my daily needs, but for them, it was exactly the right solution.

My Take on Chromebooks Summary:
If you can manage your tasks on a Chromebook for six months, give it a shot. You might find you don’t need a Windows laptop at all, avoiding the constant upgrade treadmill. This path isn’t for me, but for the right person, it’s an excellent option.

I know: Shocker. Again, this route ISN'T for me, but for my parents, it was EXACTLY what the doctor ordered.

Okay, now that we’ve covered tablets and Chromebooks, let’s get back to Windows laptops.

Back to laptops.. Windows Laptops.

Which laptop brand should I get?

Before diving into whether you should try hard to get Windows 10 on your laptop (we’ll get to that soon), let’s address the broader question: Which laptop brand should you buy?

Here’s the reality: All laptops are basically the same.

I know, it’s a bold statement, but hear me out. Much like cars, 99% of the “guts” in laptops are nearly identical. The differences between them mostly come down to features like:

  • The number or type of ports (USB 3.0, USB-C, etc.).
  • Whether it has one or two video chips (let’s not even go there).
  • Keyboard styles: does it twist or snap off to become a tablet, or is it just a plain laptop?
  • Speed differences: some are a little faster, some a little slower.
  • Weight: some are heavier, others lighter.
  • Screen sizes: from 14" to 16", there’s a range.
  • 10-key pad: some laptops have it, some don’t.
  • Power supplies: large, heavy ones versus compact travel-friendly options.
  • Touchscreens: available on some models, not on others.

But again, 99% of laptops running Windows are fundamentally the same in terms of what they can do. That’s great news for most users because it means you can’t really go wrong with a new laptop.

My #1 Buying Tip: Understand the Warranty

Since laptops are so similar, the real difference comes down to support. A good warranty can make or break your ownership experience. (We’ll dive deeper into warranties in the next section.)

Where to Find the Best Deals

Here are my top recommendations for buying a new laptop:

  1. New Dell Inspiron Laptops

    • They’re affordable, reliable, and fast, and Dell offers excellent warranties (more on this shortly).
    • Inspiron laptops are "perfectly reasonable" for the average person. Like Goldilocks, not too much, not too little. Basically "just right."
    • Make sure you select a model with a Solid-State Drive (SSD)—I can’t emphasize this enough. Avoid drives with moving parts; they’re outdated. Good news, its hard to find a laptop anymore without SSDs anyway in 2024 / 2025.
  2. Dell Factory Outlet: https://www.dell.com/en-us/dfh/lp/outlet

    • Think of this as Dell’s “island of lost toys.” Most items here are lightly used returns, often from customers who decided they couldn’t afford the purchase.
    • Everything comes with Dell’s original warranty, so you’re protected. I’ve personally purchased four laptops from the Outlet, and it’s been a win every time.
  3. Online Retailers: NewEgg, Backmarket, and others

    • These sites offer great deals, including new, off-lease, or market closeouts.
    • While the prices are tempting, warranties can be hit or miss. Many items are covered by the manufacturer’s warranty only, so you’ll need to research each deal carefully. Don’t expect much after-sales support from the retailer.
  4. Retail Stores: Best Buy, Office Depot, Staples, etc.

    • Even with an enticing warranty or a killer deal, I can’t recommend these stores for laptops.
    • Why? These places are often staffed by undertrained employees, and turnover is high. Can you trust them to help with a problem 1.5 years down the line?
  5. Other Online Deal Sites: Woot, Buy.com, etc.

    • Like NewEgg, these sites often offer manufacturers’ warranties only, which can range from 30 to 90 days. That’s not ideal for most buyers.

Understanding the warranty (the most important part of your laptop)

Let’s take a moment to talk about Dell laptops and why I’ve historically been a big fan. (Stick with me to the end, though—I’ll explain why I personally use Lenovo now. Trust me, it’ll make sense.)

The simple reason I’ve recommended Dell laptops for years is that Dell’s warranty structure is easy to understand—even for my “pea-brain.”

Here’s how it works:

  1. Default Warranty (1 Year):
    If something fails (e.g., power supply, screen goes blank, USB port dies), you call Dell, and they’ll attempt to fix the issue over the phone.

    • For user-replaceable parts (e.g., battery, mouse, removable DVD drive), they’ll ship the part to you with a pre-paid box for the return. You handle the swap yourself.
    • For non-user-replaceable parts (e.g., screen, motherboard), they’ll ship the part overnight to a regional repair center. Once it arrives, the center will call you to schedule a repair.
  2. Upgraded Warranty (3 Years On-Site):
    For an additional cost, Dell offers a three-year on-site repair option—they’ll send a technician to you.

  3. Accidental Damage Coverage:
    For an extra fee, Dell offers insurance for mishaps like spilling coffee on your laptop, dropping it on a marble floor, or even submerging it in water.

The Reality of Warranty Timelines

Dell’s warranty is excellent, but it doesn’t mean your laptop will be fixed within 24 hours. Here’s how it typically works:

  • If you call after 2:00 PM, they might miss the day’s shipping cutoff. In that case, your replacement part will ship the next business day.
  • Once the part arrives at the repair center, they’ll call you to schedule a repair, which could take another 24 hours.

So, the process begins immediately, but repairs usually take 24 hours after the part reaches the repair center.

Because I understand and can explain this process, I’ve confidently recommended Dell to many “Joe and Jane users” over the years. Dell’s straightforward warranty is the “devil I know,” and I trust it to deliver reliable service.

Why Warranty Matters

I cannot stress this enough: Understanding your laptop’s warranty is the single most important factor when choosing a laptop.

While I’ve outlined Dell’s warranty structure here, feel free to investigate other manufacturers’ warranties. Just make sure you understand the terms before you buy. For me, Dell’s warranty is reliable, transparent, and easy to explain, which is why I usually recommend their laptops to everyday users.

“How much laptop do I, a regular person, need?”

If your daily tasks include things like surfing the web, using Facebook, Microsoft Office, Google Docs, Gmail, Hotmail, Office 365, Netflix, Skype, or similar, you have what I call “modest needs.”

Again: If this is "all you do" again, maybe a laptop is "too much" and you should instead consider a Chromebook which does all that stuff and doesn't have all the "Windows burden" associated with it.

For these needs, a Chromebook might be worth considering. It can handle all of that without the added complexity of a full Windows machine.

But if you’re running high-powered software—like Quark, World of Warcraft, Final Cut, Movie Maker, VMware Workstation, Hyper-V, AutoCAD, Camtasia Studio, or Mathematica—you’ll need something more robust.

Now, before we get into this, there’s a handful of.. holycow.. NEW $200 full Windows laptops out there. (Here’s an older Wall Street Journal Entry on them. And here’s a LaptopMag.com article from 2017 on sub-$200 laptops) And here's an article for 2018 from Best Laptops World for computers under $200. But … they FAIL the “sniff test.” Read the article, then also read my discussion on Chip Type.. right here.

So, here’s my answer for your “modest needs” person.

CPU Chip type and speed:

Here’s the dirty little secret the laptop manufactures don’t want you to know: This almost doesnt matter. Or said another way, you almost cannot go wrong. Here are my suggestions:

Here’s a secret the laptop manufacturers don’t want you to know: For most users, the CPU type almost doesn’t matter. That said, here are my recommendations:

Intel Core Chips (i3, i5, i7, i9):

  • Best Bang for Your Buck: The Intel i5 is usually the sweet spot for performance and cost.
  • Upgrade Option: If your budget allows, go for an i7. Even at its lowest speed, it offers solid performance and is often worth the extra cost.
  • Overkill: The i9 is powerful but unnecessary for most users unless you’re a heavy-duty power user or gamer. Power supplies you have to lug around for i9 are also typically much heavier.

Avoid These Chips:

  • Intel Celeron: Avoid at all costs. These processors are underpowered and often found in $200 budget laptops that fail to deliver a good user experience.
  • Intel Atom: While these offer excellent battery life, they’re significantly slower than the Core series. Just totally avoid.

Snapdragon / ARM Laptops

There's a a new choice on the block ... in a chip called ARM Snapdragon X. If this word maybe sounds familiar to you, it's because many phones utilize Snapdragon processors. They are very low power, which means you get pretty insane battery life. Snapdragon laptops are closer to ATOM processors than they are to Intel i3/i5/i7s. This is because all the software you're running has to convert everything from "Intel speak to Snapdragon speak."

They are considered "Always on, always connected." So even if you close the lid, they don't really go to sleep... they jusst "sip" power and will just be ready to rock when you re-open the lid. (Like an iPad works.)

The good news is that, by all accounts, Snapdragon PCs are pretty nifty and if you use your PC like I use my iPad... for checking web stuff, surfing, skyping, etc etc. If you use a PC like this, then a Snapdragon PC is a pretty good choice. There is a tradeoff: you have to sacrifice a bit of a speed drop, but you get a really big advantage of outrageous near all-day battery life. Sometimes up to like 21 hours.

Depending on what you do with your PC this could be an excellent "daily driver" See this Forbes review of a Lenovo Snapdragon PC from 2024.

The problem with Snapdragon machines is: there's always going to be some level of IN-compatibility with SOME software. Mostly games. Here's the gist in this article. But there could also be some other application that YOU NEED that JUST WONT FRICKIN' WORK on ARM machines. Here's an unofficial list.

Typically low-level software, like security software, VPN software, and/or other things that require drivers require special ARM versions. Most apps will work just fine, but, you never know until you needed "Applicatoin ABC" and it just falls over and dies on ARM, when it would have worked fine on a normal x64 laptop. 

I do think for MOST PEOPLE an ARM laptop might be just the right thing though and you should consider it in your searches. Here's a single page which links to all vendors with Snapdragon laptops. If I had to pick one in a hurry, I'd likely go with this beauty. I'm pretty sure this will be my next "traveling PC" I get. But, if you like Dell and their warranty, here's a list of those.

What's the deal with CoPilot (and NPU chips)

Additionally, just to make this more complicated, there's a whole new category or machines which contain NPU chips .. Neural Processing Unit chips. Sounds like what the Terminator had in his head, and maybe it's not too far off, honestly. NPUs are chips which accelerate AI processing on your computer. So when you make a ChatGPT request, like "Draw two ferrets at the county fair" all that stuff happens on the ChatGPT website... and out pops a picture that you download.

But with an NPU chip ON your computer, your computer is able to take on some of this workload locally. This makes sense if your application supports it. Right now, this is in early, early days. There's a few things in Windows 11 that takes advantage of this, including Windows 11's new Recall feature. Recall lets you look backward at your work and locate stuff you did on-screen yesterday or last week. Demo example here.

As we head into 2025, there's like a small handful of apps which use the NPU chip, and here they are. If you don't get a machine with an NPU chip, you will be just fine as a "normal person." You wont miss it.

Gamer Laptops

Avoid “gamer” laptops unless gaming is your main priority. They’re expensive, have poor battery life, and often come with bulky power supplies. For everyday tasks, they don’t offer noticeable speed improvements.

RAM:

  • Minimum: Get at least 16GB of RAM. This is the new baseline for modern laptops.
  • Recommended: If your budget allows, consider 32GB for better multitasking and future-proofing.

Video card / chip:

Unless you’re playing graphically intensive games, the video card doesn’t matter much. Apps like Netflix, Hulu, and Minecraft run just fine on integrated graphics. Avoid laptops with multiple video chips—they add complexity without meaningful benefits for most users.

Screen Size / Resolution & Touch:

Look for something with WXGA or WXGA+ resolution. This can mean 1280×720 and up, which is decent on a laptop. 

In a total surprise, I find Microsoft Surface laptops to have "too much" resolution and too insane on my eyes. I'm over 40, and.. well, that means my eyes are just so-so. I would test-drive any laptop and make sure the resolution works for you. Of course this is adjustable in software / Windows.. but sometimes Windows looks lousy when not at the uppermost maximum resolution.

Some laptops don’t have touch screens. I still don't personally own any touch-screen laptops. I dont like to touch my monitor, but you might. 

Wireless Networking support:

All laptops have built-in Wireless cards. You don’t have to get all worried if you don’t have the fastest wireless card.

No matter what new laptop you get you'll be fine. The fastest is a thing called "Wifi7" but I think only a handful of laptop manufacturers put Wifi 7 chips built into their notebooks (Asus being one of them). Its not needed for most regular humans. And you likely don't have a Wifi7 router so... "who cares." Whatever you get here is fine.

Picking the OS. Windows 11 or 10. 

Let’s cut to the chase: It’s nearly impossible to buy a new laptop without Windows 11.

And honestly, that’s fine—there’s no compelling reason to stick with Windows 10. It’s approaching End of Life status, meaning support and updates will soon dwindle.

Even if you’re not a fan of Windows 11’s new look and feel, my advice is simple: get used to it. I did, and it’s not as bad as you might think. There's even software you can get to make it look and quack like Windows 10 or even Windows 7 if you wanted like Stardock

Windows Pro vs. Home: Does It Matter?

Not really. Both versions now support full disk encryption, which is the one feature I care about the most. So, whether you choose Pro or Home, you’re covered. There’s no need to stress about this decision. And since you're buying this laptop for yourself, you don't need Pro which is more suited for domain-joined corporate environments.

Example Buys for 2024 / 2025:

For the best price-to-performance ratio, your top choice is likely the Dell Factory OutletDell Outlet

I found plenty of excellent options under $600. Here’s one example available at the time of writing:

  • Processor: Intel i7 Gen 12
  • Operating System: Windows 11 Pro
  • Storage: 512GB Solid-State Drive (SSD)
  • Memory: 16GB DDR4 RAM
  • Display: 15.6" FHD (1920 x 1080), non-touch
  • Graphics: Intel HD Graphics
  • Model: Dell Outlet Inspiron 15 - 3520
  • Total Price: $510 (as of Nov 27, 2024)

Are these the lightest, fastest, or fanciest laptops on the market? Absolutely not. But for most users, these laptops—combined with the warranty options explained earlier—are more than sufficient for everyday tasks.

Looking at ARM Machines

If the ARM architecture interests you (see above for its pros and cons), here’s my top pick the Lenovo Yoga slim 7x.:

  • Model: Lenovo Yoga Slim 7x
  • Processor: Snapdragon® X Elite X1E-78-100 (3.40 GHz)
  • Operating System: Windows 11 Home 64 (ARM)
  • Graphics: Integrated Qualcomm® Adreno™ GPU (again ... this doesn't matter at all.)
  • Memory: 16GB LPDDR5X-8448MHz (Soldered)
  • Storage: 1TB SSD M.2 2242 PCIe Gen4 TLC
  • Display: 14.5" 3K (2944 x 1840)
  • Total Price: $999.00 (as of Nov 27, 2024)

This machine offers incredible battery life and solid performance for typical day-to-day use. However, remember the potential compatibility issues outlined earlier when considering ARM machines.

So, after this: everything else.. everything else.. is just bells and whistles when it comes to laptops. 

You could argue that touch is becoming more and more important. So, if you wanted touch, then… get one with touch.  :-) Again: I have two "daily driver" Windows PC laptops, neither has touch, and I don't miss it, not even a litle bit.

What kind of laptop do you own, Jeremy? (Here comes a little geekier stuff.)

Some of you might be wondering: What kind of laptop does Jeremy use? Well, here’s the answer—and fair warning, this gets a little geeky.

My Main machine driver is a Lenovo P1 Core i9 (10th generation) from 2020. It’s equipped with:

  • i9 Processor
  • 4TB of storage spread across two SSDs.
  • 32GB of RAM.
  • Windows 11
  • A hefty build with a beefy power supply.
  • Its typically docked, like 90% of its life and travels with me like 10% of its life.

It’s big, heavy, and built for power. Why? Because I’m not a regular user.

I do live demos in front of thousands of people, and my laptop has to perform flawlessly. For me, speed and reliability trump portability.

My "Everyday" Laptop: Lenovo X1 Carbon (9th genreation) also from 2020. It's got::

  • i7 processor
  • 16GB of RAM.
  • 1TB SSD.

This laptop is light, portable, (as is the power supply) and has pretty good battery life (though I did just change the battery out myself this year.) It’s perfect for:

  • Carrying around the house.
  • Quick trips where I’m not presenting complex demos (just PowerPoints, for example).

It handles 98% of my needs and represents what I’d recommend for a “mere mortal” machine.

Looking Ahead: Lenovo Yoga ARM

I’m considering upgrading my secondary laptop to the Lenovo Yoga ARM machine I mentioned earlier. It has incredible battery life and should be a great fit for my lighter use cases—but I haven’t pulled the trigger just yet.

Why Not Dell?

Good question! I know I’ve mentioned Dell about 80 times in this article, and I absolutely recommend it for most people.

However, I personally prefer Lenovo for its build quality. Over the years, I’ve owned several Lenovo laptops, and here’s the kicker:

  • I’ve never needed the warranty.
  • I’ve never had a dead pixel, fried USB port, or malfunctioning keyboard. Not once.

My Needs vs. Yours

To be clear, my setup is not recommended for regular users. My work involves hardcore demos, so I need:

  • 32GB of RAM.
  • Extremely fast storage.
  • Extremely fast processing.
  • A laptop that can handle demanding workloads.
  • A laptop that runs specialized applications (VMware Workstation and Camtasia 2024 mostly.)

But if you’re intrigued by Lenovo and willing to check out their warranty options, go for it. Just remember, your needs may differ significantly from mine!

Final Thoughts (and if you read nothing else…)

If you’re overwhelmed by the details, here’s the TL;DR version:

  1. For Most People:

    • Stick with a Dell laptop from the Dell Factory Outlet for the best price-to-performance ratio. Look for a machine with 16GB of RAM, an i5 or i7 processor, and an SSD.
    • For lighter needs, consider a Chromebook, especially if most of your work is web-based.
  2. Avoid These Pitfalls:

    • Don’t buy laptops with Intel Celeron or Atom processors—they’re too slow.
    • Skip gamer laptops unless you’re gaming; they’re heavy, overpriced for everyday use, and have poor battery life.
  3. Windows 11:

    • Don’t fight it—Windows 10 is nearing End of Life.
    • Windows Home vs. Pro? It doesn’t matter for most users anymore.
  4. If You Want ARM:

    • ARM laptops, like the Lenovo Yoga Slim 7x, offer insane battery life but may face app compatibility issues. They’re great for light, portable use.
  5. Key Features to Focus On:

    • 16GB RAM is the new standard.
    • Stick with integrated graphics unless you’re gaming. (Don't buy laptops with multiple grahpic chips.)
    • Choose a screen resolution that’s comfortable for your eyes—test it out in person if possible or make sure you can return it easily.
  6. Touchscreens:

    • Nice to have, but not essential. If you like them, get one. If not, don’t worry about it.
  7. The Warranty is Key:

    • The warranty can make or break your experience. Understand what you’re getting and consider extended or accidental damage coverage.
  8. What Jeremy Uses:

    • I recommend Dell for most people, but I personally use Lenovo for its build quality and reliability.

At the end of the day, buy what suits your needs. Whether it’s a laptop, a Chromebook, or even an ARM machine, make an informed choice—and don’t stress too much. Most modern laptops are good enough for the average user.

Hope this guide helps you and your friends out.

– Signed, your friendly neighborhood Jeremy Moskowitz, Enterprise Mobility MVP
Nov 2024
22

The Many Ways to Configure Windows Firewall Rules using Intune or Command Line

The Many Ways to Configure Windows Firewall Rules

In today's rapidly evolving threat landscape, organizations must prioritize a multilayer security strategy. That includes configuring and enforcing Windows Firewall on servers and workstations. In this article we will look at the multiple ways to deliver Windows Firewall settings to your Windows devices.

Using Intune

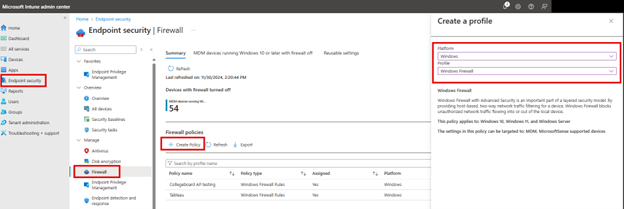
There are a several ways to configure Windows Firewall Rules and enforce them using the Microsoft Intune Admin Center. One way is to navigate to Endpoint Security > Firewall and click “Create Policy.” Then choose “Windows” as the Platform and then choose one of the two Profile options:

Windows Firewall: Choose this option to enable or disable the Windows Firewall for different network profiles and only need basic firewall settings and configurations.

Windows Firewall Rules: Use this option if you already have Windows Firewall enabled and you want to create granular custom firewall rules for inbound and outbound traffic.

In the example below I chose Windows Firewall.

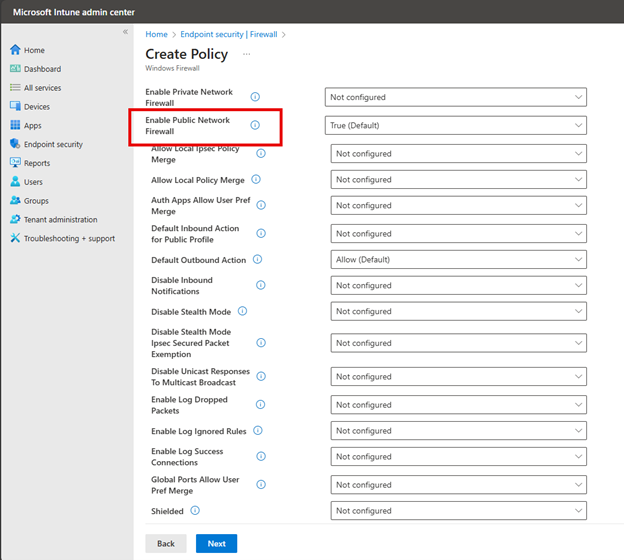
You then have the option to enable or disable the Windows Firewall for Domain, Private or Public Networks. If you aren’t sure which profile to choose, here are some tips:

  • The Domain profile in Windows Firewall is applied when a computer is connected to a network that is identified as a Domain Network. The Domain profile takes precedence over Private and Public profiles when connected to a domain network and is typically more permissive than the Public profile, as the domain network is assumed to be trusted and secure.
     
  • The Network private profile is for networks in which devices are visible to one another on the same network. Network discovery is usually enabled and file and printer sharing features are active. This profile is typically used for SOHO environments.
     
  • The Public profile is designed for use on untrusted networks such as an establishment that provides a public or guest network. The devices are not discoverable by other devices on the network stricter firewall rules are applied to limit incoming connections.

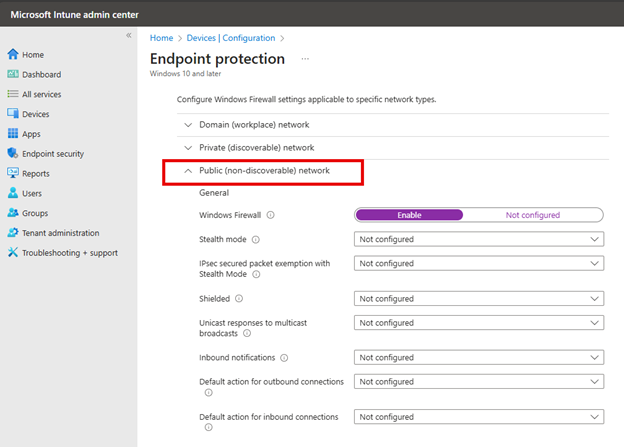
You can then configure basic settings for each of these profiles as shown below. Here I chose to enable the Public Network.

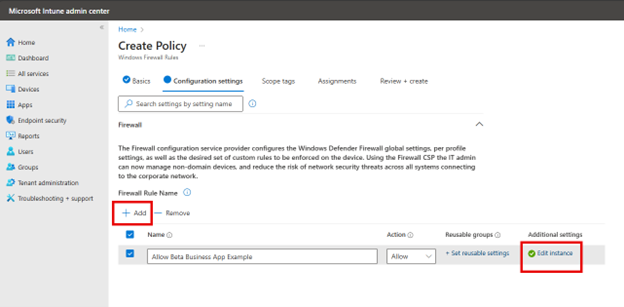
Choosing the Windows Firewall Rules option I outlined earlier provides you with a different interface to select more customized rules as shown in the screenshot below.

Clicking the Edit instance will prompt you with the port configuration settings.

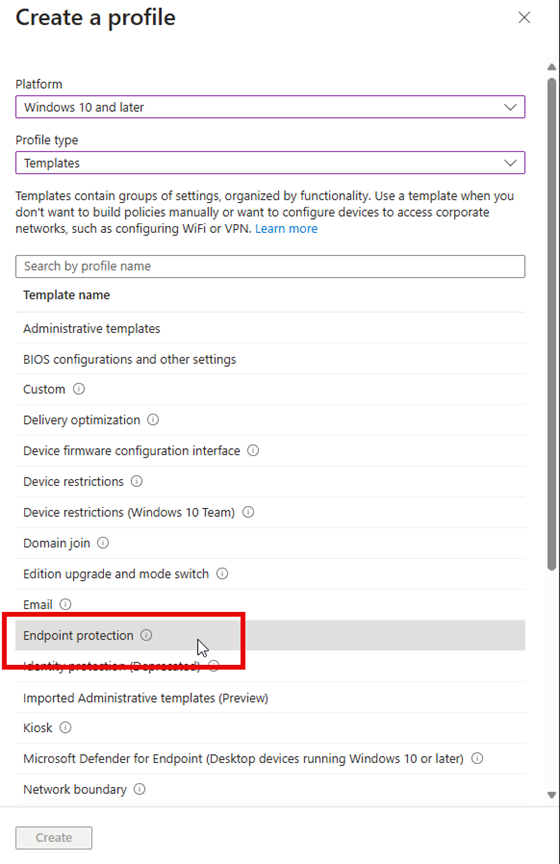
You can also configure Windows Firewall using Intune Configuration profiles. Navigate to Devices > Configuration Profiles and create a new profile. Select Windows 10 and later as the platform. Then choose Endpoint protection as the profile type as shown below.

Name the profile and then proceed to the next screen where once again, you can configure basic settings for the Domain, Private and Public profiles.

Another approach to configuring firewall rules with Intune is to use PowerShell Script Deployment. This method leverages NetFirewallRule cmdlets to define firewall rules as is shown below:

New-NetFirewallRule -DisplayName "Allow Inbound Port 80" -Direction Inbound -LocalPort 80 -Protocol TCP -Action Allow

You would then use the Microsoft Win32 Content Prep Tool and package it into an .intunewin file. You can download the Win32 Content Prep Tool from Microsoft's official GitHub repository. Then go to the Microsoft Intune Admin Center and navigate to Apps > Windows > and add a new Windows app (Win32). Then upload the .intunewin file and set the following install command:

powershell.exe -executionpolicy bypass -file .ps1

Whichever option you choose to deliver the Firewall settings, you would then assign the profile to the designated groups you want to target and then save it.

Using Group Policy

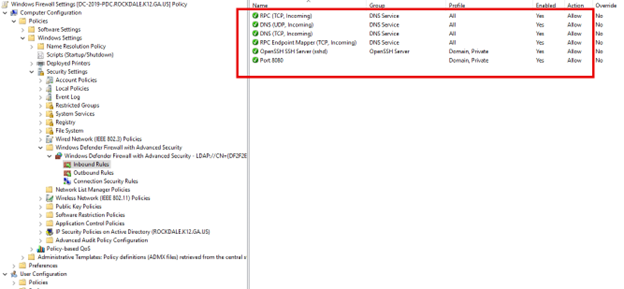
If you want to configure Firewall settings for domain-joined computers, then Group Policy is the best option. Using the Group Policy Management Console, create a new GPO and navigate to Computer Configuration > Policies > Windows Settings > Security Settings > Windows Defender Firewall with Advanced Security. You can enable your desired network profiles by right-clicking on "Windows Defender Firewall with Advanced Security" and selecting "Properties.” To add rules, you would expand either "Inbound Rules" or "Outbound Rules" and right-click and select "New Rule.” Then simply follow the wizard to define the ports, programs or custom rules you want as shown below.

Ultimately, whether using Intune or Group Policy, the goal remains the same: to protect critical assets from unauthorized access and potential threats while maintaining seamless operational efficiency. Stay safe out there.


Nov 2024
18

Setting up Autopilot in Intune for Streamlined Device Deployment

Whether you are onboarding laptops for new employees that work in a remote office or executing a large-scale refresh for employees or students, the manual effort required to configure each device can drain IT resources, disrupt productivity, and create inconsistent user experiences. If your computers are going to be integrated within Azure AD however, there is a simpler way that streamlines the process.

Windows Autopilot is a cloud-based Microsoft solution that simplifies and automates the deployment and configuration of new Windows devices. By leveraging the OEM-installed version of Windows, Autopilot gives you true zero-touch deployment.

Key benefits of Windows Autopilot include:

  1. Zero-touch deployment: Devices ship directly to end-users, eliminating IT intervention.
  2. No OS re-imaging: Autopilot automates app installation, driver setup, and policy configuration.
  3. Enhanced productivity: Reduced setup time allows employees to start work sooner.
  4. Customized experience: Pre-configured settings and branding personalize the out-of-box experience (OOBE).
  5. Simplified redeployment: Devices can be easily wiped and reconfigured for new users.

Zero touch deployment includes things such as automatic Azure AD or Hybrid Azure AD join, MDM auto enrollment, local administrator account restrictions, dynamic group assignments, and device resets.

Windows Autopilot is managed using Microsoft Intune. It is here where you can register devices, create deployment profiles, assign them to Azure AD groups, configure settings for the out-of-box experience (OOBE) and establish compliance policies and application deployments.

What are the requirements for Autopilot?

While there is no specific "Windows Autopilot license" its functionality can be enabled through one of the following plans:

  • Microsoft Intune Plan 1
  • Microsoft 365 Business Premium
  • Microsoft 365 Enterprise E3 or E5
  • Microsoft 365 Education (Academic) A1, A3, or A5
  • Microsoft 365 F1 or F3
  • Enterprise Mobility + Security E3 or E5

What operating systems support Autopilot?

  • Windows 10 and 11 Pro
  • Windows 10 and 11 Pro for Workstations
  • Windows 10 and 11Enterprise
  • Windows 10 and 11 Education
  • Windows 10 Enterprise 2019 LTSC

Autopilot works with Entra ID, formerly Azure AD. The device IDs for any computer that will participate in Autopilot will have to be uploaded to your Entra ID ahead of time. Some OEMs will work in cooperation with you, so they are ready to go upon delivery. You can also add the computers yourself by capturing the device information and uploading it in a CSV file. You can obtain the hardware hash and serial number using the Get-WindowsAutopilotInfo.ps1and saving the captured information in a CSV file which you can then import into Intune.

To upload the CSV file Microsoft Intune Admin Center you navigate to Devices > Enroll Devices > Windows enrollment. In the Windows Autopilot Deployment Program pane, select Devices and then click Import and select a CSV file containing device information. An example is shown below although the serial numbers have been hidden.

Create an Autopilot Profile

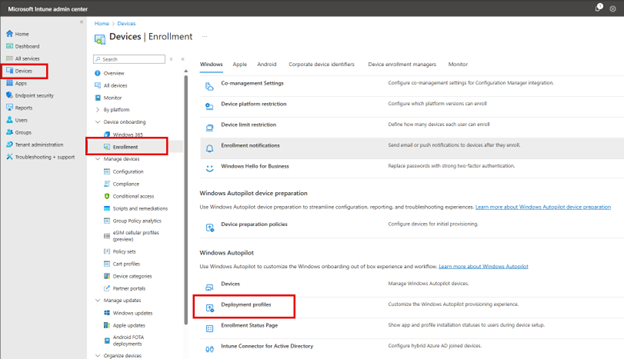
Once the computer hardware information is uploaded to Entra ID, it is time to create an autopilot profile. Navigate to Windows > Windows enrollment > Deployment profiles as shown in the screenshot below.

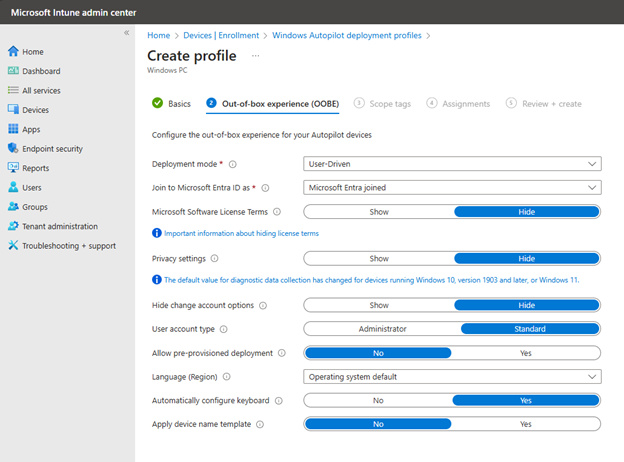
Click Create profile and choose Window PC. Then provide a name for the profile. In the next window you will configure the settings for the out-of-box experience as shown in the screenshot below.

In most cases you will choose User-Driven for the Deployment mode as this is for is for end users who will log in with their Azure AD credentials. You could choose Self-Deploying for kiosks or shared devices that don’t require user interaction. Once you have your desired settings, you can assign the profile to your desired groups.

Before initiating the Autopilot deployment, you will create the necessary configuration profiles and application profiles in Intune. These profiles will define the settings, policies, and applications that will be applied to devices during the Autopilot process, ensuring a consistent and secure setup for all deployed devices.

Setup and Enrollment Status Page

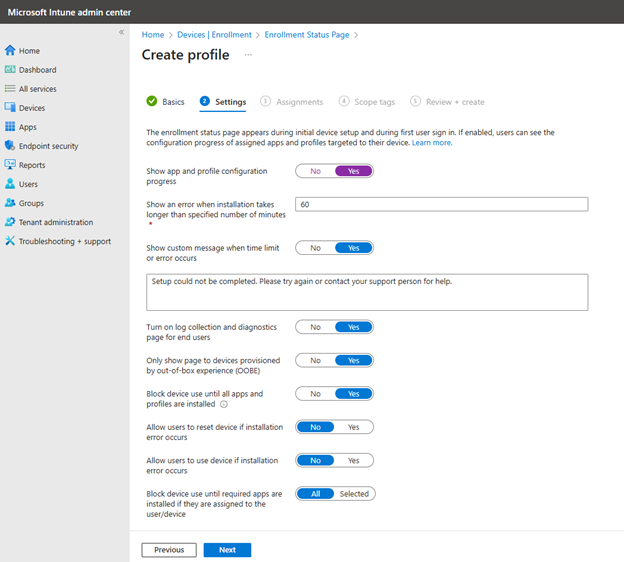
While it isn’t required, you can set up an Enrollment Status Page to track device enrollment progress and ensure all required applications are installed before users access the desktop. This is done by navigating to Devices > Enrollment > Windows enrollment and click "Create" to set up a new ESP profile. Here you can configure settings such as:

  • show app and profile configuration progress
  • Block device use until all apps and profiles are installed
  • Specify required apps that must be installed before users can access the desktop
  • Set time limits for installation and error handling

An example is shown in the screenshot below.

Like all profiles, you would then assign the ESP profile to your target user or device groups.

Testing your Autopilot Deployment

Of course, it is highly recommended that you test all of this on a few sample devices to ensure proper functionality. When a registered device connects to the internet it should automatically begin the Autopilot process, prompting user sign-in with Azure AD credentials and applying configurations as per the assigned profile.


Nov 2024
04

Managing Device Addition Limits in Intune

If you are an AD administrator, you're likely aware that Active Directory (AD) typically limits users to adding 10 devices to a domain by default. For Azure AD, the default limit is higher, maxing out at 50 devices per user. Domain admins and global administrators are usually exempt from these limitations. However, there may be situations where you need to allow lower-level IT staff or other personnel to add more devices than the default limit allows, or you may need to modify the device limit or restrict it further for Azure AD users.

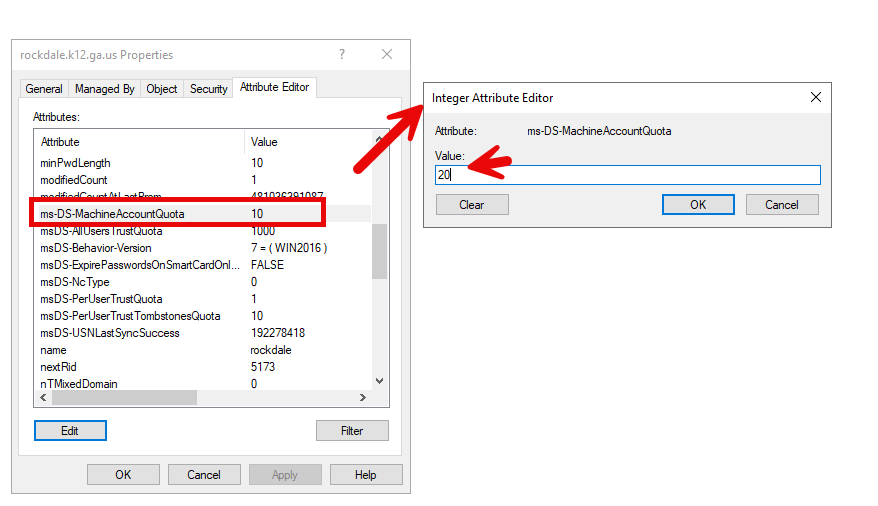
To Modify the restriction in on-prem AD, there is no Group Policy to do it. Instead you have to:

  • Use Active Directory Users and Computers and right-click on the domain name at the top
  • Select Properties.and go to the Attribute Editor tab.
  • Find the ms-DS-MachineAccountQuota and change its value to the desired number of devices

In the example below, I have raised the number to 20.

Restricting Ordinary Users to 15 Devcies or Less for Azure

If you want to limit the number of device enrollments for ordinary users in Azure AD, you can do so using Microsoft Intune. Here's how to set up device enrollment restrictions:

  1. Access the Microsoft Intune Admin Center
  2. Navigate to either:
    • Devices > Enrollment restrictions, or
    • Devices > Windows > Enrollment restrictions
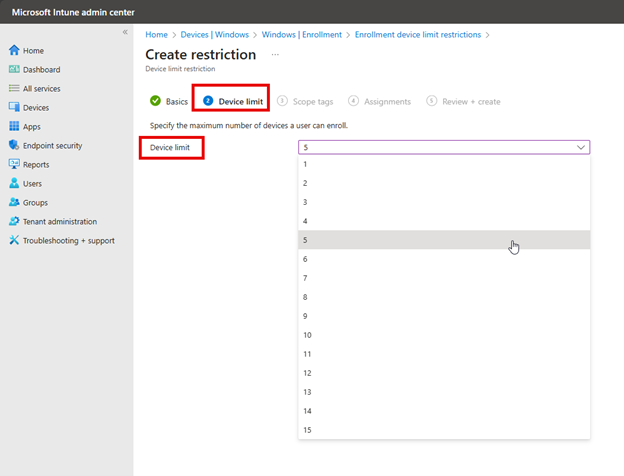
  3. Click on "Device limit restrictions"
  4. Select "Create restriction"
  5. In the settings, you can choose a limit between 1 and 15 devices per user as shown below:

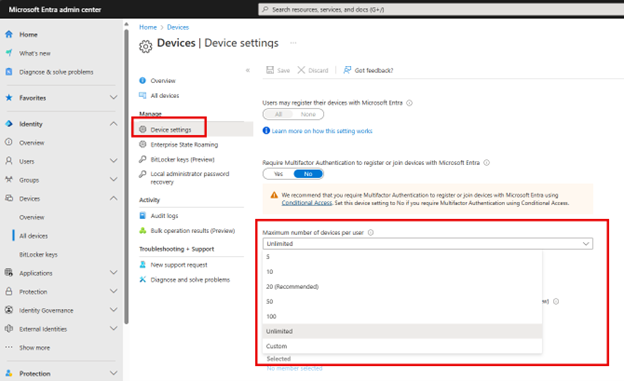
Then complete the policy by assigning the groups or users to it and finish out the wizard. If you want to make the restriction greater than 15, you will have to do so using the Microsoft Entra Admin Center and navigate to Devices > Device Settings. The available options are shown in the screenshot below.

Windows Autopilot

For large organizations, school systems implementing one-to-one device programs for students, or companies with numerous remote workers, Windows Autopilot offers a more efficient alternative to manually adding devices to Azure. This cloud-based solution streamlines the process of setting up and pre-configuring new Windows devices and ensure they are business-ready without requiring hands-on IT involvement. Autopilot automates device registration, configuration, and enrollment into Azure AD and Intune.

When a user receives a device, they simply connect it to the internet and log in with their corporate credentials. Autopilot automatically configures the device based on its assigned profile, installing necessary applications and applying company policies. This zero-touch deployment approach eliminates the need for IT to manually prepare each device, making the process faster and more scalable across the organization.

You can create the necessary Autopilot profiles using Intune which I will cover in a future blog.